Chat now with support
Chat with Support

NetVault 13.0.2 - Administration Guide for Managed Service Providers

Introduction Getting started Configuring clients Managing catalog search Configuring storage devices
About storage devices SAN considerations Quest DR Series systems Quest QoreStor NetVault SmartDisk EMC Data Domain Systems Snapshot Array Manager Virtual Tape Libraries Virtual standalone drives Shared Virtual Tape Libraries Physical tape devices Storage tiers
Backing up data Managing policies Restoring data Managing NetVault dashboard Managing jobs Monitoring logs Managing storage devices
Role-based access to manage storage devices Monitoring device activity Managing disk-based storage devices in list view Managing disk-based storage devices in tree view Managing the Snapshot Array Manager Managing tape libraries in list view Managing tape libraries in tree view Managing tape drives in list view Managing tape drives in tree view Adding shared devices
Managing storage media Managing user and group accounts Managing Tenant Monitoring events and configuring notifications Reporting in NetVault Working with client clusters Configuring default settings for NetVault
About configuring default settings Configuring encryption settings Configuring plug-in options Configuring default settings for post-scripts Configuring default settings for Verify Plug-in Configuring Deployment Manager Settings Configuring Job Manager settings Configuring Logging Daemon settings Configuring Media Manager settings Configuring Network Manager settings Configuring Process Manager settings Configuring RAS device settings Configuring Schedule Manager settings Configuring Web Service settings Configuring Auditor Daemon settings Configuring firewall settings Configuring general settings Configuring security settings Synchronizing NetVault Time Configuring the reporting utility Configuring NetVault WebUI default settings Configuring NetVault to use a specific VSS provider Configuring default settings using Txtconfig
Diagnostic tracing Managing diagnostic data Using the deviceconfig utility NetVault processes Environment variables Network ports used by NetVault Troubleshooting
Common errors Safe Mode in NetVault

Adding a NetVault SmartDisk

To use a NetVault SmartDisk for backups and restores, you must first add the device to the NetVault Server. You can use the configuration wizard to add and configure this device.

1
In the Navigation pane, click Guided Configuration, and then on the NetVault Configuration Wizard page, click Add Storage Devices.
In the Navigation pane, click Manage Devices, and then click Add Device.
2
On the Add Storage Devices page, select the NetVault SmartDisk option, and click Next.
3
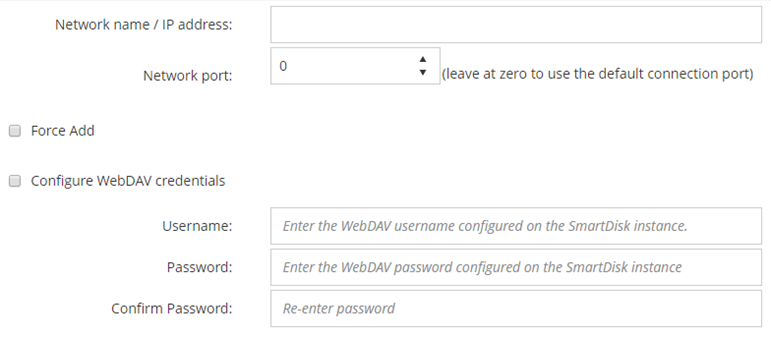
On the Add NetVault SmartDisk Instance page, provide the following details.

Network name/IP address

Type the Fully Qualified Domain Name (FQDN) or IP address of the host on which NetVault SmartDisk is installed. You must provide this information even if the device is deployed on the NetVault Server.

If the server is unable to resolve the host name, it fails to add the device.

Network port

The default value for this setting is zero (0). If the device is listening on the default port, do not change this value.

If the device is listening on a non-default port, type the port number configured as the Network Settings:Remote Listen Port in the percolator.cfg file. For more information about configuring a non-default port for a NetVault SmartDisk, see the Quest NetVault SmartDisk Administrator’s Guide.

Force Add

If the device is already added to another NetVault Server with the same name, select the Force Add check box. This option can be useful if you have performed a disaster recovery to rebuild the NetVault Server.

Configure WebDAV credentials

To prevent unauthorized access to data, you can set up WebDAV authentication for server requests on NetVault SmartDisk. NetVault SmartDisk uses Digest Access Authentication with WebDAV. For more information about setting up authentication on the NetVault SmartDisk Server, see the Quest NetVault SmartDisk Administrator’s Guide.

If WebDAV authentication is enabled on the NetVault SmartDisk, select this check box, and provide the following information:

Username: Specify the user account configured on the NetVault SmartDisk Server.
Password: Type the password for the user account.
Confirm Password: Type the password again for confirmation.
4
Click Next to add the device.

Migrating savesets and backup jobs from NetVault SmartDisk to QoreStor

Use the migration feature to move savesets and backup jobs from NetVault SmartDisk device to QoreStor. As part of migration, all saved and scheduled backup jobs are redirected from the targeted NetVault SmartDisk device to the targeted QoreStor device. This process is completed before the data from existing backups is migrated.

The Expire All function is automatically disabled during the migration process. However, it is not disabled on the new target.

Migrating savesets and backup jobs

b
On the Manage Devices page, note the status of the NetVault SmartDisk device and the QoreStor device.
b
On the Explore Storage page, click Explore Disk Storage.
c
On the Explore Disk Storage page, select the applicable device in the repository table, and click Explore Repository.
d
On the Explore Disk Storage Repository page, review the information listed in the Saveset table.
4
When you are ready to start the migration process, click Manage Devices in the Navigation pane.
5
Click the Manage Device icon for the NetVault SmartDisk device.
6
On the RAS Device Management page, click Start Migration.
7
In the Select target device dialog box, select the QoreStor device to which you want to migrate the NetVault SmartDisk saveset.

The View logs page displays all NetVault logs. To view only the NetVault SmartDisk, enter NVSD in the text box. The process is displayed as a percentage of the savesets that have been migrated.

EMC Data Domain Systems

This section includes the following topics:

Related Documents

The document was helpful.

Select Rating

I easily found the information I needed.

Select Rating