
Delete Asset Subtypes
About Asset Subtypes, custom fields, and device detail preferences
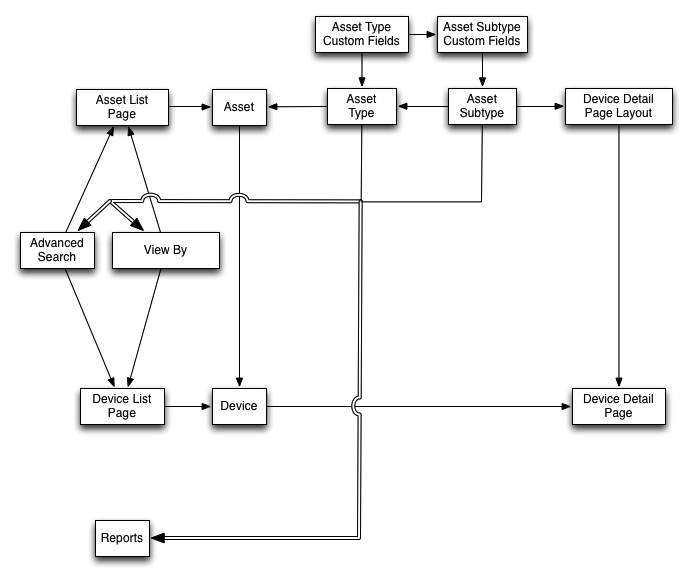
Asset Subtypes inherit the fields from the Asset Type, and you can add custom fields to enable the appliance inventory process to collect relevant information about the Asset Subtype. For example, you could add the Asset Subtype Printer to the Device Asset Type. You could then add a custom field for the Printer subtype, such as Toner. The Toner field would then be available to Device Assets with the subtype Printer.
|
NOTE: To enable the appliance to populate Asset Subtype fields from Agentless devices, you must assign the appropriate Asset Subtype when the device is configured, you must obtain the appropriate object identifier (OID), and you must map that identifier to the subtype field on the SNMP Inventory Configuration Detail page. You cannot add or change SNMP device subtypes after they have been configured. See Obtain a list of object identifiers (OIDs) using the Administrator Console. |
In addition, you can choose whether to show or hide the details that appear for each Device Asset Subtype on the Device Detail page. For example, you can hide information that is irrelevant to printers, such as Installed Programs, Discovered Software, and Metered Software, from the Device Detail page of assets with the subtype Printer.
Workflow for using Asset Subtypes with SNMP devices
The workflow for using Asset Subtypes with SNMP devices includes these tasks:
|
1. |
|
2. |
|
3. |
Optional: Populate the fields: |
|
◦ |
To enable the system to populate fields with data from SNMP devices, obtain the object identifiers (OIDs) to use for the custom fields, then add the field for Agentless devices on the SNMP Inventory Configuration Detail page, select the Asset Subtype, then add the OID information for the fields. See Obtain a list of object identifiers (OIDs) using the Administrator Console. |
Add Asset Subtypes and select Device Detail page preferences
In addition, you can choose which fields to display on the Device Detail page, and the sections where you want those fields to appear. This enables you to customize the Device Detail page and emphasize the most important information.
|
1. |
|
a. |
Log in to the appliance Administrator Console, https://appliance_hostname/admin. Or, if the Show organization menu in admin header option is enabled in the appliance General Settings, select an organization in the drop-down list in the top-right corner of the page next to the login information. |
|
b. |
|
c. |
|
▪ |
|
2. |
|
NOTE: In a default installation, Device Assets include two Asset Subtypes for printer devices: Laser Printer: Color and Laser Printer: Monochrome. Each of these subtypes provides a common set of fields that apply to most printers. The appliance also comes with a set of printer templates for typical SNMP-enabled printer models, based on these Asset Subtypes. You can edit these templates or add new ones, as needed. When you apply a printer template to a device, the data defined in the template, such as toner levels or descriptions, is collected for the printer in the next inventory cycle. For more information, see About printer templates. |
|
The name of the Asset Subtype. This name appears in the list on the Asset Type Detail page. | |
|
4. |
In the Subtype Fields section, click the Add button in the heading row on the right side of the table: |
|
The name of the Asset Subtype. This name identifies the Asset Subtype on the Asset Detail page. | |||||||||||||||||||||||||||||||
|
The values that appear in fields that contain lists of values. This field is enabled when you select Single Select or Multiple Select from the Type drop-down list. If you select Single Select or Multiple Select, you must enter at least one value in this field. To use multiple values, separate each value with a comma. | |||||||||||||||||||||||||||||||
|
The value that appears in the field by default. If you select Single Select or Multiple Select from the Type drop-down list, you must type one of the values given in the Available Values field. | |||||||||||||||||||||||||||||||
|
The type of field. Field types include:
| |||||||||||||||||||||||||||||||
|
Whether the asset field points to other assets. A check box is enabled when you select Assets Asset Type from the Type drop-down list. Select the check box to allow this custom field to point to multiple records. | |||||||||||||||||||||||||||||||
|
The location, on the Device Detail page, where the field is reported. For example, if you are creating a printer Asset Subtype, with a field named Toner Level, you might select Hardware because that field is related to printer hardware. However, you can choose any section in the drop-down list for any field. |
|
6. |
|
7. |
|
a. |
|
8. |
To enable the system to automatically populate custom fields with data on the Device Detail page, you must obtain the appropriate object identifiers and map the fields OIDs. See:
To manually update custom fields, go to the Asset Detail page. See Update custom asset fields manually.
Edit Asset Subtypes
|
1. |
|
a. |
Log in to the appliance Administrator Console, https://appliance_hostname/admin. Or, if the Show organization menu in admin header option is enabled in the appliance General Settings, select an organization in the drop-down list in the top-right corner of the page next to the login information. |
|
b. |
|
c. |
|
2. |
|
3. |
Set an Asset Subtype as the default
To automatically assign new assets to a subtype, you can mark an Asset Subtype as the default.
|
1. |
|
a. |
Log in to the appliance Administrator Console, https://appliance_hostname/admin. Or, if the Show organization menu in admin header option is enabled in the appliance General Settings, select an organization in the drop-down list in the top-right corner of the page next to the login information. |
|
b. |
|
c. |
|
▪ |
|
2. |
|
3. |
|
4. |
View subtypes available to Asset Types
|
• |
|
1. |
Log in to the appliance Administrator Console, https://appliance_hostname/admin. Or, if the Show organization menu in admin header option is enabled in the appliance General Settings, select an organization in the drop-down list in the top-right corner of the page next to the login information. |
|
2. |
|
3. |
|
▪ |
View Asset Subtypes on the Assets page
You can use the View By menu to sort the Assets page by subtypes.
|
1. |
|
a. |
Log in to the appliance Administrator Console, https://appliance_hostname/admin. Or, if the Show organization menu in admin header option is enabled in the appliance General Settings, select an organization in the drop-down list in the top-right corner of the page next to the login information. |
|
b. |
|
2. |
To view the subtypes assigned to a specific Asset Type, go to the View By menu in the upper right and select an Asset Type. |
|
3. |
To view a single subtype for an Asset Type, go to the View By menu, select an Asset Type, then select a subtype. |
Assign or change Device Asset Subtypes from the Devices page
If you have existing Device assets that are not assigned to subtypes, you can assign them to subtypes or change their subtype assignments, from the Devices page, provided that those devices are not SNMP (Simple Network Management Protocol) devices. Subtypes for SNMP devices must be assigned when the devices are initially configured.
You have existing device assets in appliance inventory and you have created subtypes for the Device Asset Type. See Add Asset Subtypes and select Device Detail page preferences.
|
1. |
Log in to the appliance Administrator Console, https://appliance_hostname/admin. Or, if the Show organization menu in admin header option is enabled in the appliance General Settings, select an organization in the drop-down list in the top-right corner of the page next to the login information. |
|
2. |
|
a. |
|
c. |
|
TIP: You can also use the View By drop-down list to identify devices that belong to a specific Asset Subtype. |
|
4. |
|
5. |
Assign assets to subtypes or change subtype assignments from the Assets page
If you have existing assets that are not assigned to Asset Subtypes, you can assign them to subtypes or change their subtypes, from the Assets page, provided that those devices are not SNMP (Simple Network Management Protocol) devices. Subtypes for SNMP devices must be assigned when devices are initially configured.
You have existing assets in appliance inventory and you have created subtypes for Asset Types. See Add Asset Subtypes and select Device Detail page preferences.
|
1. |
|
a. |
Log in to the appliance Administrator Console, https://appliance_hostname/admin. Or, if the Show organization menu in admin header option is enabled in the appliance General Settings, select an organization in the drop-down list in the top-right corner of the page next to the login information. |
|
b. |
|
a. |
|
c. |
|
TIP: You can also use the View By drop-down list to identify assets that belong to a specific Asset Subtype. |
|
3. |
|
4. |
Select View By > Asset Type > Device, and select one of the available entries in the list. For example, to display all device assets, select All Device Subtypes. |
|
5. |
Update custom asset fields manually
You have added custom Asset Subtypes or custom asset fields.
|
1. |
|
a. |
Log in to the appliance Administrator Console, https://appliance_hostname/admin. Or, if the Show organization menu in admin header option is enabled in the appliance General Settings, select an organization in the drop-down list in the top-right corner of the page next to the login information. |
|
b. |
|
3. |
Delete Asset Subtypes
You can delete Asset Subtypes provided that no assets are assigned to those subtypes.
You have Asset Subtypes that do not have any assets assigned to them.
|
1. |
|
a. |
Log in to the appliance Administrator Console, https://appliance_hostname/admin. Or, if the Show organization menu in admin header option is enabled in the appliance General Settings, select an organization in the drop-down list in the top-right corner of the page next to the login information. |
|
b. |
|
c. |
|
2. |
|
3. |
Managing Software assets
Managing Software assets
You can customize the Software Asset Type, and add Software assets for applications in the Software page inventory as needed.
Software assets can be added for Software page inventory only. Software assets are not required for applications in the Software Catalog inventory.
Customize the Software Asset Type
Customize the Software Asset Type
|
1. |
|
a. |
Log in to the appliance Administrator Console, https://appliance_hostname/admin. Or, if the Show organization menu in admin header option is enabled in the appliance General Settings, select an organization in the drop-down list in the top-right corner of the page next to the login information. |
|
b. |
|
c. |
|
2. |
|
a. |
|
b. |
|
c. |
To add a field, click the Add button in the table heading: |
|
d. |
|
e. |
|
3. |
Adding Software assets
Adding Software assets
Software assets enable you to track information about applications in the Software page inventory. For example, after you add Software assets for applications, you can associate those assets with License assets to track license information.
|
NOTE: Software assets are not required to set up License Compliance for applications in the Software Catalog inventory. See About License Compliance for Software Catalog applications. |
Add Software assets on the Software list
You can add Software assets for one or more applications at once by selecting applications on the Software list.
Software assets can be added for Software list inventory only. Software assets are not required for applications in the Software Catalog inventory.
|
1. |
|
a. |
Log in to the appliance Administrator Console, https://appliance_hostname/admin. Or, if the Show organization menu in admin header option is enabled in the appliance General Settings, select an organization in the drop-down list in the top-right corner of the page next to the login information. |
|
b. |
|
3. |
The assets are created, and they appear on the Assets list.
Add Software assets in the Assets section
You can create Software assets one-at-a-time in the Assets section.
Software assets can be added for Software list inventory only. Software assets are not required for applications in the Software Catalog inventory.
|
1. |
|
a. |
Log in to the appliance Administrator Console, https://appliance_hostname/admin. Or, if the Show organization menu in admin header option is enabled in the appliance General Settings, select an organization in the drop-down list in the top-right corner of the page next to the login information. |
|
b. |
|
c. |
For more information, see View and configure asset lifecycle settings. | |||||||||||||||||||
|
Select the location for this asset from the drop-down list. The values in this list contain all locations defined on the appliance. See Managing locations | |||||||||||||||||||
|
The asset name. For example, Office Pro SW Asset. | |||||||||||||||||||
|
Review or add barcodes that you want to associate with this asset. See Add barcodes to assets. | |||||||||||||||||||
|
a. |
|
b. |
Optional: In the Software field, select the name of the application to associate with the asset. To search for items, begin typing in the field. |
|
c. |
Optional: In the Software Label field, select a label in the Select label drop-down list. The list is empty unless you have created a Smart Label. To filter the labels list, enter a few characters of the label name in the Filter field. |
|
3. |
The new asset appears on the Assets list.