Oracle Instant Client Installation
To run Benchmark Factory, you must have the client dll files installed.
To install the Oracle Instant Client dlls
- Install the Oracle Instant Client on your system following the directions provided by Oracle.
- Copy tnsnames.ora from a configured system to your system.
- Edit your systems Environment Variables using one of the following methods:
- Add to the path variable the directory to which you copied the Instant Client files.
- Add a new System variable Named TNS_Admin, and place the directory location of the tnsnames.ora file in the value field.
Note: Environment Variables can be reached by right-clicking the My Computer Icon, selecting properties, then select the Advanced tab, and then select the Environmental Variables button.
Creating a SQL 2005 Trace Table Using the SQL Server Profiler
To create a SQL 2005 trace table
- Initiate the SQL Profiler.
- Click the New Trace icon. The Connect to SQL Server window displays.
- Select the appropriate server name from the drop-down list.
- Select the appropriate authentication from the drop-down. Enter the login name and password if required.
- Click Connect. The Trace Properties window displays.
- Enter a name for the trace in the Trace name field.
- Check the Save to table check box. The Connect to Server dialog displays.
- Select the appropriate server name from the drop-down list.
- Select the appropriate authentication from the drop-down. Enter the login name and password if required.
- Click Connect. The Destination Table window displays.
- Select the appropriate database from the Database drop-down list.
- Select the appropriate owner from Owner drop-down.
- Select the appropriate table from the Table drop-down list.
- Click OK. The Trace Properties window displays.
- Click the Events Selection tab.
- Verify that all check boxes are checked in the TSQL-SQL:BatchStarting Events, and TSQL-SQL:BatchComplete Events.
- Click Run.
- Run SQL statements.
- When finished running SQL statements, click the Stop selected trace icon. The table is created.
Creating a SQL 2008_2008 R2 Trace Table Using the SQL Server Profiler
To create a SQL 2008/2008 R2 trace table
- Initiate the SQL Profiler.
- Click the New Trace icon. The Connect to SQL Server window displays.
- Select the appropriate server name from the drop-down list.
- Select the appropriate authentication from the drop-down. Enter the login name and password if required.
- Click Connect. The Trace Properties window displays.
- Enter a name for the trace in the Trace name field.
- Check the Save to table check box. The Connect to Server dialog displays.
- Select the appropriate server name from the drop-down list.
- Select the appropriate authentication from the drop-down. Enter the login name and password if required.
- Click Connect. The Destination Table window displays.
- Select the appropriate database from the Database drop-down list.
- Select the appropriate owner from Owner drop-down.
- Select the appropriate table from the Table drop-down list.
- Click OK. The Trace Properties window displays.
- Click the Events Selection tab.
- Verify that all check boxes are checked in the TSQL-SQL:BatchStarting Events, and TSQL-SQL:BatchComplete Events.
- Click Run.
- Run SQL statements.
- When finished running SQL statements, click the Stop selected trace icon. The table is created.
Migrating Data Using the Command Line Wizard
The Repository is a database where all test results are stored. Benchmark Factory inserts test results into the repository and provides an easy way to access the data. By default, the Repository is a MySQL or SQLite database that resides on the same machine as Benchmark Factory. The Repository can reside on another database server if required. To change the database, open the Repository Manager or use the Repository Settings page of the Setting dialog.
Benchmark Factory allows you to migrate data from the DOS command line.
To migrate data using the DOS command line
- Click Start | All Programs | Accessories | Command Prompt.
-
Navigate to the Benchmark Factory bin directory. For example:
CD C:\Program Files\Quest Software\Benchmark Factory <version number>\bin.
-
To display the syntax help, type:
bmfdatamigrationWizard.exe -?

-
Press Enter. The usage parameters display.
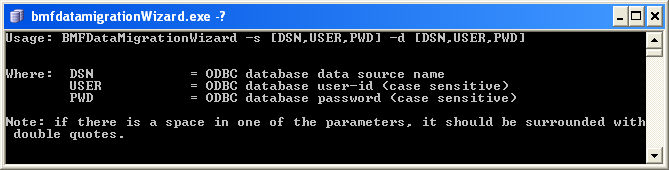
-
To perform the migration, use the following syntax:
BMFDataMigrationWizard -s [DSN,USER,PWD] -d [DSN,USER,PWD]
Example:
BMFDataMigrationWizard -s [MyDatabase,root,yourpassword] -d[LocalServer,sa,sa]
