Storage indexing
Recovery Manager for Exchange uses indexing on offline Exchange database storages (*.edb) to accelerate searching and data retrieval. This feature is supported only for Exchange Server 2007, Exchange Server 2010, Exchange Server 2013, Exchange Server 2016 and Exchange 2016 CU5.
System requirements
The Indexing service requires the certain amount of memory to run the indexing process and perform the search queries effectively. By default, the Indexing service (elasticsearch_rmex2) uses 2 GB of RAM. This value can be changed in order to run search queries on large databases.
To change the Indexing service memory allocation
- Navigate to the <RMEX installation folder>\elasticsearch\bin folder.
- Open the esi_config.bat file.
- Change the ES_HEAP_SIZE=2g parameter to set the new required memory usage (e.g. ES_HEAP_SIZE=4g).
- Run esi_service2_uninstall.bat.
- Run esi_service2.bat.
The desired heap size can be calculated using the following formula:
HEAP = EDB/150
Where EDB is the maximum size for the offline Exchange database on the machine (in gigabytes).
For example, the required heap size for the 600 GB database will be:
HEAP = 600/150 = 4 GB
The heap size should not be larger than 1/2 of the total available memory on the machine and should not exceed 32 GB.
Permissions required for indexing
Quest Recovery Manager Task Scheduler service account (typically is Local System) should have Read and Write access permissions to the RME-Storages database on the SQL server.
- If SQL server is installed on a local machine (.\QUESTRME instance), the 'NT AUTHORITY\SYSTEM' account must have the db_owner role on the RME-Storages database.
- If you use the remote SQL server, the Quest Recovery Manager Task Scheduler service account should have the Read and Write access to the RME-Storages database.
Enable indexing
The data source indexing is a resource-intensive activity, and so it is recommended to set up a dedicated computer for the Index database. In this case, you need to have two Recovery Manager for Exchange installations on different workstations and specify the path to the Indexing service on the host that is intended for the Index database (Indexing Url on the Indexing tab). If the Indexing service and the Index database are located on the same workstation, you do not need to change this setting.
To enable indexing
|

|
Note: You should add a storage only after the indexing feature is enabled. Otherwise, the indexing will not be activated for the storage.
The  icon indicates that the storage is indexed. icon indicates that the storage is indexed. |
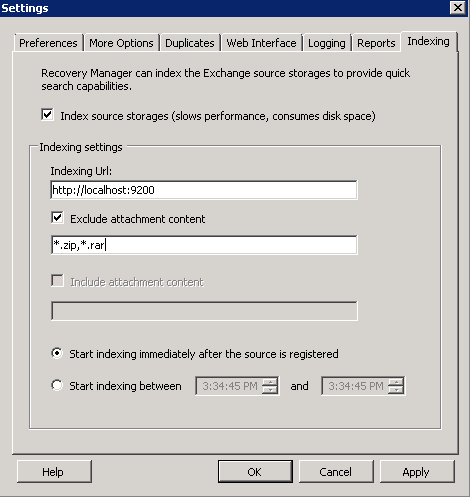
- In the Recovery Manager for Exchange Console, select Tool | Settings from the main menu and go to the Indexing tab.
- Select the Index source storage (slows performance, consumes disk space) check box.
- On the Indexing tab, you can specify the location of the Indexing service in the Indexing Url text box. The default port that is used by the service is 9200.
- Include or exclude the attachment content from indexing by selecting the Exclude attachment content or Include attachment content option. Here you can specify file types as shown on the screenshot below.
- The indexing will be started immediately after you add a storage if you select the Start indexing immediately after the source is registered option or on schedule if you use the Start indexing between option.
- Add a storage that you want to use. For more information on how to add a storage, see Add Storage Wizard.
- To view the progress of the indexing task, go to the Home page and click the Automated tasks link.
Configuration parameters
The Indexing configuration parameters can be modified in the Indexing service configuration file:
%Program Files%\Quest\Recovery Manager for Exchange\elasticsearch\config\elasticsearch.xml
- http.port: 9200 – port that is used by the Indexing service.
- path.data: <path to the Index data> – path to the Index data.
|
|
Note: Restart the Indexing service (elasticsearch-service-x64.exe on 64-bit machines or elasticsearch-service-x32.exe on 32-bit machines) to apply a new configuration. |
By default, the index data is stored in the following location: %Program Files%\Quest\Recovery Manager for Exchange\elasticsearch\data\RMEX.
Estimating the indexing performance
Performance tests with typical heterogeneous data show the following results.
Machine configuration: AWS m3.xlarge, 4 vCPU (Intel Xeon E5-2670 v2, 2,5 GHz), 15 GB of RAM.
Results:
| 2,6 GB |
3 |
50000 |
20000 |
1 machine - 10 min |
0,6 GB (23%) |
| 116 GB |
1000 |
9300000 |
0 |
1 machine – 2 h
2 machines - 1 h 20 min |
5,3 GB (4,5%) |
| 360 GB |
100 |
24845810 |
551932 |
1 machine - 4 h 23 min |
72 GB (20%) |
Troubleshooting
If you have any problems with indexing, please call Quest Support, describe the issue in detail, and send the resulting log files from the following location: %Program Files%\Quest\Recovery Manager for Exchange\elasticsearch\logs.
In this section, all messages and message-level items, such as items in public folders and calendar items, are called messages.
Recovery Manager for Exchange provides the following methods for restoring messages:
- Method 1: Finding and restoring messages. Allows you to search multiple source storages for messages by a multitude of search criteria. You can then select and restore messages from a list of search results.
- Method 2: Restoring messages while browsing a source storage. Offers a quick way to restore messages while browsing a source storage in the Recovery Manager Console.
- Method 3: Restoring messages using an automated task. Allows you to restore messages by creating and running or scheduling an automated task. For more information about automated tasks, see Automated tasks.
- Method 4: Exporting messages. Allows you to export messages to individual new .eml, msg, or .txt files. When exporting messages to individual files, you can re-create the source storage folder structure in the target restore location: the messages being exported will be placed in the appropriately named target subfolders to reflect the location of the exported messages in the source storage.
- Method 5: Restoring messages to their home Exchange Server mailboxes. Allows you to restore selected messages to their original live Exchange Server mailboxes residing in the domain you specify. If target mailboxes are not found in the specified domain, you can either skip these mailboxes or create them on a live Exchange Server in the domain. You can choose whether to create new mailbox-enabled accounts for the missing mailboxes or restore accounts for these mailboxes from an Active Directory backup by using Recovery Manager for Active Directory.
|
|
Note:
- To restore accounts for the missing mailboxes, you can only use Active Directory backups registered and unpacked with Recovery Manager for Active Directory. The backups must be unpacked using either the Online Restore Wizard or the Group Policy Restore Wizard. For more information on how to unpack an Active Directory backup, see the Recovery Manager for Active Directory User Guide.
- To restore accounts for the missing mailboxes, you can only use Active Directory backups registered and unpacked with Recovery Manager for Active Directory. The backups must be unpacked using either the Online Restore Wizard or the Group Policy Restore Wizard. For more information on how to unpack an Active Directory backup, see the Recovery Manager for Active Directory User Guide.
|
To find and restore messages
- Search source storages for the messages you want to restore. For more information about how to search for messages, see Searching for messages, attachments, or folders in source storages.
- When your search is complete, in the Search results list, select the check boxes next to the messages you want to restore.
- Click Restore.
- Follow the instructions in the wizard to complete the restore operation.
To restore messages while browsing a source storage
- Register the source storage from which you want to restore messages. For more information about how to register storages, see Registering a storage.
- Browse the source storage in the left pane to select the folder that contains the messages you want to restore.
- Select the messages you want to restore in the right pane.
To select multiple messages, hold down CTRL and click the messages you want to restore.
- Right-click any of the selected messages, and select Restore from the shortcut menu.
- Follow the instructions in the wizard to complete the restore operation.
|
|
Note:
To reduce the number of steps you have to go through in the restore wizard, use the copy-and-paste or drag-and-drop operation.
To restore messages using copy-and-paste
- Browse the console tree to select the folder that contains the messages you want to restore.
- Select the messages you want to restore in the right pane.
- Right-click any of the selected messages, and select Copy from the shortcut menu.
- Right-click the target storage folder in the left pane, and select Paste from the shortcut menu.
- Follow the instructions in the wizard to complete the restore operation.
To restore messages using drag-and-drop
- Browse the console tree to select the folder that contains the messages you want to restore.
- Select the messages you want to restore in the right pane, and drag them to the target storage in the left pane.
- Follow the instructions in the wizard to complete the restore operation.
|
