Installing Recovery Manager for Exchange
Installing Recovery Manager for Exchange
Before installing Recovery Manager for Exchange, make sure the computer meets the minimum hardware and software requirements provided in the Release Notes supplied with your version of Recovery Manager for Exchange.
To work with Exchange Server databases, Recovery Manager for Exchange requires several Exchange Server files that can be found on the Exchange Server distribution CD or in the Exchange Server installation folder. For more information on the required Exchange Server files and their locations, see Required Exchange Server DLLs.
To install Recovery Manager for Exchange
- Run the Autorun.exe file located in the root of the Recovery Manager for Exchange installation CD.
- In the Autorun window, open the Setup tab, and then click Install next to Recovery Manager for Exchange.
You might be prompted to install applications required by Recovery Manager for Exchange if they are not already installed on your computer. For example, if you do not have Microsoft .NET Framework, you will be prompted to install it. When the installation of these applications finishes, you might be prompted to restart the computer.
- Step through the Setup Wizard.
- On the User Information page, specify a valid Recovery Manager for Exchange license, and then click Next:
- Click Browse.
-
In the dialog box that opens, locate the Quest license file (*.dlv) and click Open.
For information about the licensing model and managing licenses, see Licensing.
- On the Choose Setup Type page, select a Setup option, and click Next:
Table 3: Setup options
| Express |
Installs Recovery Manager for Exchange with default parameters and Microsoft SQL Server 2008 SP1 Express Edition. |
| Custom |
Allows you to select the Recovery Manager for Exchange features to install and specify other installation parameters.
If you want to install the Web Interface feature, use the Custom option. |
- Follow the instructions in the Setup Wizard.
- If you selected to install the Management Shell feature, use the Allow Management Shell Scripts page to change the PowerShell execution policy to RemoteSigned.
If you select to keep the current PowerShell execution policy, you may need to manually set the RemoteSigned policy in order for the Management Shell to work.
- On the completion page, leave the Configure Recovery Manager for working with Exchange Server databases check box selected if you want to configure Recovery Manager for Exchange for working with specific versions of Exchange Server now, then click Finish. Otherwise, clear the check box, and click Finish.
For more information on how to configure the Recovery Manager for Exchange, see Configuring Recovery Manager for Exchange.
Recovery Manager for Exchange is installed for all user accounts on the computer.
Uninstalling Recovery Manager for Exchange
To uninstall Recovery Manager for Exchange
- In Control Panel, click Uninstall a program.
- In the list, select Quest Recovery Manager for Exchange, and then click Change.
- Follow the steps in the wizard that starts to remove the program from your computer.
Starting Recovery Manager for Exchange
To start Recovery Manager for Exchange
- Complete the steps related to your version of Windows:
Table 4: Steps to start Recovery Manager for Exchange
- Click Start.
- Point to All Programs | Quest | Recovery Manager for Exchange.
- Click Recovery Manager for Exchange
|
- On the Apps screen (Windows logo key + Q), click the Recovery Manager for Exchange tile.
|
When started, Recovery Manager for Exchange displays the following window, also known as the Recovery Manager Console:
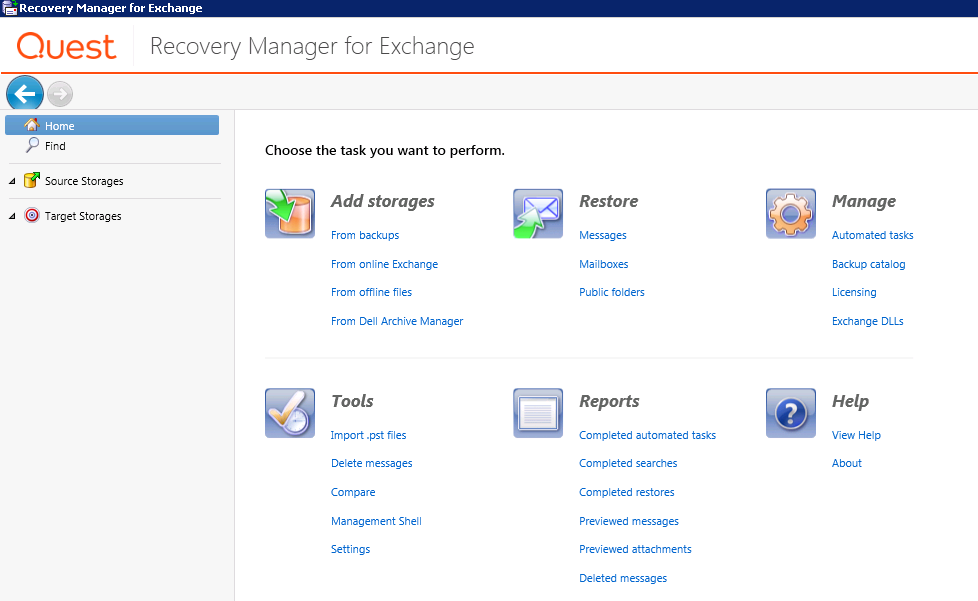
The left pane of the window contains a console tree, showing items that are available for management. The left pane includes the following nodes:
- Home. Select this node to display a Task Pad View in the details pane. You can use the Task Pad View to launch wizards that guide you through the registration of storages, restore operations, data import operations, or creating automated tasks.
- Find. Select this node to display a Find View in the right pane. You can use the Find View to run one or multiple simultaneous searches using different search criteria to find the items you want to preview and/or restore. While your searches are running in the Find View, you can continue working with Recovery Manager for Exchange. For more information, see Searching for messages, attachments, or folders in source storages.
-
Source Storages. Expand this node to browse existing source storages, view their contents, or select particular items (such as mailboxes, folders, or messages) for restore operations. You can also rename or delete existing source storages. For detailed instructions on how to manage storages, see Working with storages.
- Target Storages. Expand this node to browse existing target storages and view their contents. Optionally, you can create new folders or delete unnecessary data from existing target storages (this functionality is not supported for target storages based on Archive Manager instances). You can also rename or delete registered target storages. For detailed instructions on how to manage storages, see Working with storages.
The right pane, also known as the details pane, displays the contents of the nodes you select in the left pane. You can perform a restore by clicking a source folder node in the left pane, and then dragging items from the details pane to a target folder node in the left pane. For detailed instructions on how to perform a restore operation, see Restoring data.
The Task Pad View has the following areas:
Table 5: Task Pad View areas
| Add storages |
Provides links that allow you to register storages from the specified types of items. When you click a link in this area, a wizard starts. For more information about this wizard and the options it provides, see Add Storage Wizard.
In this area you can use the following links:
- From backups. Allows you to use third-party backup software to extract Exchange Server databases from backups and register these databases as source storages. For more information on supported third-party backup software, see the "Supported Backup Software" section in the Release Notes supplied with this version of Recovery Manager for Exchange.
- From online Exchange. Allows you to register the following items:
- Online Exchange Server mailboxes
- Public folder hierarchies
- Online mailboxes and public folder hierarchies hosted in Exchange Online that is part of Microsoft’s Office 365 cloud-based service.
- Exchange Server recovery databases or databases from a recovery storage group.
- From offline files. Allows you to register an offline Exchange Server database from a specified folder or multiple offline Lotus Domino databases or Personal Folders (.pst) files located in different folders.
- From Archive Manager. Allows you to register an Archive Manager instance.
|
| Restore |
Provides the following links:
- Messages. Starts a wizard that helps you find and selectively restore messages and other message-level items. For more information, see Message Restore Wizard.
- Mailboxes. Starts a wizard that helps you selectively restore mailboxes. For more information, see Mailbox Restore Wizard.
- Public folders. Starts a wizard that helps you selectively restore public folders or restore the entire public folder hierarchy of an Exchange organization or Exchange Online (Office 365). For more information, see Public Folder Restore Wizard.
|
| Manage |
Provides the following links:
- Automated tasks. Click this link to display the Task Manager View in the right pane. You can use the Task Manager View to display a list of existing automated tasks and create, modify, schedule, run, stop, and monitor your tasks. For more information, see Task Manager View and Automated tasks.
- Backup catalog. Click this link to display the Backup Catalog Manager View in the right pane. You can use this view to add new backups to the Recovery Manager for Exchange backup catalog and remove previously cataloged backups. You can also register source storages from cataloged backups. For more information, see Backup Catalog Manager View.
- Licensing. Click this link to display the Licensing View in the right pane. You can use the Licensing View to view details of the installed license file and to manage allocated licenses. For more information, see Licensing.
- Exchange DLLs. Click this link to specify locations of Exchange dynamic link libraries (DLLs). Recovery Manager for Exchange requires these DLLs to work with Microsoft Exchange Server databases. For more information, see Required Exchange Server DLLs.
|
| Tools |
Provides the following links:
- Import .pst files. Click this link to start a wizard that helps you import all data from one or more Personal Folders (.pst) files into online mailboxes in an on-premises or cloud-based Exchange organization. For more information, see Import .Pst Files Wizard.
- Delete messages. Click this link to start a wizard that helps you find and selectively delete messages from writable source storages registered with Recovery Manager for Exchange. For more information, see Message Delete Wizard.
- Compare. Click this link to compare storages registered with Recovery Manager for Exchange. You can also compare specific mailboxes or folders in the storages. For more information, see Comparing and restoring storages, mailboxes, or folders.
- Management Shell. Click this link to open the Recovery Manager for Exchange Management Shell. For more information, see the Management Shell section in the User Guide.
- Settings. Click this link to open a dialog box that allows you to configure various parameters of Recovery Manager for Exchange. For more information, see Configuring Recovery Manager for Exchange
|
| Reports |
Provides links that allow you to view reports about activities performed in Recovery Manager for Exchange. |
The bottom of the Recovery Manager Console has a status bar. When you click a node in the left pane, the status bar displays the number of mailbox or public folder items the node contains.
The red cross ( ) icon displayed next to an item in the Recovery Manager Console indicates that the item is “soft-deleted.” An item that is marked as deleted but remains on the Exchange Server or Lotus Domino computer for a defined period of time. The item can be recovered before that period expires.
Backup Catalog Manager View
To register Exchange stores databases from a backup, you must first catalog that backup. When cataloging an Exchange Server backup, Recovery Manager for Exchange analyses the backup and writes information about the backup to a Microsoft SQL Server database that is called the backup catalog.
Recovery Manager for Exchange uses information stored in the backup catalog to extract Exchange Server stores from the cataloged backups and register these stores as storages.
The Backup Catalog Manager View enables you to manage the Recovery Manager for Exchange backup catalog. You can add backups to the backup catalog, remove previously cataloged backups from the catalog, and register Exchange Server stores from the cataloged backups.
To display the Backup Catalog Manager View
- From the main menu, select Manage | Backup Catalog.
The Backup Catalog Manager View includes the following tabs:
