You can enable trace logging on the machine where Content Matrix is installed and migrations are run to assist Quest Support with troubleshooting.
NOTE: For Distributed Migration, trace logging must be enabled on each agent machine.
To enable trace logging:
1.Open the file LogSettings.xml, which can be found in one of the following folders:
·If you are required to be a local administrator on the machine where Content Matrix is installed: C:\ProgramData\Metalogix
OR
·If you are not required to be a local administrator on the machine where Content Matrix is installed: C:\Users\<username>\AppData\Roaming\Metalogix\Common
2.Set <LoggingLevel> to one of the values described in the following table.
WARNING: When trace logging is enabled, entries are appended to the log file for each migration job that is run, and the same log file is used for all editions. This means the log file can become very large, which is why it is recommended that you only enable trace logging at the request of Quest Support.
|
Value |
Description |
|---|---|
|
None [Default] |
Trace logging is disabled (i.e., no entries are written to the log file). |
|
Error |
Only Error messages are logged. |
|
Debug |
Error and Debug messages are logged. NOTE: Debug should only be used for advanced troubleshooting as it may impact migration performance. |
Log entries are written to the file MetalogixGlobalLog.txt, which is located in the same folder as LogSettings.xml.
Link correction in Metalogix Content Matrix eRoom Edition involves the following post-migration actions:
·Mapping the source and target URLs, which are based on the links listed in the Link Dictionary
THEN
·Running the link correction.
NOTE: Link Correction options are specified as a pre-migration configuration task.
To map source and target URLs after a migration:
1.In Explorer View, select the target SharePoint site for which you want to map links.
2.Right-click and choose Link Correction > Map Links.
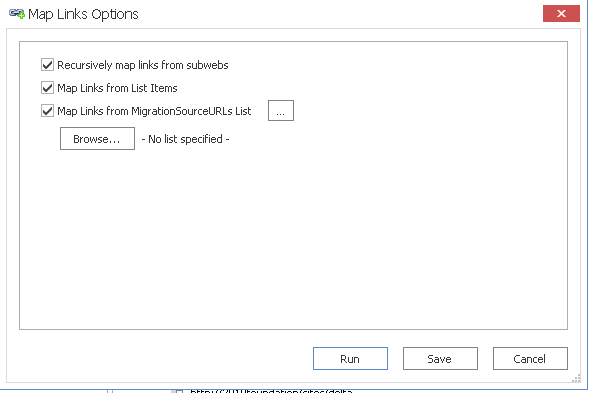
An informational dialog and the Map Links Options dialog displays.
3.When you are ready to map links, close the informational dialog.
4.If you want links to be mapped for all subsites of the selected site, make sure the Recursively map links from subwebs box is checked.
5.If you want links that exist in list items (in the list item's field data) to be included in the mapping, make sure the Map Links from List Items box is checked.
NOTE: This option is more specific for eRoom links that are migrated to SharePoint (as items in a Links list).
6.If you want to add any link mappings from the MigrationSourceURLs list into the Link Dictionary:
a) Make sure the Map Links from MigrationSourceURLs List box is checked.
b)Click [Browse...] to open a SharePoint tree view with all of the data connections, and select the MigrationSourceURLs list that had been configured on the Link Correction Options tab prior to migration to include in the link correction mappings.
c)If you want Metalogix Content Matrix to validate the target side links from the MigrateSourceURLs list, click the [...] button to display a secondary Map List Options dialog and make sure the Validate Target URLs option is checked.
d)Click [OK] to return to the primary Map List Options dialog.
Now you can save or run the link mapping action.
When the map links option is run the target node will be crawled looking for list items with values in the MigrationSourceURL column. These values are then used to populate the Link Dictionary.
To run Link Correction:
REMINDER: Links must be mapped before Link Correction can be run.
1.In Explorer View, select the target SharePoint site for which you want to correct links.
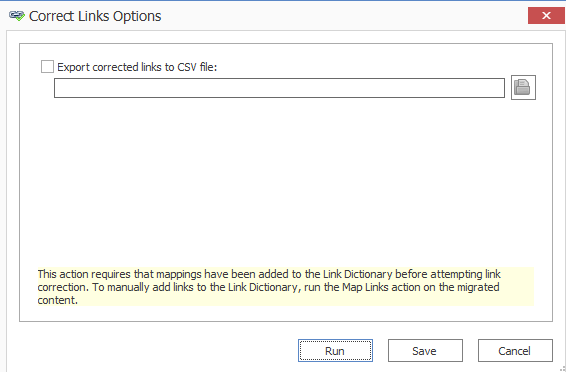
2.Right-click and choose Link Correction > Correct Links to display the Correct Links Options dialog.
3.If you want Metalogix Content Matrix to output a CSV file containing a list of any of the links that were corrected by the link correction action:
a)Check the Export corrected links to CSV file: box.
b)Enter a file name in the text box, then click the folder icon and navigate to the location where you want to save the CSV file.
Now you can save or run the link correction action.
Metalogix Content Matrix - eRoom Edition uses a Link Dictionary database to store a list of mappings for link correction. This database is populated through the use of the Link Correction Options tab when configuring a migration, and as a post migration option.
The first method to manage the Link Dictionary is through the use of the Settings heading in the ribbon menu, which includes the following options:
·Export Link Dictionary - This option will create a CSV file containing a list of all of the current URL mappings between the eRoom source and the SharePoint target. The CSV will contain two columns, Source URL and Target URL. Selecting this option will open the Link Dictionary Export Options dialog.
If you want Metalogix Content Matrix to output a CSV file containing a list of any of the links that were corrected by the link correction action, enter a file name in the text box, then click the folder icon and navigate to the location where you want to save the CSV file.
Then you can save or run the CSV creation action.
·Clear Link Dictionary - This option will delete any link mappings that currently exist in the Link Dictionary database file. When selected a warning dialog will open to confirm that the links should be cleared.
The second method is through a manual process. The database file that is used for the link mapping can be found at the following location:
[Drive]:\Users\[USER]\AppData\Roaming\Metalogix\Metalogix Content Matrix Console - eRoom Edition
In this folder, the LinksCache.sdf file is a database file that contains the link mappings.
NOTE: If using this method, the Metalogix Content Matrix Console should be closed/shutdown before editing/accessing any files in this folder location.
If you want to remove all the existing mapping, and are not able to use the Settings > Clear Link Dictionary method, you can navigate to this folder location and delete the LinksCache.sdf file, then restart the Metalogix Content Matrix Console.
You may also want to clear any existing link mappings, but do not want to permanently lose the existing mappings. In this case the current LinksCache.sdf file can be renamed and saved, and a new LinksCache.sdf file can be created. All of the existing mappings will still exist in the renamed file, and new mappings can be created in the new file. Should you want to switch back, you can rename the newer version of the file, and return the original file back to its original file name, LinksCache.sdf.
Metalogix Content Matrix lets you run an incremental migration (also known as a delta migration or an incremental copy) to migrate new and updated data from the source to the target. This can save time when relatively minor changes have been made to a large source environment, and you want to migrate those changes to your target environment.
Incremental migrations are based off previous migration actions. In order to create an incremental job, a non-incremental migration action must have already been run, and a job item for that action must exist in the Job List.
Incremental migrations can be run from the Metalogix Content Matrix Console UI or through a PowerShell script.
Prerequisites and Limitations of Incremental Migrations
·To run an incremental migration, a full migration must have already been run for the content you want to migrate incrementally. This is because of the following: firstly, there must be content on the target environment to compare changes on the source environment against, and secondly, incremental migrations can only be created from an existing job item in the Job List.
·The only supported connection types are Local Connection (SharePoint Object Model) and Remote Connection (Metalogix SharePoint Extensions Web Service). For more information about connection types, please see Connecting to SharePoint.
·Incremental migration works by comparing the last modified dates for each item on the source and target. Therefore, the following scenarios do not fully support incremental migration:
§If an item on the source is moved after the initial non-incremental migration action, it is considered a new item and is migrated incrementally. This will result in duplicated items.
§If an item on the source is deleted after the initial non-incremental migration action, there is no longer a last modified date on the source to compare to the target. This will result in the deletion not being detected by Metalogix Content Matrix Console, which means that the deleted item on the source remains on the target after the incremental migration action.
·Only Title and Description eRoom metadata is supported. Other metadata types are not supported because they have no equivalent object in SharePoint.
·It is a Known Issue that an incremental migration action will incorrectly duplicate eRoom objects if:
1.A set of eRoom objects is migrated non-incrementally to a subsite on the target.
2.That same set of eRoom objects is then migrated non-incrementally to a different subsite on the target.
3.An incremental migration job is then created from the non-incremental migration action that was created in step 1.
NOTE: This issue applies to all eRoom object types and migration actions that support incremental migration.
Supported Incremental Migration Actions and Objects
The following is a list of migration actions that support incremental migration:
·Paste as Document Library (except when migrating calendars, discussions, and polls)
·Paste as Site
·Paste all Items As Site
·Paste as Site Collection
·Paste as Site Collection using Nested Object Flattening
·The following object-specific migration actions:
§Paste Calendar and Paste Calendar Event
§Paste as Database
§Paste Discussion and Paste Discussion Topic
§Paste Document, Paste Container as Folder, and Paste Folder > All Items
§Paste as eRoom Link and Paste Link as Link to a Document
§Paste Note
§Paste as Poll
The following is a list of eRoom objects that support incremental migration:
·Calendars
·Databases
·Discussions (known as Discussion Boards in SharePoint)
·Documents
·Links
·Metadata (only 'Title' and 'Description')
·Notes
·Polls (known as Surveys in SharePoint)
·Rooms
To migrate eRoom Content Incrementally:
1.Ensure that a non-incremental migration action has already been run for the content you want to migrate incrementally.
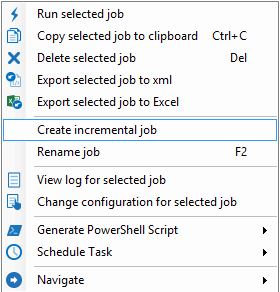
2.In the Job List, select the existing job item.
3.Right-click and choose Create incremental job.
A new incremental job is added to the Job List.
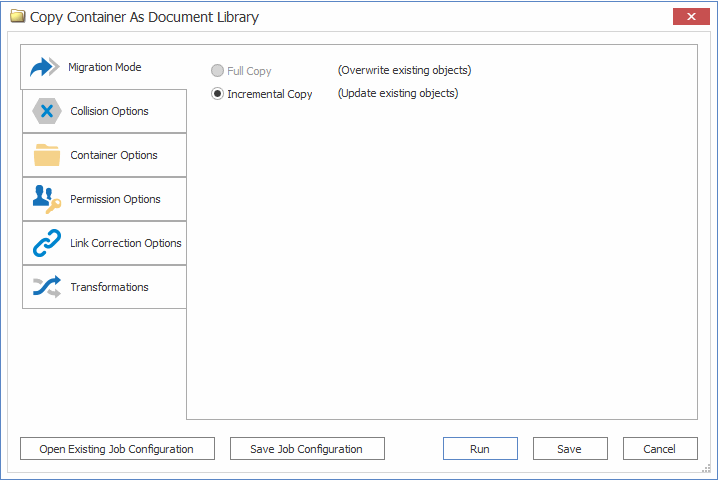
4.If you want to change the configuration options for the incremental job:
§In the Job List, navigate to the incremental job:
§Right-click and choose Change configuration for selected job to display the Copy Container As... dialog.
5.Change any configuration settings as you would if you were configuring copying options for a full migration.
EXCEPTIONS:
§In the Migration Mode tab, the Incremental Copy option is selected, and all other options are disabled.
§In the Collision Options tab, the Use existing content option is selected, and all other options are disabled.
Now you can save or run the action.