Metalogix Content Matrix can import any desired user mappings from an XML file. Importing user mappings from an XML file involves creating an XML file with the desired mappings, then importing that file. This option is generally used if migrating from an eRoom environment that has a large number of users/groups.
To create a an xml file of user mapings:
Create a file, with any name, that contains any desired user mappings. The file can either be text based or an XML file, but must contain a root level node named Mappings, and have one child node for every mapping that you want imported. Each child node must contain two attributes: Source and Target. The Source is the Login Name of the source side user, and the Target attribute is the Login Name of the target user that is being mapped to.
The XML file should follow the below format:
<Mappings>
<Mapping Source="eRoomUser1" Target="Domain\User87" />
<Mapping Source="eRoomUser2" Target="Domain\User254" />
</Mappings>
NOTE: The Login Names used in the above example may vary depending on the authentication methods used by the source and target environments.
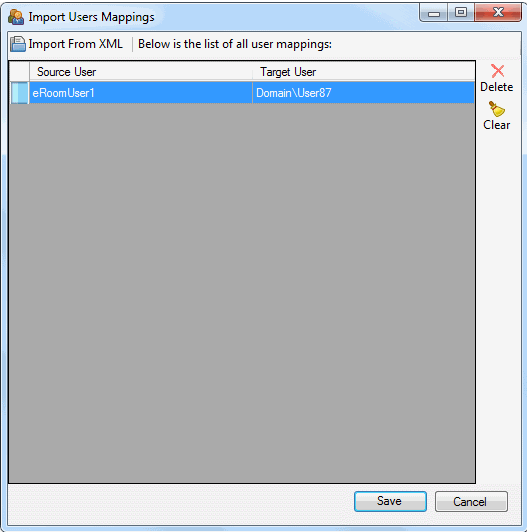
To import the XML file into Metalogix Content Matrix:
1.In Explorer View, select the top-level node of the eRoom connection .
2.Right-click and choose Import User Mappings to display the Import Users Mappings dialog.
3.Click Import From XML button, then navigate to and open the XML file you want to import.
The Import User Mappings dialog is populated with the mappings contained in the XML file.
Now you can:
§delete single mappings (by selecting the desired mapping, and clicking Delete)
§clear all mappings (by clicking Clear)
Any mappings that are listed in the Import Users Mappings dialog are not authenticated until the time of migration. Any spelling mistakes that exist will not be corrected. If a user mapping is not valid, or authenticated, the migration account will be used instead.
4.Click [Save] to continue and add the mappings.
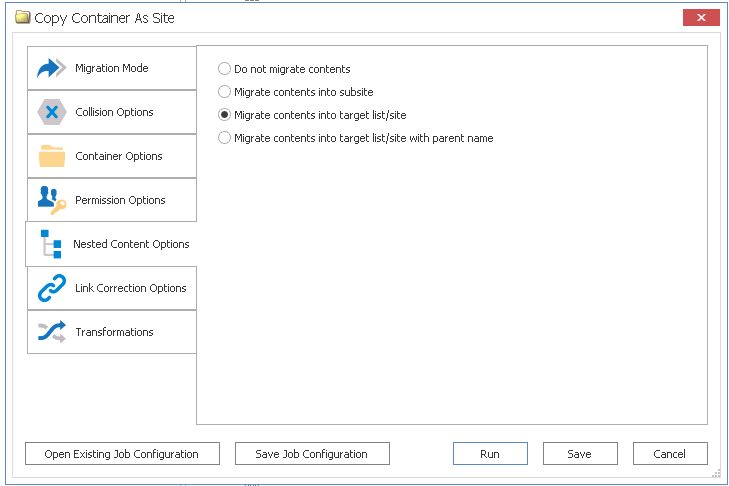
Hierarchy structure is different between eRoom and SharePoint. eRoom hierarchy structure can become very complicated, because a list can have any number of sub-elements, including other lists, folders, or items. These sub-elements can also contain other lists, folders, items, and so on. This kind of potential behavior is called "nested content."
In SharePoint, however, only sites can contain other types of content (such as lists, calendars, document libraries, etc.). This can become an issue when migrating content that can exist in a nested structure to a different hierarchy structure. Metalogix Content Matrix has a set of Nested Content options that users can set when migrating their content. These options are available for most migration actions, and are found under the Nested Contents tab. The Nested Contents tab is available for the following actions:
To configure Nested Content Options:
Select how you would like to have nested content handled. Use the information in the following table for guidance.
|
If you want to ... |
Select ... |
|
prevent any nested content from being migrated to the target |
Do not migrate contents. |
|
migrate any nested content of a migrated item into a single subsite under the migration target (with all of the nested content flattened to a single level and placed under the subsite) |
Migrate contents into subsite. |
|
migrate any nested content into the target site or list, so that: ·If the target is a SharePoint site, or if the migration is creating a SharePoint site under the selected target location, all of the nested content would be flattened to a single level and placed under the selected target site ·If the target is a SharePoint list or library all of the nested content would again be flattened to a single level but would be placed under the parent site of the selected target SharePoint list/library. |
Migrate contents into target list/site. |
|
migrate any nested content into the target site or list in the same manner as the Migrate contents into target list/site option, but with the parent site or list name appended to the end of the nested content lists |
Migrate contents into target list/site with parent name. |
You can view, create, and edit Transformers which, as the name implies, "transform" content during migration.
There are several built-in, non-editable transformers that Metalogix Content Matrix uses to process data during the migration. Advanced users can also create custom transformers using PowerShell.
The Transformations tab consists of two main sections: Available Definitions and Applied Transformers For <Object>. The Available Definitions section will list all of the transformation definitions that are available for the current migration action, in alphabetical order. For example, the Site definition is available when migrating at the site level or higher. However, if migrating as a document library or migrating documents, this definition will not be listed.
When one of the Available Definitions items is selected, any transformations that exist/have been configured within the migrating content will appear. Some of the actions that may be grayed out. These grayed out items are mandatory transformations that are run during the course of a normal migration, and these actions cannot be edited or removed. However, they can be reordered by using the up and down arrows to the right-hand side of the window if you want a transformation action to occur before a mandatory action. Actions that appear and are not grayed are user added transformations, and can be moved, edited and deleted at the users discretion.
In some cases, you could add another instance of an existing transformer, and then have it run in two different locations within the migration process. One could be run in the middle, and it could be run again just before the end.
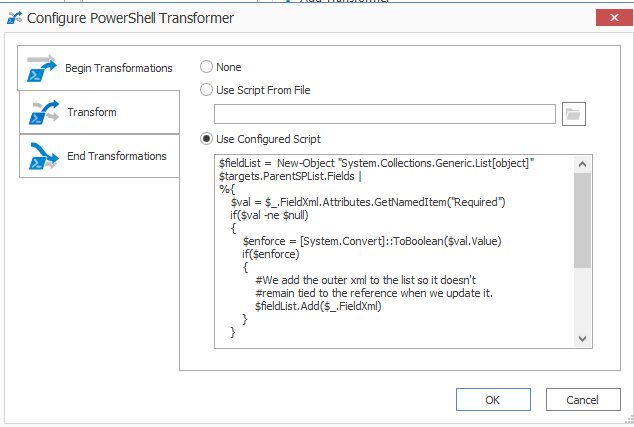
When you select the Add Transformer > Invoke PowerShell script option for an Available Definition, you can use custom PowerShell scripts to create your own transformations beyond the built-in capabilities of the Metalogix Content Matrix.
Specify when you want the script to run by selecting one of the following options:
Begin Transformation The transformation script will run before the migration of the affected objects, allowing you to read and make changes to objects on the source before objects themselves migrate.
Transform The transformation script will run while the migration of the affected object(s) is in progress. For example, the user mapping between source and target would be run using the Transform option.
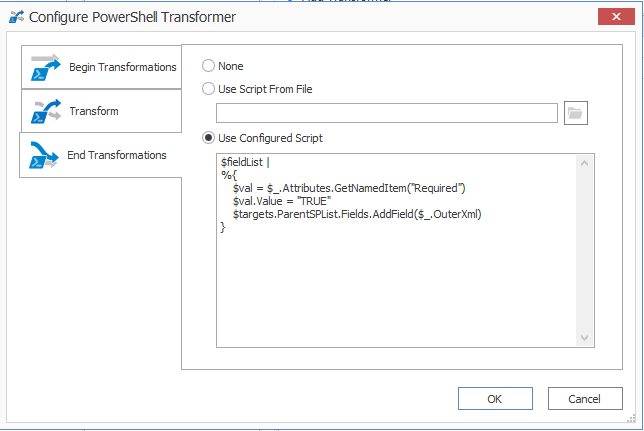
End Transformation The transformation script will run after the migration of affected object(s), allowing you to read and make changes to objects on the target.
EXAMPLE: The following Transformer consists of two scripts for disabling and re-enabling the Required setting for a column list.
·The first script entered into the Begin Transformation tab sets the setting of any columns that are Required to false before copying begins.
·The second script, entered into the End Transformations tab, sets the setting back to true after item migration has completed.