Before you migrate an eRoom database, you may need to update the Metalogix Content Matrix Application Settings.xml file to account for:
·columns containing numbers and special characters
·when migrating as a Discussion Board, the format of the discussion column, and/or
·the formatting of database Change Logs.
To open the ApplicationSettings.xml file:
1.Close Metalogix Content Matrix, if it is not already closed.
2.Navigate to ApplicationSettings.xml and open the file in a text editor. By default, this file is located in the following directory: [Drive]:\Users\[User name]\Application Data\Metalogix\Metalogix Content Matrix Console - [Product name] Edition.
Migrating Columns Containing Numbers and Special Characters
When migrating source data that contains Number-type columns with both numeric and non-numeric characters, or with unsupported formatting, additional steps must be taken to preserve the formatting of the columns. By default, certain characters are stripped when migrating, which may cause the following unintended scenarios:
·For numeric data with leading zeroes, those zeroes stripped. This may affect data such as zip codes, which can correctly begin with '0'.
·For numeric data containing non-numeric characters (with the exception of a single decimal point), those characters stripped. For example, "7.2.0" will be migrated as "720", "+91 123-456-789" will be migrated as "91123456789", and so on. This may affect data such as telephone numbers, which can correctly begin with "+1" or "+91", or correctly contain hyphens, for example.
To migrate numeric data while preserving formatting, the ConvertNumericFieldsToText flag in the ApplicationSettings.xml file must be updated. The flag preserves formatting by searching for column Titles that contain specified strings, and then migrating their associated Number-type columns as Single Line of Text-type columns. The default column title values are as follows: Tel, Telephone, Phone, Postal, and Zip. To modify this flag's values, do the following:
In the ApplicationSettings.xml file, navigate to the ConvertNumericFieldsToText entry and add or remove values as desired.
Values must be separated by a comma (','). The default code block is shown below:
<XmlableEntry>
<Key>ConvertNumericFieldsToText</Key>
<Value>Postal, Telephone, Phone, Tel, Zip</Value>
</XmlableEntry>
Once ApplicationSettings.xml is saved, all future database migration actions will not strip non-numeric characters from Number-type columns with any of the specified values as a Title.
Text Format When Migrating as a Discussion Board
When an eRoom Database is migrated into SharePoint as a Discussion Board, the discussion column will be migrated as a Rich text column instead of an HTML text column by default. To migrate the discussion column as an HTML text column, do the following:
In the ApplicationSettings.xml file, navigate to the MigrateDiscussionColumnAsRichText entry, and change its value from True to False.
Note that this entry will not be available until at least one eRoom Discussion Board has been migrated.
Once ApplicationSettings.xml is saved, all databases migrated as SharePoint Discussion Boards will now use an HTML text column instead of a Rich text column.
Changing the Formatting of eRoom Database Change Logs
By default, eRoom Change Logs are migrated as rich text entries. This preserves the change log table's structure, as well as any applied HTML formatting.
In the ApplicationSettings.xml file, navigate to the EnablePlainTextHistory entry and change its value to True.
Once ApplicationSettings.xml is saved, all Database Change Logs will be migrated as plain text.
eRoom links are a special case of list migration because the eRoom and SharePoint handling of these objects is slightly different. In eRoom, links are stored independently within eRoom containers of any type, and not in a specific list. Conversely, in SharePoint, links must be contained in Links lists. For this reason, Metalogix Content Matrix handles these objects differently than other eRoom list types. There are a few cases to consider.
·If a single eRoom link item is copied, it can only be migrated into a SharePoint Links List (this is the only target that will work for a copy of this level).
·In the event that an entire eRoom container containing links is migrated, the resulting SharePoint site will automatically have a Links list created, at the appropriate place(s) in the hierarchy. The individual links in the source eRoom container will be placed in these SharePoint list.
To initiate the migration of a single link:
1.In Explorer View, select the eRoom link to be migrated.
2.Right-click and choose Copy eRoom Link(s).
3.Select the SharePoint Links list to which you want to migrate the link(s).
4.Right-click and choose Paste eRoom Link(s).
5.There are no configuration options for this action, so the migration of the links will start immediately.
Alternately, if a SharePoint container that contains links is selected, the content can be migrated using the Paste eRoom Container Special > All Items option. Please see the Migrate All Items of an eRoom Container page for more details.
The Paste [Object] dialog provides a tabbed interface that enables you to configure a migration according to your specifications. Available tabs will vary based on the type of migration that you initiated.
If you chose to migrate an eRoom as a SharePoint Site Collection, complete the Site Collection Options tab as described below.
To configure Site Collection Options:
1.Select the existing Web Application within which you want to create the collection from the drop-down.
NOTE: If the Self-Service Mode was selected this option will be set to the default web application and cannot be changed.
2.Enter a Site Title and optional Description.
3.If different than the default, select a default Language for the new site collection.
NOTE: Only languages that have language packs installed in SharePoint will be available for selection.
4.If different than the default, select a base Template for the new site collection.
5.If the Web Application into which you are migrating the Site Collection has more than one Content Database and you would like to specify the one you want to use, select it from the drop-down.
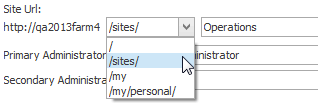
6.Select the appropriate managed path and enter the URL name in the Site URL field.
NOTE: The text box is only available when the managed path is not set to the root of the site (as this would overwrite the actual root site), but is available when the managed path is not set to the root.
7.If different from the default (the migrating account), enter the user account that will be the Primary Administrator for the new Site Collection.
The migrating should be set as the Primary (or Secondary) Administrator to help ensure that the account can access the new site collection after its creation, so it can migrate the remaining content.
8.(Optional) Enter a user account that will be the Secondary Administrator for the Site Collection.
NOTE: This field does not authenticate, so any spelling mistakes will not be automatically corrected.
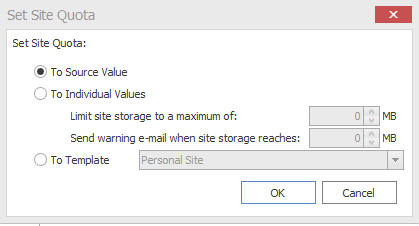
9.If you want to set a Site Quota:
a)Check the Set Site Quota box.
b)Click the [ ] button to display the Set Site Quota dialog.
c)Select the appropriate option:
§To Source Value (default) - the quota value from the source site will be used.
§To Individual Values:
§Limit site storage to a maximum of: "X" Mb - The maximum size of the new site collection., in megabytes (Mb)
§Send warning e-mail when site storage reaches: "X" Mb - The size at which to send a warning e-mail to the Site Collection Administrator, that the site collection is getting near it's set volume capacity.
§To Template - Match the same value for a site template on the target side.
NOTE: This drop down list will only display site templates that contain a site quota value.