Edit Objects
Toad Data Modeler allows you to edit objects from multiple places. See the following options.
To edit objects on the Workspace
Double-click or Enter the selected object.
To edit objects from Model Explorer
Find the object in tree and double-click it (or right-click | Edit).
|

|
Note: Double-clicking in Model Explorer does not highlight the object on the Workspace (WS) but opens the Object Properties dialog instead. To highlight a object on WS, right-click and select Find on Workspace. |
To edit objects from Objects menu
- Select an object on Workspace or in Model Explorer.
- Select Objects Menu | Edit
To edit objects from Model menu
- Select Model Menu | Model Items | the object type (e.g. Entities).
- In the dialog (Entities), select the object and click Edit.
Buttons in Object Properties dialogs:
 - opens the Application Variables form
OK - confirms changes, closes the form/dialog
Cancel - cancels changes
Apply- confirms changes, doesn't close the form/dialog
Help - Help navigation
Note: Objects of your model that have the Generate checkbox disabled in their Properties dialogs are displayed in Model Explorer this way:
Format Objects
To set format for new models (models that you will create)
- Select Settings | Options | Model section | Physical/Logical Model.
- Define options on tabs General, Workspace, Shape, Note Lineand Entity.
- Press CTRL+N to create a new model.
The format will be used for new models/workspaces. Using this option you cannot change format of objects in already existing models.
To change format of objects in existing models
- Right-click the Workspace and select Workspace Format.
The format is applied to all objects on current Workspace, that share the Workspace format and all objects that you will create on the Workspace.
|
Example
You have two entities on your Workspace. One has blue brush color and the other one has red brush color. Your Workspace has red brush color. When you change your Workspace format brush color from red to white, the entity with red brush will also change. |
|
General Tab |
Description
|
|
Auto Complete |
This option automatically adds newly created objects to all Workspaces where this option is enabled.
Select Settings | Options | Physical Model | Workspace tab where you can:
a] Check the Auto Complete checkbox
- All newly create Workspaces will have this option enabled.
b] Uncheck the Auto Complete checkbox
- Except for the All Items workspace, all newly created workspaces will have this option disabled.
|
|
Note: The All Items workspace is intended to serve as a main workspace for your models, containing all model objects. By default, all newly created objects in other workspaces are created in All Items workspace as well. This can be disabled by unchecking Auto Complete option in the Workspace Format dialog (right-click the workspace in Model Explorer). | |
|
Hide Line Captions |
Select this option to hide relationship names on Workspace. |
|
Font Settings |
Contains several font settings such as font type, style, size etc. |
| Shape Tab |
Description |
|
Recalculate Size |
Select this option to automatically adjust size of an object (entity, note) to fit the length of the text it contains. |
|
Shadow Effect |
Displays shadows in ER diagram. |
|
Use Brush Color for Full Shape |
The object brush color will be used as main color of the object shape. |
| Note Line Tab |
Description |
| End Type 1, 2 |
You can select endings for note lines here. |
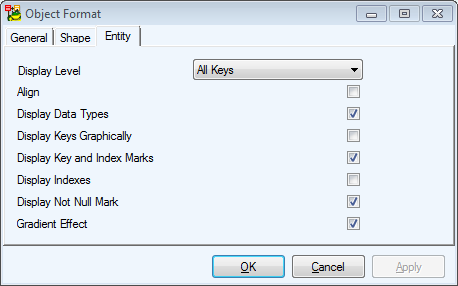
| Entity Tab |
Description |
| Display options |
Defines display options for entities such as the display level, what properties should be displayed etc. Options for Physical model differ from those in Logical model. |
To change format of a particular object
Right-click the object on the Workspace and select Format.
|
|
TIP:
- You can arrange objects on Workspace in different layers. Arrange Objects in Layers
- If you need to preserve format of a particular object when you change the format of your Workspace, select the Lock Format option in the Object Format | General tab.
|
Select Objects
To select multiple objects on Workspace:
- Hold SHIFT and click the objects you want to select. This option works regardless of the currently used Selection tool.
- Drag your mouse over the objects on Workspace.
|
|
Note: If you drag your mouse from the left side, only the objects that are entirely in the selection box will be selected. If you drag your mouse from the right side, all objects that are partly in the frame will be selected. |
|
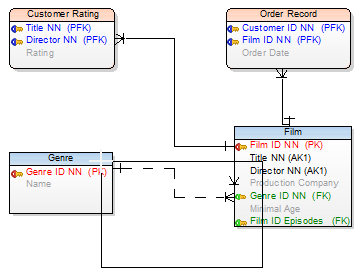
Scenario
You want to select Customer and Order Record entities and the relationship between them.
Solution: Drag your mouse from the left side as long as both entities are completely in the frame (see the image below).
Release your mouse button. Objects have been selected.
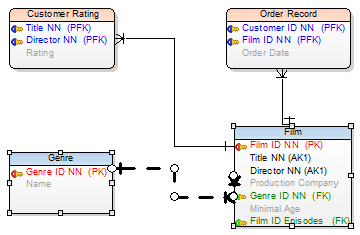
The result will be the same if you drag your mouse from the right side and include even a small part of the two entities in the frame.
|
To select more objects on WS by category or schema/owner
- Right-click the Workspace | Select Objects.
- Define a category or owner, or category and owner and click Select.
To select child and parent objects of the selected entity on the Workspace
Right-click the selected entity and select Select | Parent Objects or Select Child Objects or Select Parent and Child Objects.
To select multiple objects in Model Explorer and grids (e.g. Entity Properties form)
Use SHIFT or CTRL keys.
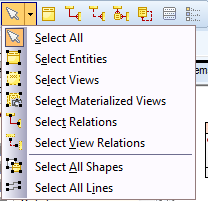
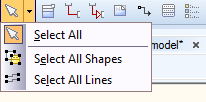
To select a specific type of objects on Workspace:
There are several tools to select specific objects in Toad Data Modeler. All of them are located under the  button on Model Objects Toolbar. Once you select a tool from the dropdown menu, you are only able to select the object type you chose (e.g. with Select Entities tool you are able to select entities only).
Physical Model Selection tool options:
Logical Model Selection tool options:

Metamodel Selection tool options:
Align Objects
|
|
TIP: When aligning objects manually, you might want to use the Snap to Objects function. |
To align objects on Workspace
- Select objects you want to align.
- Select align style from the Alignment Toolbar.

Additional options for object arrangement and size change can be found in Objects Menu.
| Arrange |
Various options for arranging objects into layers:
- Bring to front - brings the object to the top layer.
- Bring forward - brings the object one layer up.
- Send backward - sends the object one layer down.
- Send to back - sends the object to the bottom layer.
|
| Arrange | Setting |
Opens Object Format dialog and focuses the Z-order (layer of selected object, higher number - upper layer) |
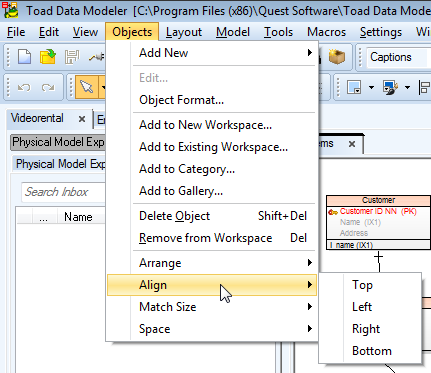
| Align |
Aligns multiple selected objects:
|
| Match size |
Matches sizes of multiple selected objects:
- Width
- Height
- Width and Height
|
| Space |
Offsets selected objects by the same length:
- Vertical Equally
- Horizontal Equally
|
