In this topic, you can find sample scripts that can be executed via Scripting Window or used in user macros.
Reorder attributes/columns
Option 1:
Attributes.InitSort();
//set ordinal values as you need
var temp = Attr1.Ordinal;
Attr1.Ordinal = Attr2.Ordinal;
Attr2.Ordinal = temp;
Attributes.Sort(); //it will get ordered according to the ordinal values set for individual items
Option 2:
Attributes.Move(2,0) // Moves the third attribute to the place of the first attribute (parameters are current_index,
The first parameter is the Current index in the list and the second is the index where an item should move.
Refresh of Model Explorer and Workspace
RefreshAllWorkspaces
- Refreshes all Workspaces of currently active model.
RefreshWorkspace
– Refreshes the selected Workspaces by ID.
RefreshModel
– Refreshes all Workspaces and also Model Explorer.
Add a Relationship and Key
//Create Relation with Shortcut on WS workspace
var Rel = Model.AddLink(2004,ParentEntShape.ID, ChildEntShape.ID, WS.ID);
OR
//Create Relation without Shortcut
Model.AddLinkObject(2004, ParentEnt, ChildEnt);
Add Columns to Keys
Key.AddAttribute(Attr)
– Adds an attribute to key.
Key.CommitChanges()
– Propagates the changes.
Possibility to Set User Rights
//SelectedObject - Every object that can have permission (Entity, Function, Procedure etc.)
//User - User or User Group
Model.AddUserRight(SelectedObject, User, 'SELECT', 'Grant');
Accessing First Entity in First Model
function main()
{
var app = System.GetInterface('Application');
var Model = app.Models.GetObject(0); // first model in Application View
var Entity = Model.Entities.GetObject(0); // first entity in a model
...
...
}
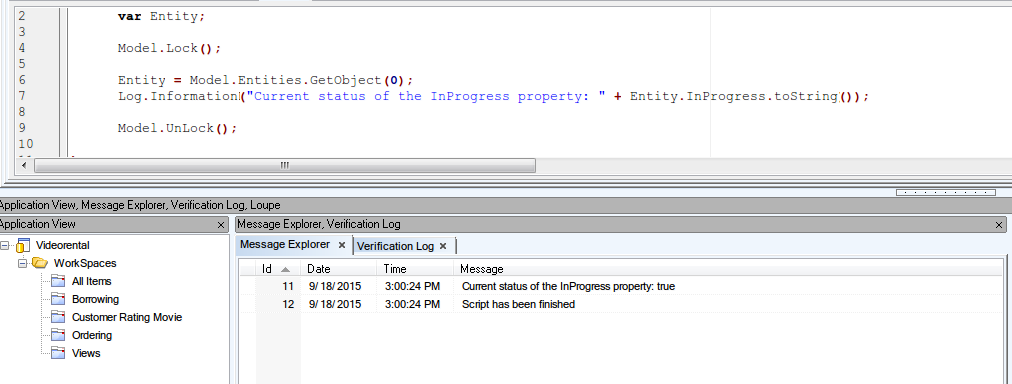
Using Lock and Unlock Methods
It is good to use the Lock and Unlock methods, otherwise you will not see changes on your Workspace directly. Use both methods to make safe modifications and refresh your WS automatically.
function main()
{
...
Entity.Lock();
Entity.Name = "new_name";
Entity.UnLock();
...
Accessing Log (Message Explorer)
Use the following to make Log accessible.
function main()
{
...
Log = System.CreateObject('Log');
...
}
Iterating Entities and Modifying Second Parameter of Attribute Data Type
This sample is for Oracle models only and changes the second parameter of Char(x) and Varchar2(x) data types to BYTE.
function main()
{
var app = System.GetInterface('Application');
var Model = app.Models.GetObject(0);
var e, a, Entity, Attribute;
Model.Lock();
for (e=0; e<Model.Entities.Count; e++) // iterate entities
{
Entity = Model.Entities.GetObject(e);
Entity.Lock();
for (a=0; a<Entity.Attributes.Count; a++) // iterate attributes
{
Attribute = Entity.Attributes.GetObject(a);
if ((Attribute.DataType.Caption == "Char(x)") || (Attribute.DataType.Caption == "Varchar2(x)"))
{
Attribute.DataTypeParam2 = "BYTE";
}
}
Entity.UnLock();
}
Model.UnLock();
}
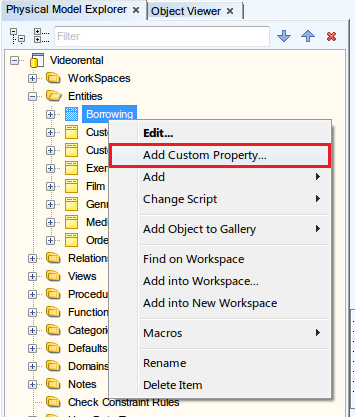
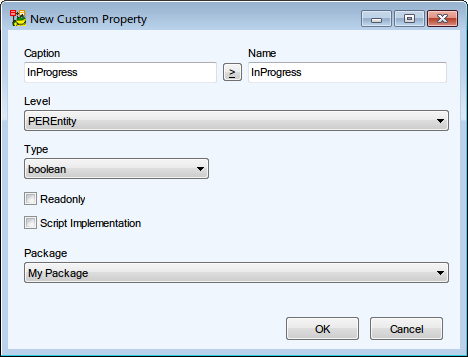
Creating New Entities
function main()
{
var app = System.GetInterface('Application');
var Model = app.Models.GetObject(0);
Model.Lock();
var Entity = Model.CreateNewObject( 2002 );
Entity.Name = 'MyNewEntity';
Model.UnLock(); // Refresh all windows associated with your model
}
Object type of PEREntity is 2002. More information can be found in the Reference document. Click Help | Reference to open the Reference.
Converting Entity and Attribute Names to Lower Case
function main()
{
var app = System.GetInterface('Application');
var Model = app.Models.GetObject(0);
for (e=0; e<Model.Entities.Count; e++)
{
Entity = Model.Entities.GetObject(e);
Entity.Lock();
Entity.Name = Entity.Name.toLowerCase();
Entity.UnLock();
Log.Information("Name of entity "+Entity.Name+" was changed.");
for (a=0; a<Entity.Attributes.Count; a++)
{
Attribute = Entity.Attributes.GetObject(a);
Attribute.Lock();
Attribute.Name = Attribute.Name.toLowerCase();
Attribute.UnLock();
Log.Information("Name of attribute "+Attribute.Name+" in entity "+Attribute.Owner.Name+" was changed.");
}
}
}
Note: The toLowerCase function is a JavaScript function.
Adding a Prefix to Entity, Index and Trigger Names
function main()
{
var prefix = "abc"; // defined prefix
var regular_expression_prefix = new RegExp(prefix+"_");
var app = System.GetInterface('Application');
var Model = app.Models.GetObject(0);
// Entities
for (e=0; e<Model.Entities.Count; e++)
{
Entity = Model.Entities.GetObject(e);
if (Entity.Name.search(regular_expression_prefix) == -1) // if prefix is not used in name
{
Entity.Lock();
Entity.Name = prefix+"_"+Entity.Name;
Entity.UnLock();
Log.Information("Name of entity "+Entity.Name+" was changed.");
}
// Indexes
for (i=0; i<Entity.Indexes.Count; i++)
{
Index = Entity.Indexes.GetObject(i);
if (Index.Name.search(regular_expression_prefix) == -1) //if prefix is not used in name
{
Index.Lock();
Index.Name = prefix+"_"+Index.Name;
Index.UnLock();
Log.Information("Name of index "+Index.Name+" in entity "+Index.Owner.Name+" was changed.");
}
}
// Triggers
for (t=0; t<Entity.Triggers.Count; t++)
{
Trigger = Entity.Triggers.GetObject(t);
if (Trigger.Name.search(regular_expression_prefix) == -1) //if prefix is not used in name
{
Trigger.Lock();
Trigger.Name = prefix+"_"+Trigger.Name;
Trigger.UnLock();
Log.Information("Name of trigger "+Trigger.Name+" in entity "+Index.Owner.Name+" was changed.");
}
}
}
}
Renaming NotNull Constraints
The script is for Oracle models only. It goes through all NotNull attributes and sets their notnull constraint name in format NN_nameoftable_number. For names exceeding 30 characters, it will truncate the NN_nameoftable part.
function main()
{
var app = System.GetInterface('Application');
var Model = app.Models.GetObject(0);
for (e=0; e<Model.Entities.Count; e++)
{
Entity = Model.Entities.GetObject(e);
count = 0;
for (a=0; a<Entity.Attributes.Count; a++)
{
Attribute = Entity.Attributes.GetObject(a);
count++;
if (Attribute.NotNull)
{
ConstraintNotNullName = "NN_" + Entity.Name;
SumLength = ConstraintNotNullName.length + 1 + count.toString().length;
if (SumLength > 30)
ConstraintNotNullName = ConstraintNotNullName.substr(0,30-(count+1));
ConstraintNotNullName = ConstraintNotNullName + "_" + count.toString();
Attribute.ConstraintNotNullName = ConstraintNotNullName; // change name of index
Log.Information("NotNull Constraint Name of attribute "+Attribute.Name+" in entity "+Attribute.Owner.Name+" was changed.");
}
}
}
}
Selecting Override Identity Checkboxes at Once
This script is valid for Microsoft SQL Server 2000 and Microsoft SQL Server 2005 models only.
You can use the script provided that you set autoincrement in a domain, use the domain in PK attribute and create relationship to another entity. In this case, FK attribute with the domain (and identity) will be created in child entity. However, you need to override the identity. Not to do it for each FK attribute individually, you can run this script that goes through all FK attributes and automatically selects the checkbox Override Identity. After you execute the script, take a look at the Log window where all entities and attributes where the checkbox was selected is written out.
function main()
{
var app = System.GetInterface('Application');
var Model = app.Models.GetObject(0);
for (e=0; e<Model.Entities.count; e++)
{
Entity = Model.Entities.GetObject(e);
for (a=0; a<Entity.Attributes.count; a++)
{
Attr = Entity.Attributes.GetObject(a);
for (i=0; i<Attr.PKForeignKeys.count; i++)
{
PKAttr = Attr.PKForeignKeys.GetObject(i).AttrParent;
FKAttr = Attr.PKForeignKeys.GetObject(i).AttrChild;
if (PKAttr.Domain != null)
{
if (PKAttr.Domain.Identity)
{
Log.Information(FKAttr.Owner.Name+"."+FKAttr.Name);
FKAttr.Identity_override = true;
}
}
}
}
}
}
Why Do We Need a New Package?
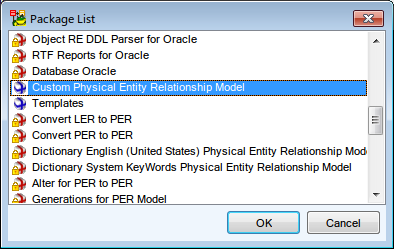
Packages are containers for groups of scripts, customized Form definitions, metamodels etc. In Toad Data Modeler, the following three types of packages may exist.
- System packages - have the lowest priority (distributed with Toad Data Modeler application).
- Add-on packages - have higher priority than system packages (can be downloaded from web site, shared among users etc. No add-on package exists after installation.).
- My Package - has the highest priority (created automatically upon installation of Toad Data Modeler).
User packages exist as separate XML files with extension .TXG. System packages are in binary format with extension .TBG.
You can make your modification without the necessity to create a new package, but all scripts and modifications you will ever make will be stored in the My Package.txg file. If you plan to share your modifications with others, it's a good idea to create a new package for this purpose. In this example, we will create a new package CustomerFeedback, and store all scripts used in this tutorial, metamodel and form modifications into this package. It will give us the possibility to share the CustomerFeedback.txg file with others.
Create a New Package
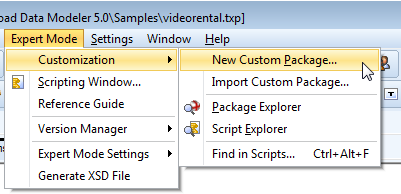
Click Expert Mode| Customization | New Package or activate Package Explorer and click the New Custom Package icon.
Define Name of the package.

Select packages on which the new package depends. In this example, the Customer Feedback will not be dependent package. It will just extend existing packages.
Example of dependent package: Package RE Microsoft SQL Server 2005 depends on RE Microsoft SQL Server package and extends Microsoft SQL Server 2005 package. (RE is abbreviation for Reverse Engineering.)
Select packages you want to extend. In our example, we will be extending Database Oracle 10g package and HTML Reports for Oracle 10g.
You can write description to the Description tab.
Newly created package will appear in the Package Explorer. You can also see package extensions there. Custom packages have blue icon.
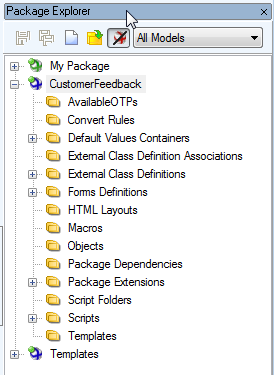
Just to compare, see My Package (where all modifications are stored if you don't use add-on packages) - it has a green icon and is listed at the top.
Well, a new package exists, let's continue adding new properties.
For more information, see Add New Properties in Metamodel.
Properties and methods can be added visually, via Metamodel.
For our purpose, we will need two new properties.
- ConfirmedByCustomer (boolean)
- NotesFromCustomer (string)
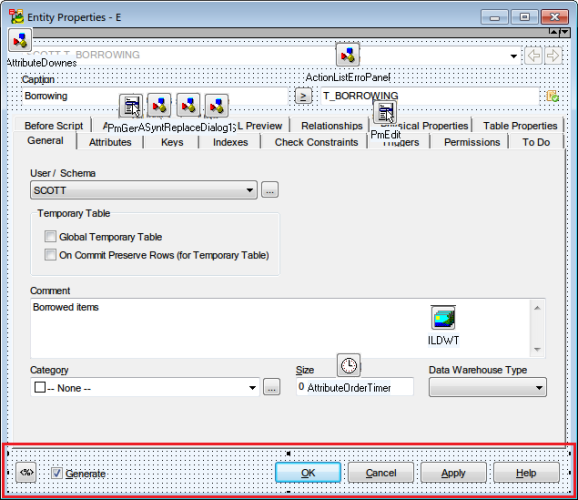
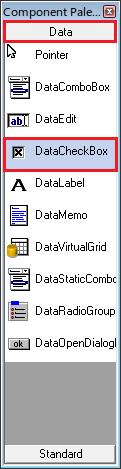
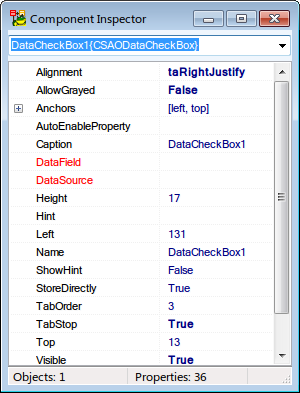
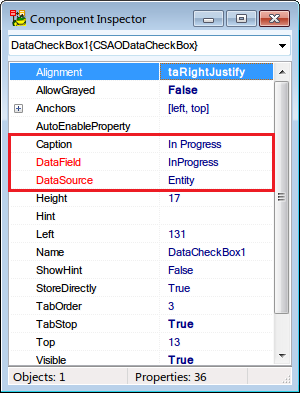
This is where our values will be stored. The properties will be assigned to items that will appear in Entity Properties form. The ConfirmedByCustomer property value will be assigned to a checkbox, and the NotesFromCustomer value will be assigned to a text box.
How To Add New Properties
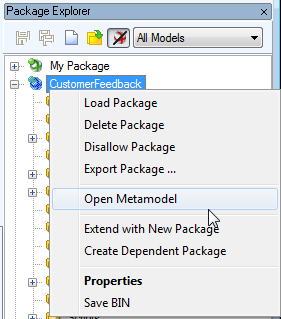
Right-click the CustomerFeedback package and select Open Metamodel.
Empty metamodel digram opens.
Right-click the workspace and select Add Class...
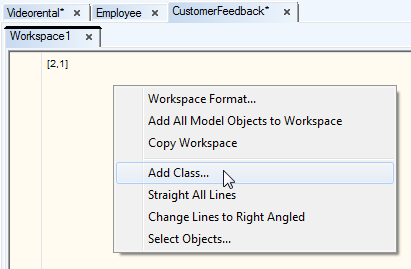
Select class you want to extend. For our purpose, we need to extend PEREntityOR10 class.
PER - Physical Entity Relationship model.
Entity - Items must be accessible in the Entity Properties form.
OR10 - Modification will be made for Oracle 10g only.
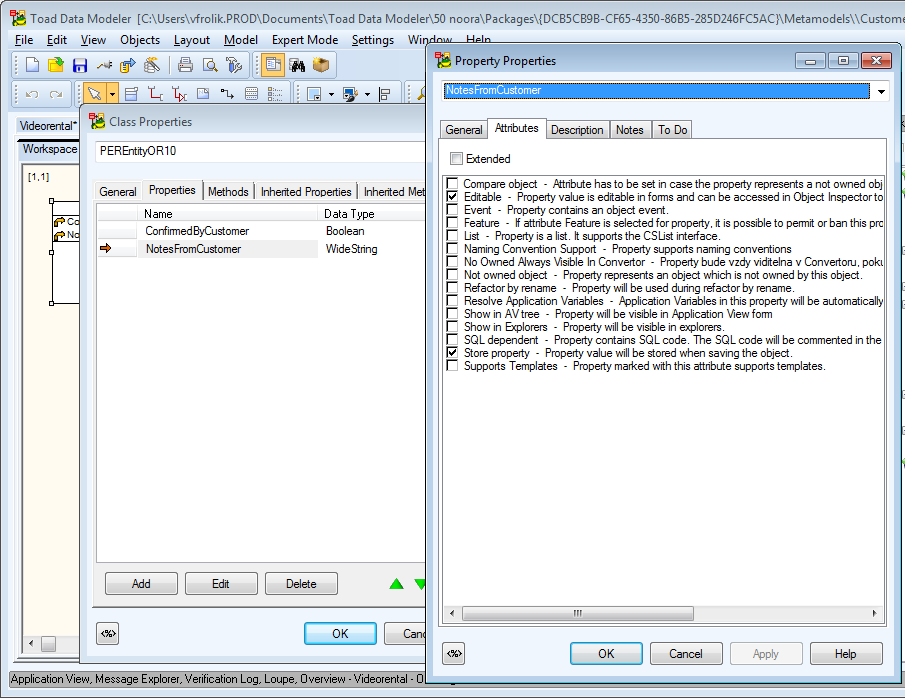
Select the newly added class and right-click it. Select Edit.

Add two new properties to the class.
ConfirmedByCustomer, data type Boolean.
On tab Attributes of the Property Properties dialog, you can define property Attributes. Select Editable (we need to be able to edit the values) and Store Property (we want to store the values with model).
Now define the second Property NotesFromCustomer, on tab Attributes, select the same attributes - Editable and Store Property.
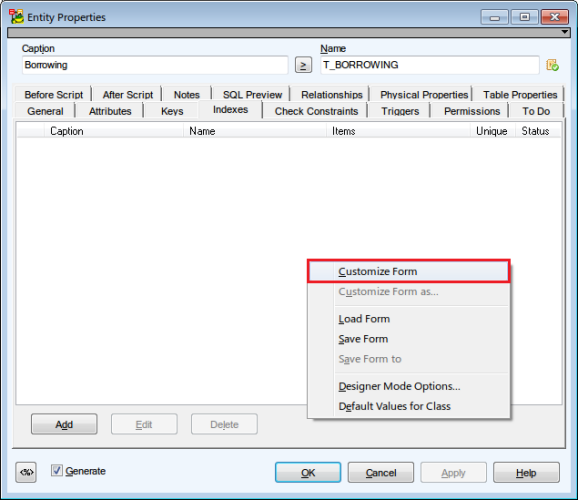
Properties have been added to the metamodel. Now it's necessary to save the metamodel and restart the application. Then we can continue modifying Entity Properties form.
|

|
Note: Metamodels are XML documents stored as .TXM files. |
For more information, see Modify Form.