This section provides conceptual and procedural information to help you understand and configure replication in Rapid Recovery.
Replication is the process of copying recovery points from one Rapid Recovery Core and transmitting them to another Rapid Recovery Core for disaster recovery purposes. The process requires a paired source-target relationship between two or more Cores.
The source Core copies the recovery points of selected protected machines, and then asynchronously and continually transmits that snapshot data to the target Core.
Unless you change the default behavior by setting a replication schedule, the Core starts a replication job immediately after completion of every backup snapshot, checksum check, mountability check, and attachability check. Log truncation of any type also triggers a replication job, as does checking the integrity of recovery points or of an Oracle database. If any of these actions are included in nightly jobs, then completion of nightly jobs also triggers a replication job. For more information, see Scheduling replication.
|
|
NOTE: When you replicate data for a cluster, you must replicate the entire cluster. For example, if you select a node to replicate, the cluster is automatically selected. Likewise, if you select the cluster, all nodes in that cluster are also selected. |
For optimum data security, administrators usually use a target Core at a remote disaster recovery site. You can configure outbound replication to a company-owned data center or remote disaster recovery site (that is, a “self-managed” target Core). Or, you can configure outbound replication to a third-party managed service provider (MSP) or cloud provider that hosts off-site backup and disaster recovery services. When replicating to a third-party target Core, you can use built-in work flows that let you request connections and receive automatic feedback notifications.
Replication is managed on a per-protected-machine basis. Any machine (or all machines) protected or replicated on a source Core can be configured to replicate to a target Core.
Possible scenarios for replication include:
|
|
NOTE: In this scenario, customers only have access to their own data. |
Possible replication configurations include:
Figure 1: Point-to-point replication configuration
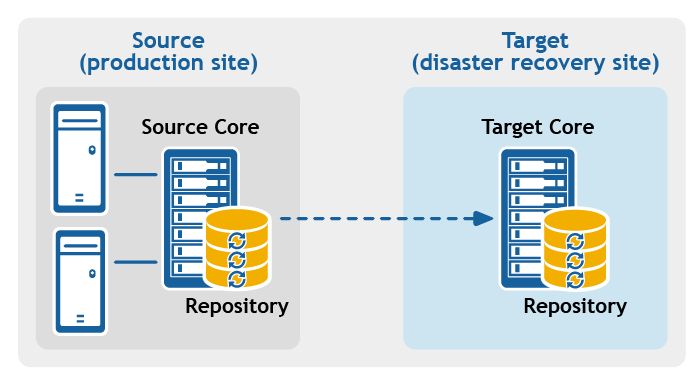
Figure 2: Multipoint-to-point replication configuration
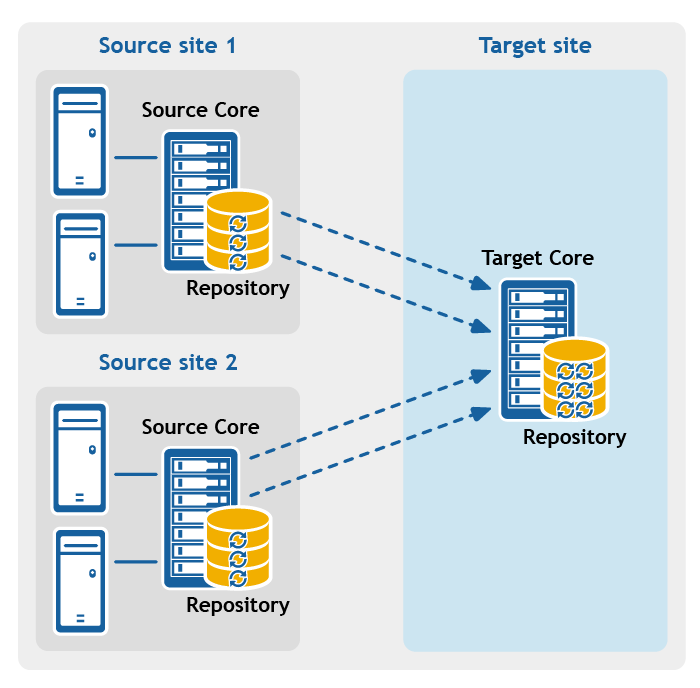
Figure 3: Point-to-multipoint replication configuration
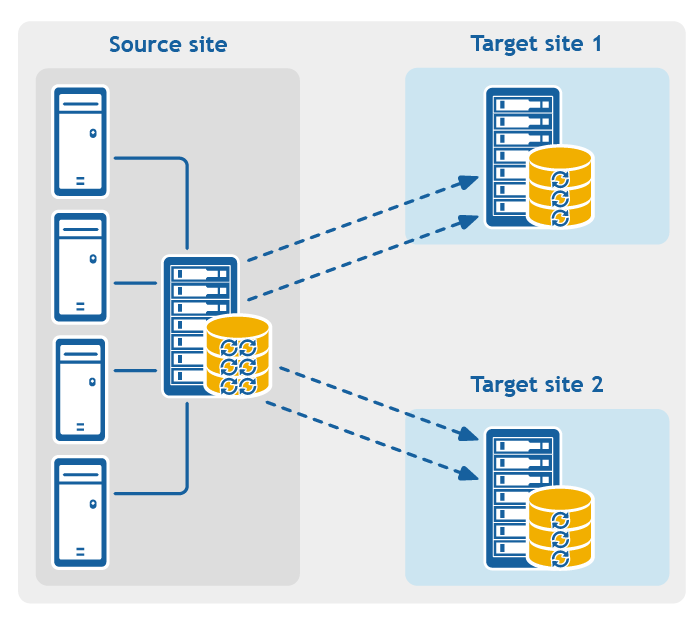
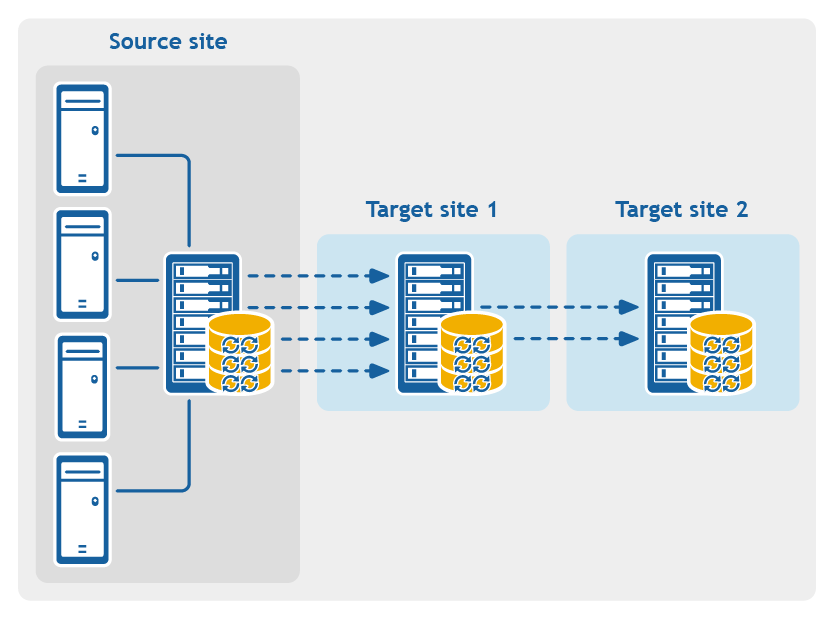
Figure 4: Multi-hop replication configuration
Rapid Recovery captures snapshots of a protected machine, and saves the data to a repository as a recovery point. The first recovery point saved to the Core is called a base image. The base image includes the operating system, applications, and settings for each volume you choose to protect, as well as all data on those volumes. Successive backups are incremental snapshots, which consist only of data changed on the protected volumes since the last backup. The base image plus all incremental snapshots together form a complete recovery point chain.
From a complete recovery point chain, you can restore data with ease and confidence, using the full range of recovery options available to Rapid Recovery. These options include file-level restore, volume-level restore, and bare metal restore.
Since logically you cannot restore from data that does not exist, in the case of an incomplete recovery point chain, you cannot restore data at the volume level or perform a bare metal restore. In such cases, you can still restore any data that does exist in a recovery point at the file level.
If the information you want to restore from a recovery point is in a previous backup that is not available to the Core (an earlier incremental snapshot or the base image), the recovery point is said to be orphaned. Orphaned recovery points are typical in some replication scenarios.
For example, when you first establish replication, your options for restoring data from the replicated recovery points are limited. Until all backup data from the source Core is transmitted to the target Core, creating full recovery point chains from the orphans, you can only perform file-level restore.
By default, replication transfer jobs are automatically queued by the Core immediately after each regularly scheduled backup transfer completes. Thus, unless the replication schedule for a protected machine is customized, its replication schedule is based on its standard backup snapshot schedule.
When you first set up replication, if one or more recovery points exist on the source Core, the replication process begins immediately, unless:
If you pause replication initially, replication begins when you explicitly resume replication.
If you set up replication and specify the use of a seed drive, replication to the target Core begins with the next regularly scheduled backup snapshot.
|
|
NOTE: You can also force a backup of the protected machine after establishing replication. This causes replication to begin immediately after the protected machine snapshot completes. |
If you specify a seed drive when you set up replication, only future backup transfers are replicated. If you want existing recovery points from the original protected machine to exist on the target Core, you must seed data from the protected machine. To seed data, create a seed drive from the source Core, and then consume the seed drive on the target Core.
You can also customize the replication schedule for a protected machine. For example, if you use the default protection schedule of one backup per hour, you can specify that the source Core replicate to the target Core at a different schedule (for example, once daily at 2AM).
The following topics discuss restoring from replicated data and whether you need to seed recovery point data from the source Core.
When you first establish replication, unless you specify the use a seed drive, the source Core begins transmitting all of the recovery points for the selected machines to the target Core. Transmitting your data over the network can take a good deal of time. Factors involved include the speed of your network, the robustness of your network architecture, and the amount of data to be transmitted to the target Core. For example, if the backup data on the source Core measures 10GB and the WAN link transfers 24Mbps, the transfer could take approximately one hour to complete.
Based on the amount of information you want to copy to the target Core, the seed drive can add up to hundreds or thousands of gigabytes of data. Many organizations choose not to consume the network bandwidth required, and instead opt to define and consume a seed drive. For more information, see Performance considerations for replicated data transfer.
If you specify the use of a seed drive when defining replication, then only recovery points saved to the source Core after you establish replication are replicated to the target Core. Backups saved on the source Core before replication was established will not be present on the target Core until you explicitly seed the data, using the following process.
To avoid slowing down your network with an intensive transfer of historical data, seed your prior backup data to the target Core using a seed drive. A seed drive is an archive file that copies a set of deduplicated base images and incremental snapshots from the source Core. The seed drive file contains the full set of previous recovery points for the protected machines you want to replicate from the source Core to the target Core.
Move the seed drive file to a storage volume which you then make available to the target Core. Then you consume the information from the seed drive. This involves attaching the volume with the seed drive image to the target Core and importing the data to the repository from the Core Console. This process repairs orphans, uniting incremental snapshots replicated to the target Core with their base images, to form one or more complete recovery point chains. This process is sometimes called copy-consume.
Seeding data from your source Core is not always required. For example:
|
|
NOTE: In this case, Quest recommends capturing a new base image immediately before or immediately after setting up replication. This step ensures a full recovery point chain exists on the target Core from which to restore data in the future. |
If one of these situations applies to you, you do not need to seed data. In such cases, replication can be completed entirely from the source Core.
If you set up replication for a Core with existing recovery points and may need to restore at the volume level, want to perform a BMR, or want to restore data from an earlier base image or incremental snapshot, seeding is required. In these situations, consider your seeding needs and strategy. Review the information in this topic and decide whether you will seed to your target Core, and which approach you will use.
If you want your replicated machines on a target Core to have access to data saved previously on the original source Core, seed your target Core using one of the following approaches:
|
|
NOTE: Quest does not recommend seeding large amounts of data over a network connection. Initial seeding potentially involves very large amounts of data, which could overwhelm a typical WAN connection. |
If replicating to a third-party Core, once your media is received by the MSP, a data center representative typically attaches the media and notifies you when it is ready for you to consume (or import) the seed data into the Core.
|
|
NOTE: Because large amounts of data need to be copied to the storage device, an eSATA, USB 3.0, or other high-speed connection is recommended. If the total size of the seed data archive is larger than the space available on the removable media, the archive can span across multiple devices. |
|
|
NOTE: While replication of incremental snapshots can occur between the source and target Cores before seeding is complete, the replicated snapshots transmitted from the source to the target remain orphaned until the initial data is consumed, and they are combined with the replicated base images. |

