
Desktop Authority for VPN Clients
Desktop Authority for VPN Clients
When remote users login to their machines (using cached credentials) and establish a VPN connection to the network, Desktop Authority will not run. Desktop Authority can be configured to fire an event when a network connection (VPN) is established.
Desktop Authority uses Network Location Awareness to detect when a new network connection becomes available. Once the new connection is detected, Desktop Authority will be notified and can then determine whether it will execute for the user.
Configuration settings
Configuring Desktop Authority for VPN Clients requires a few simple registry settings.
|
|
IMPORTANT: Always use caution when manipulating the registry on any computer. Changes made to the registry happen immediately, and no backup is automatically made. Make sure to back up or export the registry key or subkey before making your changes. |

VPN Client configuration settings are made on the client machine to the following registry hive/key depending on the computer's architecture.
- 32-bit: HKEY_LOCAL_MACHINE\SOFTWARE\ScriptLogic
- 64-bit: HKEY_LOCAL_MACHINE\SOFTWARE\Wow6432Node\ScriptLogic
Enable Desktop Authority for VPN Clients
Purpose: Enables or disables the VPN Client feature in Desktop Authority.
Applies to: User Management, Computer Management
Value name: EnableNLA
Value type: REG_DWORD
Value data: 1 (Enable), 2 (Disable - Default)
Login script validation
Purpose: Desktop Authority for VPN Clients will verify that the user has been assigned SLogic or SLogic.bat as their logon script. Desktop Authority will validate and execute for any user that has SLogic or SLogic.bat configured as their logon script in Active Directory.
If the company implementation of Desktop Authority does not assign Slogic or Slogic.bat as their user's logon script, an alternate script name can be defined using the NLAAltScript value. The specified script is used to validate that the user logged into the computer is a Desktop Authority user.
|
|
Note: Multiple alternate script file names may be specified. Delimit each file name with a comma. |
Applies to: User Management, Computer Management
Value name: NLAAltScript
Value type: REG_SZ
Value data: The name of the alternate login script file
Examples:
Login.bat
Login.bat,Login,Slogic.bat,Slogic
Connection time interval
Purpose: Desktop Authority will execute when a new network connection is detected and the user's assigned logon script has been validated. If the connection is dropped and then reestablished within 30 minutes, the default, Desktop Authority will not execute again. In order to change the time interval, use the NLAperiod value.
Applies to: User Management, Computer Management
Value name: NLAperiod
Value type: REG_DWORD
Value data: 0 (No Restriction/Disabled), 1 - 86400 (in seconds, default -1800 seconds/30 minutes)
User Management event type
Purpose: When a new network connection is detected and the user's assigned logon script is validated, a Refresh event will be triggered. To override the event that occurs when Desktop Authority executes use the NLAUBMEvent value.
Applies to: User Management
Value name: NLAUBMEvent
Value type: REG_SZ
Value data: Logon or Refresh or Logoff (Default - Refresh)
|
|
Note: If Logon is specified, the Desktop Authority client splash screen will be displayed. However, the client splash screen is not displayed during a Refresh or Logoff event. |
Alternate script location
Purpose: When Desktop Authority is executed, the SLogic.bat file is executed from the NETLOGON shared folder, by default. To instruct Desktop Authority to look in a different location for Slogic.bat use the NLAUBMLocation value. The full UNC path must be entered.
Applies to: User Management
Value name: NLAUBMLocation
Value type: REG_SZ
Value data: path of the logon script (Default - %Logonserver%\Netlogon)
|
|
Note: If the location of the login script is %Logonserver%\Netlogon, the default, then the NLAUBMLocation does not need to be specified. |
Example:
%logonserver%\\Netlogon\DA
\\ServerName\FolderName\SubFolderName
Hide command prompt
Purpose: The main purpose of this registry setting is to allow for troubleshooting in the case where Desktop Authority is not being executed properly.
By default, when Desktop Authority is executed, the command prompt window for SLogic.bat will be hidden. To display the SLogic.bat command prompt window when Desktop Authority is executed, configure the NLAShowWindow value to 1.
Applies to: User Management
Value name: NLAShowWindow
Value type: REG_DWORD
Value data: 0 (Disable– Default), 1 (Enable)
Limit Concurrent Logons
Since Desktop Authority executes during the logon process, which is before the user has control of their desktop, you have the ability to forcibly log off the user if you detect they have logged on too many times.
To Limit Concurrent Logons, you must:
- Share each user’s home directory.
- Configure user logon maximums.
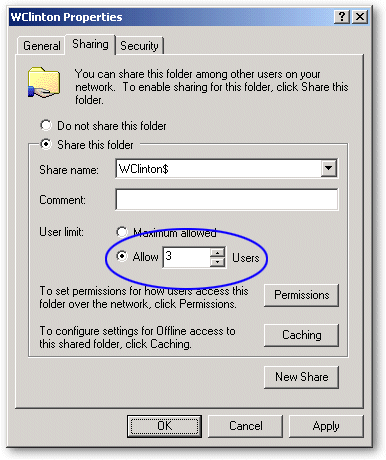
Since the Concurrent User Limit is applied individually to each user's share, you can configure your users to have different concurrent logon maximums while other users (such as Administrators) have no limit. This is done by setting the maximum number of connections in the properties dialog box for the share of the individual’s user folder.
Figure 62: Set the maximum number of logons allowed by setting allowed user logons
Provide a drive mapping in Desktop Authority.
Using the Drive Mappings object within the Manager, map a drive to each user’s Home Directory.
Example:
Map drive H: to the shared folder \\$HomeServer\$HomeDir\
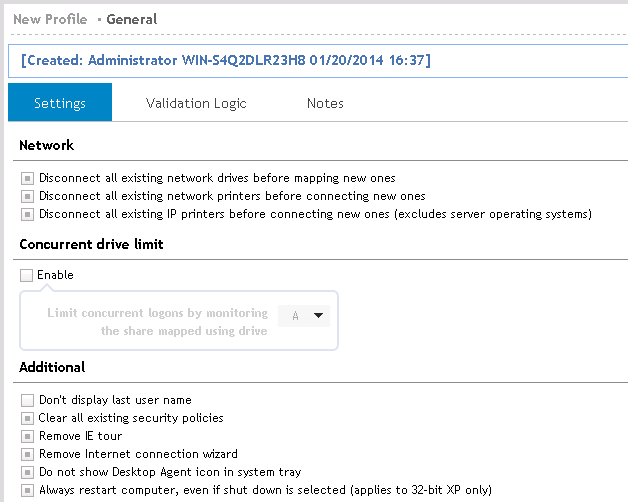
Set the concurrent logons limit.
Tell Desktop Authority what drive letter you are mapping to the user’s share. Do this by selecting the Limit concurrent logons by monitoring the share mapped using drive check box on the General object.
Figure 63: Set the drive to monitor for concurrent logons
Once configured, Desktop Authority will immediately log off any user that attempts to concurrently log on more times than they are allowed.
Root Mapping Home Directories
Root Mapping, step-by-step
The Root Mapping concept originates from the Novell Netware operating system. It allows a drive to be mapped to a directory that looks and acts like a root directory instead of a subdirectory.
Root Mapping to the user’s home directory provides a simple path to the directory. Since all other users’ home directories on the drive are invisible to the user, there is no confusion as to where the directory is. The user does not have to scroll through a list of folders to search for their own folder. This makes it faster to find what they are looking for.
For example, using Desktop Authority, you can “root map” drive letter H: to each user’s home directory and then have Microsoft Office open/save paths default to H:\Documents; you can redirect Internet Explorer’s bookmarks to H:\Bookmarks; you can create Outlook/Exchange mail profiles on-the-fly and store the personal address book and/or personal folders on H:\Exchange; and you can redirect all your shell folder pointers to H:\ShellFolders. Simply put, you end up with the ability for any user to logon to any machine and retrieve all their settings -- without a visit from the network administrator and without using Roaming Profiles!
- Create a base share point for your user's home directories.
- Open Windows Explorer on the server to house home directories. Create a folder called "Users".
- Right click the Users folder you just created and select the Sharing tab. Share this folder as "Users".
Note: You may elect to have multiple base share points spread across one or many servers. Since Desktop Authority can use dynamic variables when mapping drives, you will only need a single entry on the Drive Mappings object to accommodate any configuration you wish. If you have hundreds or thousands of users, you may want to create a more complex "user tree". For example: You may create a "users" folder. Under the users folder, you create "faculty" and "students". Under the students folder, you create "sophomores", "freshmen", "juniors" and "seniors" folders. In this more complex example, the (4) sub-folders of "students" would be the base share points.Replace this text with a description of a feature that is noteworthy.
- Create your users with User Manager for Domains (UMD) or Active Directory.
When creating users with UMD, the key element to root mapping home directories is how you populate the fields of the Profile page for each user.
If your ultimate goal is to map drive letter H: to each user's home directory, choose a different letter here in UMD.
- Now specify the path to the user's home directory. Note that there are three logical pieces to the user's home path (\\server1\users\%username%), each separated by a backslash.
The Desktop Authority dynamic variable for this entire home share string is $HomePath. Separating this path into three logical pieces, the first piece "\\server" is the name of the server that contains the base share point we created in step 1 (The Desktop Authority dynamic variable, less the leading backslashes is $HomeServer). The second piece "users" is the base share point (Desktop Authority dynamic variable: $HomeBase). The last piece is the actual home directory for the user (Desktop Authority dynamic variable: $HomeDir). UMD will automatically translate the %username% environment variable to the user's logon name when you press OK to exit this screen.
When you press OK and save the user, User Manager for Domains will automatically create the user's home directory based on the information entered in this dialog.
- You must grant NTFS permissions to an administrative group so that you can share the user's home directory, and allow your third-party backup program to read any documents stored in this directory.
After you grant Full Control NTFS permissions to each users home directory for your administrative group, you can then share each user's home directory.
- Apply NTFS permissions and share each user's home directory.
Launch Windows Explorer and expand the Users folder to show the users home directories beneath it. Right click on each user home directory and select Properties. Then select the Security tab.
- Add your administrative group (e.g. Domain Admins) to the list with Full Control rights.
- Click Apply and then select the Sharing tab.
- For security, it is recommended that when you create shares for each user's home directory, you make them hidden shares. A hidden share does not show up when your clients browse the network using Windows Explorer and/or Network Neighborhood. A hidden share has a dollar sign appended to the end of the actual share name. Ex. WClint$
Now you can configure Desktop Authority's Drive Mapping object.
Now that the user and their home directory have been created, secured and shared, we can configure Desktop Authority to map a drive letter to the "root" of their home directory.
- Launch the Desktop Authority Manager, from Profiles, select the profile and then the Drive Mappings object. Insert a new configuration element.
- Specify drive H for the drive letter and a shared folder of \\$HomeServer\$HomeDir$$.
Notice how we can leverage the use of Desktop Authority's dynamic variables so that a single entry to the Drive Mappings object will accommodate mapping a drive letter to each user's home directory no matter how many servers and/or base share points exist on your network.
Also, note the use of the trailing double dollar sign. This is due to the way in which the KiXtart engine interprets strings during execution. Since dynamic variables begin with a {$}, we enter a double dollar sign {$$} so that KiXtart knows we don't want to insert a variable at this point -- we simply want a dollar sign appended to the share (i.e. hidden share).
- Save the changes, replicate and exit. Logon from a client to verify your home mapping works as expected.
Implementing a "Low Budget" Proxy
Implementing a Poor Mans Proxy
The ability of Desktop Authority to control proxy settings can even be beneficial even if you don't have a proxy server on your network. With a little creativity, you can create a "Low Budget" proxy which prevents users belonging to a specific group from browsing the Internet.
Implementing this is a simple process. Follow these steps:
- Create two domain groups. Call them InternetAccess and NoInternetAccess.
- Select the Internet Explorer Settings object. Insert a new configuration element and configure the proxy settings for the NoInternetAccess domain group. Enable the use of a proxy server by selecting the Use a proxy server check box. Enter an invalid TCP/IP address (or the address of your Intranet server) as the Proxy Server address.
By selecting the Bypass proxy server for local addresses check box, you could allow access to a small list of company/business related sites.
Set the Validation Logic Type to Group Membership with a Value of the NoInternetAccess domain group. - From the Internet Explorer Settings object, highlight the newly created element and copy it (CTRL+C). This will create a new Internet configuration element and select it for edits. Clear the Use a proxy server check box.
Set the validation logic type to Group Membership with a value of the InternetAccess domain group.
- The final step is to define a security policy that will disallow a user from changing the proxy server configuration.
Select the Security Policy object. Insert a new configuration element and configure the Internet Explorer: Disable changing proxy settings policy.
Select Enable from the Enable/Disable list.
Select Internet Explorer from the Category list.
Select the Internet Explorer: Disable changing proxy settings from the Policy list.
Modify the default Validation Logic to apply this policy for Group Membership, NoInternetAccess.