Administrative Template files are used by the Group Policy Templates object to describe security policy settings and where they are stored in the registry. Administrative templates include a policy category, policy options and registry settings for each policy contained within the template. Group Policies are rules that administrators can employ to enforce a specific desktop environment. Policies can apply to the entire domain or an individual computer or user. They are made up of a combination of one or more Registry keys.
There are several standard administrative templates that are installed with Windows 2008, 7, 8.1, 10, 2008 R2 2012, 2012 R2, 2016, and 2019. Additional Administrative templates are available in several of Microsoft's Resource kits, service packs and the Microsoft Download center. Templates can also be created from scratch or customized to meet specific needs. Custom templates are also available online for download from various sources.
Although Microsoft has its own built-in Group Policy editor, Desktop Authority lets you use existing Administrative templates providing a simpler interface for configuring the Group Policies contained within them. Using Desktop Authority's patented Validation Logic allows a policy to be configured to a granular level including OS, Class, Connection Type and more.
All Group Policies that are a part of the selected ADM/ADMX templates will be displayed within their defined categories in the Administrative Templates tree on the Settings tab. ADM Templates are displayed in the Classic Administrative Templates tree and are valid for operating systems prior to Microsoft Windows 7. ADMX Templates are used by Microsoft Windows 7 operating system and above. ADMX Templates are displayed in the Administrative Templates tree. Select a Policy category from the template tree. Once selected, the Policies within the category will be displayed in the Policy list to the right of the tree. Once the policy to be configured is selected, the Policy Setting and Explanation will be displayed.
Configure the Policy on the Policy Setting tab. Once configured, click Apply Changes to accept the changes for the current Group Policy element. Click Discard changes to undo the latest changes. Review a description on the Policy Explanation tab. To save the Group Policy element, click the Save toolbar button.
The Classic Administrative Templates tree displays the categories for all policies within the selected ADM template files. Policies within the ADMX template files are shown in the Administrative Templates tree. Each category displays the policies available for configuration in a list to the right of the category.
Figure 43: Administrative Template Tree
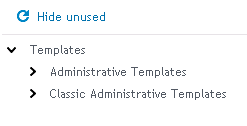
Click the Hide Unused button to hide policies in the list that are not yet configured. If policies are hidden, click Show Unused button to display all policies, configured or not.
The Policy list displays all policies for the category selected in the Administrative Template tree. Click on a policy to select it. Press the Edit button to edit the policy settings.
Figure 44: Policy configuration dialog
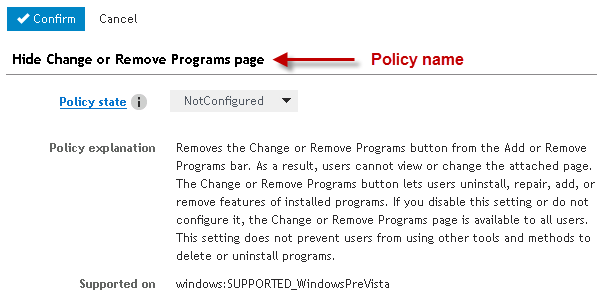
The Policy configuration tab is where each Policy is configured. The setting is displayed along with its configuration state and options. Once the policy's options are set, click Confirm to accept the changes for the current Group Policy element. Click Cancel to undo the most recent changes.
The Policy explanation provides a complete description of the policy and its settings.
Desktop Authority's Group Policy Templates object provides the ability to import Classic Administrative templates and deploy the policy settings contained within them.
Once a Group Policy Template element is added to the configuration list, administrative template settings can be configured. This requires that Administrative templates be imported into the system. By default, the Operations Master's %windir%\inf folder is scanned for existing ADM files. All ADM files that are found are imported into Desktop Authority and copied to the Group Policy folder. By default, CONF.ADM, INETRES.ADM, and SYSTEM.ADM are selected for use in the Group Policy element.
To add a new ADM template to the list, click Import template files. Browse to the ADM template file and select it. Click Select to confirm the selection. The template file will be automatically be imported and added to the list. All policies within the template file are immediately available for use in a Group Policy Templates element.
Select the template file(s) that will be used with this Group Policy Templates element (). Once template files have been selected, select the Settings tab to configure them.
Desktop Authority's Group Policy Templates object also provides support to import ADMX Administrative templates and deploy the policy settings contained within them.
Once a Group Policy Template element is added to the configuration list, administrative template settings can be configured. This requires the Administrative templates be imported into the system.
The ADMX file location defines where Desktop Authority will hold the ADMX file to be used by the system. Upon import, the system makes a copy of the file and places it in the selected file location.
Select Use default location, to use the Desktop Authority default path for ADMX files. This path is %program files%/Quest\Desktop Authority/Desktop Authority 9.0/TemplateFiles. To select a custom path, choose Global location. The Global location path is set on the Global Settings (Global_System_Settings.htm) dialog.
To add a new ADMX template to the list, click Import template files. Browse to the ADMX template file and select it (multiple ADMX files can be selected). Click Open to confirm the selection. The template file(s) will be automatically be imported and added to the list. All policies within the template file are immediately available for use in an Group Policy Templates element. Select the template file(s) that will be used with this Group Policy Templates element (). Once template files have been selected, select the Settings tab.
Select the Validation Logic tab to set the validation rules for this element.
Select the Notes tab to create any additional notes needed to document the profile element.
When adding or modifying a profile object element, the description appears above the settings tab. Enter a description to annotate the element. The default value for new profile elements can be changed by going to the system Preferences.
The Inactivity object allows automatic Logoff, Shut down, Restart, or Locking of a computer based on a period of inactivity occurring within a specified period of time. Inactivity detection time is set in half-hour increments. Inactivity settings are particularly useful in situations where you need users to logoff at the end of the day so appropriate updates are applied to all machines at logoff or the next logon. The Inactivity option of locking a computer when inactive is supported on 2008, 7, 8.1, 10, 2008 R2, 2012, 2012 R2, 2016, and 2019 operating systems only.
To select or clear an inactivity period, highlight a range of cells in the inactivity grid. Press Unselect to clear the cells. Press Select to select the cells. To select an entire day, double click the day of the week label to the left of the grid. To select a specific half-hour increment for every day of the week, double click the blue box in the All row above the grid.
Multiple inactivity settings are supported per computer, if and only if, there are no overlapping inactivity monitoring times. If any part of the detection hours overlap between elements, only the first element will be processed.
For example, if element 1 is monitoring for inactivity between the hours of 5:00am - 7:30pm and element 2 is monitoring for inactivity between the hours of 6:00am - 5:30pm, there is a period of time between 6:00am and 5:30pm which are contained in both elements. In this case, only element 1 would be processed on each applicable client.
Select Logoff, Always Shutdown, Shutdown, Restart, Standby, Hibernate or Lock from the Action list. This action will occur if the computer is considered inactive for the elapsed time specified.
Logoff— When the computer is considered inactive, log the user off.
Always Shutdown — When the computer is considered inactive, Shutdown the system regardless if any users are logged in.
Shutdown — When the computer is considered inactive, Shutdown the system only if there are no users logged in.
Restart — When the computer is considered inactive, Restart the system.
Standby — When the computer is considered inactive, put the system in Standby mode. Standby will turn off the monitor, stop the disk drives and save the current computer state into memory. At the touch of the mouse or keyboard your computer will wake up, and return to the state where you left it. In Standby mode, the computer is put into a low power state.
Hibernate — When the computer is considered inactive, put the system in Hibernation mode. In order for a computer to go into Hibernation, Hibernation mode must be enabled in the computer Power settings. If Hibernation is not enabled on the computer, selecting this option will put the computer in StandBy mode. Hibernate mode will turn off the monitor, stop the disk drives and save the current computer state into memory. The computer will then be turned off. When the computer is restarted it will return back to the state where you left it.
Lock — When the computer is considered inactive, Lock the system.
|
|
NOTE: The Lock and Logoff actions only validate on Terminal Server clients, Member servers and Domain controllers. |
There are some cases when the computer may seem to be inactive but is actually in use. For example, the computer may be running a video or a large procedure that does not require user interaction. To give the user the opportunity to delay the inactivity action for a period of time, specify the number of hours inactivity may be delayed for.
Specify a period of time in minutes for which the computer must be inactive before the Action takes place. A computer is considered inactive based on any keyboard and mouse activity.
Prior to the selected Action (Logoff, Always Shutdown, Shutdown, Restart, Standby, Hibernate, Lock) occurrence, a warning dialog may be displayed for a specified number of minutes. If the warning dialog is responded to, the Action will not take place. Once the warning box is displayed, keyboard and/or mouse activity will not abandon the desired action. The warning box must be responded to in order to cancel the Action.
Specify the text to display in the warning box.
Specify a sound file (.WAV) to play when the inactivity warning is displayed.
Specify the number of minutes to display the warning dialog on the inactive computer.
Click Unselect after selecting a set of cells in the grid to set the selected period of time as unmonitored time.
Click Select after selecting a set of cells in the grid to set the selected period of time as monitored time. Monitored time periods will display as colored blocks.
Click Clear All to remove any selections in the grid.
Select the Validation Logic tab to set the validation rules for this element.
Select the Notes tab to create any additional notes needed to document the profile element.
When adding or modifying a profile object element, the description appears above the settings tab. Enter a description to annotate the element. The default value for new profile elements can be changed by going to the system Preferences.
INI Files provide a means of configuration to many programs. The INI Files object provides a single point of control over changing values in an INI configuration file.
Select an action from the Action list to define how the INI file is to be updated. INI files can be updated by adding or deleting a Section, and/or adding or deleting a Value or Data/Expression within a specific section.
Available actions are:
Enter the name of the INI file to be updated. If no path is specified, Windows will try to locate the file in the Windows directory.
Enter the name of the section that will be updated. If the Section does not exist in the INI file, it will be created. Section names are not case-sensitive; therefore, "ThisSection" is equivalent to "thissection".
Enter the name of the value that will be updated in the INI file. If the Value does not exist in the specified section, it will be created. Value is not applicable when the Action is set to Delete Section.
Enter the data you would like stored in the specified Value. Data is not applicable when the Action is set to Delete Section or Delete Value.
Select the Validation Logic tab to set the validation rules for this element.
Select the Notes tab to create any additional notes needed to document the profile element.
When adding or modifying a profile object element, the description appears above the settings tab. Enter a description to annotate the element. The default value for new profile elements can be changed by going to the system Preferences.
The Legal Notice object allows a company-wide logon banner or notice to be centrally configured. This notice must be acknowledged by pressing the Ok button. The legal notice is displayed on the client prior to actually logging on to the domain. The Legal Notice differs from Message Boxes, in that it is displayed before the user authenticates to the domain. This provides a way for the company to spell out or remind staff of company policies regarding use of the computer network, email, Internet access, etc.
Since displaying a legal notice would interfere with the automatic logon process, the Legal Notice will NOT be applied to any 2008//7/8.1/10/2008 R2/2012/2012 R2/2016/2019 computer if the computer has AutoAdminLogon enabled.
Select this check box to temporarily disable the Legal Notice from displaying on your clients. Clear this check box to configure a legal notice.
Enter a caption for the window frame in which the message text will be displayed. Static text or Desktop Authority Dynamic Variables can be used to configure the window title.
Example:
WARNING: Use of this computer is restricted and monitored!
Enter the actual message text that will be displayed in the Legal Notice window.
Example:
Information contained within this computer system may be protected by the Privacy Act of 1974. All output, both visual and printed, must be marked appropriately and all precautions taken to prevent unauthorized use or disclosure. Do not discuss, enter, transfer, process, or transmit classified/sensitive national security information of greater sensitivity than that for which this system is authorized. This system is approved for SENSITIVE but UNCLASSIFIED information only. This is a Department of Defense (DoD) computer system. This computer system, including all related equipment, networks and network devices (specifically including Internet access), are provided only for authorized U.S. Government use. DoD computer systems may be monitored for all lawful purposes, including to ensure that their use is authorized, for management of the system, to facilitate protection against unauthorized access, and to verify security procedures, survivability and operational security. Monitoring includes active attacks by authorized DoD entities to test or verify the security of this system. During monitoring, information may be examined, recorded, copied and used for authorized purposes. All information, including personal information, placed on or sent over this system may be monitored. Use of this DoD computer system, authorized or unauthorized, constitutes consent to monitoring of this system. Unauthorized use may subject you to criminal prosecution. Evidence of unauthorized use collected during monitoring may be used for administrative, criminal, or other adverse action. Use of this system constitutes consent to monitoring for these purposes.
Select the Validation Logic tab to set the validation rules for this element.
Select the Notes tab to create any additional notes needed to document the profile element.
When adding or modifying a profile object element, the description appears above the settings tab. Enter a description to annotate the element. The default value for new profile elements can be changed by going to the system Preferences.

