Desktop Authority uses replication to provide a method of publishing Desktop Authority configurations to domain controllers. Desktop Authority does this with its own replication process from within the Server Manager. Server Manager sets the configuration of the replication process on the Server Properties tab within the Service Management dialog. Desktop Authority’s replication can be used to replace Windows Directory Replication services or work in conjunction with it. Of course, if Desktop Authority is your only logon script, there is typically no need to add the overhead of Windows' replication process to your domain controllers. Each time changes are made to your configuration using the Desktop Authority Manager, you will save the changes, replicate and then exit. By default, only the changed files will be replicated.
Desktop Authority can be replicated from any page of the Console. A selection box is available in the status bar of the console (bottom).
Choose to Replicate changed files (default, Replicate all files or perform a Force an update of the Desktop Authority folder on clients.
Replicate changed files - Select this option to replicate only those files that have a different date than those on the destination domain controller. If this check box is cleared, all files will be replicated.
Replicate all files- Select this option to replicate all files, regardless of date and time.
Force an update of the Desktop Authority folder on clients- There are various files that are distributed to each client when Desktop Authority is initially configured on each workstation. As time goes on some of these files may need to be updated. To force this update to occur on all clients, select this option.
The Replicate button contains a colored icon which indicates the status of the Manager's current configurations. This tells at a glance if the most recent configuration changes have been replicated.
The icons represent the following statuses:


The Resource Browser dialog, most commonly used to configure validation logic, is used to select a specific object from the network resources. The selectable objects are file name, folder, servers and printers. The contents of the dialog are based on the object that the Resource Browser is called from.
Domains, Users and Groups, Computers and Domain Controllers Active Directory objects can also be optionally shown in the Resource Browser. This option is configured in the system preferences.
The Browse button is used to call the Resource Browser.
A Profile is a collection of elements that define a set of configurations and default profile settings, including log file definitions, default descriptions, default Validation Logic settings, alerts and custom scripts. Profiles are applied to a particular category of users or computers based on the validation logic defined in the profile settings.
A profile may contain other profiles (children). This allows for greater flexibility and further granularity for its contained configuration elements.
User Profiles are evaluated and applied to the current user's working environment during the logon and/or logoff process or Refresh intervals. Computer Profiles are evaluated and applied to a computer during the Startup and/or Shutdown process, Refresh intervals or based on a defined Scheduled. Only profiles that pass the Validation Logic test will be executed at the specified time on the clients and/or computers.
Using profiles enables greater manageability and control over client configurations. Using profiles also offers the reward of faster logon script processing. Since profiles tend to break down a large number of configurations into smaller groups of configurations, not all settings are processed or validated at logon time. If a profile is deemed to be invalid for the client, all elements in the profile are bypassed thus saving the processing time it would have normally taken to validate each of the elements separately.
The Manager displays profiles in the Profiles branch of the Navigation tree. There are separate tabs for User Profiles and Computer Profiles. Click /
on a profile to expand or contract the objects and categories contained within the profile.
Figure 9: Overview of the parts on the navigation pane tree
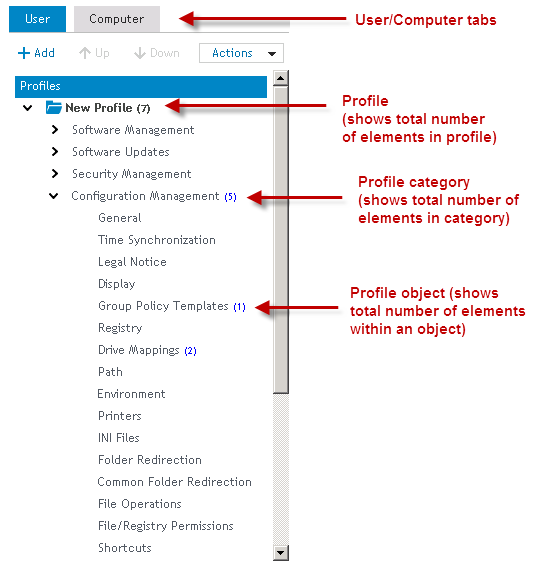
Within each part of the Profile tree, if there are elements within it (Profile, Category, Object) the number of total elements will be displayed within parentheses. Passing the cursor on top of the profile, category or object will display a tooltip with more information about the number of active and inactive elements within the section.
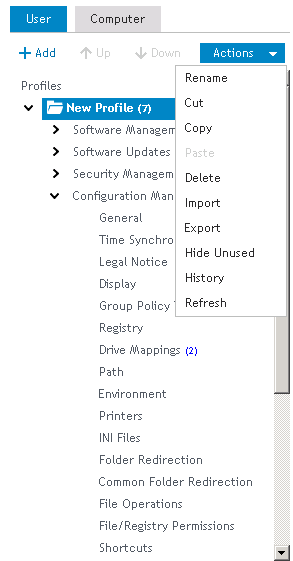
Profiles can be maintained by selecting an action from the Actions drop box. Click Add to create a new Profile. Prior to selecting an action, select either the Computer or User tab and then select either the Profile root or a specific profile to modify.
Figure 10: Select an action from the Actions list
Select Add to create a new profile. The newly added profile will be added to the point in the tree that is highlighted. Select the Profiles root to add a new parent profile. Select an existing profile before the Add to make a new child profile.
Every newly created Parent or Child profile is automatically assigned a Profile Admin Role by default. The Profile Admin role by default has full access to Add, Change and Delete elements in all Profile objects as well as the ability to add, change and delete profiles.
Select Rename to modify the currently selected profile's name.
Select Delete to remove the currently selected profile. If the profile to be deleted contains any children, the child profiles will also be removed. Upon deletion, a confirmation dialog is presented, if selected in Preferences > Confirmations.
Select Delete, Export and delete or Cancel to continue the delete procedure. The Export and delete option will save the profile to a file in a user selected location. The profile could be imported at a later time using the Import action on the Profile Actions menu.
|
|
Note: History cannot undo the deletion of a profile. Please confirm the deletion of the profile before performing the action. |
Profiles may be managed by using the standard Windows Cut/Copy/Paste actions to maneuver them into child profiles or parent profiles. Drag and Drop actions may also be used for this purpose.
Profiles can be imported for the use of restoring a previously exported profile, or for importing it into another Desktop Authority Manager.
Profiles can be exported for the use of a backup, or for importing it into another Desktop Authority Manager. The Export option copies the selected profile's configurations (profile.slc, profile.sld and profile.slp) to a selected location.
|
|
Note: When exporting profiles using Internet Explorer 9 with Enhanced security turned on, the Do not save encrypted pages to disk setting must be turned off in order for the file to be downloaded and saved. IE Enhanced security automatically turns this option on. Since Desktop Authority requires secure pages (https), the files cannot be saved while this option is turned on. |
This option will Show or Hide unused profile elements. This action affects all profiles (parent and children).
Profiles will be evaluated on a client in the order they appear in the Navigation tree. This order can be modified by using the Move Up and Move Down buttons. To move a profile, you must first select it, by clicking on it. Once it is selected (it will be highlighted), press the Move Up or Move Down button based on which way you want to move the profile.
The Desktop Authority Manager keeps track of actions taken during the current session with Desktop Authority.
Figure 11: Example History window
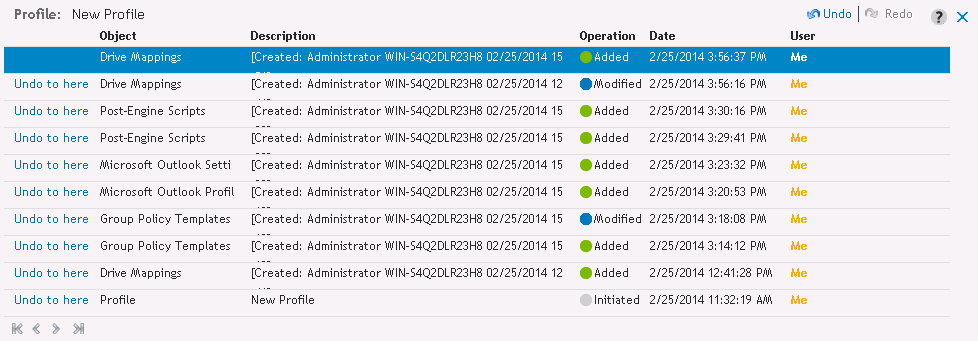
Click History to see the actions that have taken place. Click Undo to go back to a specific action or Redo to repeat and action that was previously Undone.
Operations may be undone by any user, regardless of who originally executed the action, as long as the user has the permission to perform the specific operation. If the user attempts to undo an action to which he does not have permission to, the undo operation will stop at the point where the permission does not exist.
Note: History cannot undo the deletion of a profile. Please confirm the deletion of the profile before performing the action.
Update the Profile tree display.
The View Pane for each object within a profile contains a list of the elements configured for the object.
Figure 12: Configuring Profile elements
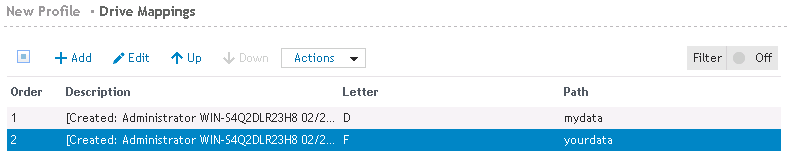
Click Read to see the settings configured for the selected element. Edit the current element by clicking the Edit button.
To the left and right of the element's description (above the tabs), click the arrow icons to move to the previous, next, first or last element configured for the profile object. Each element will be displayed in Read mode.
Figure 13: Profile element in read only mode
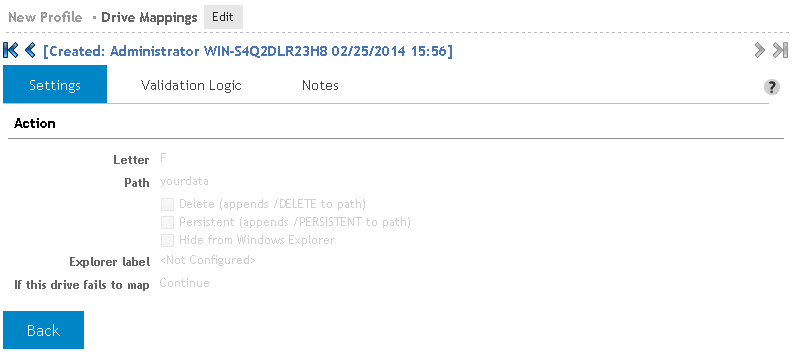
If multiple elements are selected, the fields that contain different data will display a red Merge Conflict warning. Click the Back button to return to the View pane.
Figure 14: Merge conflict warning

Click Add to add a new element to the list or select one or more elements in the list and click Edit to modify. The Settings tab for the element will be displayed. Fill in the settings for the element and click Save to complete the element configuration.
|
|
Note: Multiple elements may be modified at the same time. Any setting that appears in red denotes that the setting for that field differs among the selected elements. |
Click Delete to remove a previously configured element from the object list.
The filter can be used to reduce the number of elements being displayed in the configuration list. One can use this to find a specific element in a large list of elements, analogous to finding a needle in a haystack. Another use might be to use it as a check to make sure all of the elements for a specific operating system are configured.
Click Choose columns to configure the display and order of the columns that are displayed in the element list.
Select the columns that should display in the list. When highlighted, a column can be moved up or down in the list by clicking the up and down arrow icons.
Click Apply to save the changes. Click Default to set the element list display back to its default settings.
Elements in the configuration list can be copied and pasted for duplication, or cut for removal from the list. Use the toolbar buttons above the list for these actions. Select the elements in the list prior to clicking the appropriate toolbar action. Multiple elements may be selected for these actions.
As Desktop Authority processes the configuration elements defined by the list, Validation Logic is applied to each element, beginning at the top of the list. Prioritize the list entries by clicking the Up/Down toolbar buttons to reorganize the list.
The elements in the profile's list can be selected, edited and/or removed one at a time or several at one time. You can select more than one element in the list using the Shift or Ctrl key in combination with a mouse click. To select multiple elements, hold down the CTRL key while clicking the individual servers to select. Consecutive servers in the grid can be selected by clicking the first server to select and then, while holding down the SHIFT key, clicking the last server to select. To select the entire list of servers select the checkbox to the left of the column headers. This box will be empty if no elements are selected and will be filled with a square if some elements are selected. An element's selected status may be changed by clicking on it. If there is only one element in the list, it will always be selected.
Most often, the settings for an object consists of a Settings tab, Validation Logic tab, Description tab and a Notes tab.
The Settings tab contains the configurations options for the object. Some objects may contain other tabs which contain additional object settings.
The Validation Logic tab contains the Validation settings for a configuration element.
The Validation Logic Rules list is not required to contain any rules. If no rules are specified, the element is automatically validated on the client based on the specified Class, Operating System, Connection Type and Timing.
The Notes tab provides an area to add any additional notes needed to document the use of the profile element.

