Chat now with support
Chat with Support

Coexistence Manager for Notes 3.8.4 - User Guide

About the CMN Documentation Suite Introduction CMN Directory Connector
Directory Connector overview Installation and configuration DC Management Console Connector Creation Wizard Connector Advanced Settings Starting and stopping the Directory Connector service
CMN Mail Connector
Mail Connector features overview Coexistence mail routing basics Deployment of CMN Mail Connector Installation Configuration Mail Connector Management Console
CMN Free/Busy Connector The Log Viewer Appendix A: Known limitations Appendix B: Troubleshooting Appendix C: CMN Logs

Deployment of CMN Mail Connector

A single instance of CMN’s Mail Connector may connect through a single Notes server and a single Exchange server, or between multiple mail servers on either or both sides of the CMN service. Regardless of the number of servers or your preferred routing scheme, all mail servers on both sides must be defined in the CMN Mail Connector configuration file. Inbound and outbound servers may be specified to CMN by their DNS names, IP addresses, or MX record notations. For receipt of inbound messages (from the Internet), CMN distributes the traffic among multiple mail servers on either side in a round-robin array.

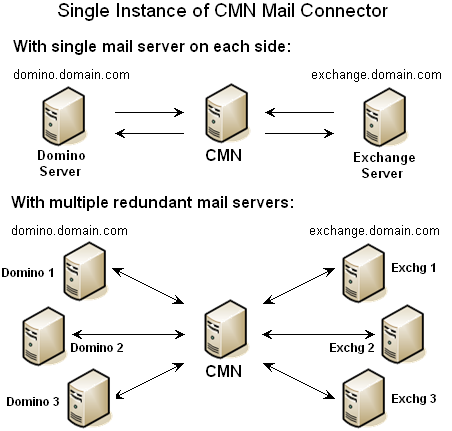
Multiple instances of the Mail Connector can be deployed for load balancing and to provide redundant mail paths.

As shown here, any CMN server can receive email from any mail server defined in the configuration file, and likewise can relay messages to any of the defined destination servers.

In multiple-CMN schemes, the CMN servers can be load-balanced by MX-record priority designations used by the source mail system or a more formal load-balancing mechanism.

CMN's Mail Connector interprets and honors MX priority settings to intelligently distribute messages in prioritized round-robin fashion. Priority designations run in reverse-numerical order, where the highest priority is 0, and higher priority numbers represent less preferred servers.

When MX resolution is enabled for CMN’s outbound servers, the Mail Connector attempts a connection at the highest priority level, and if unsuccessful attempts a connection with another server (if any) at the same priority level, or at the next lower priority level only if no server at the higher priority level is available. Within each group of servers at the same priority level, the Mail Connector randomly selects a server in the group for its first connection attempt, and then if unsuccessful proceeds to the other servers in random round-robin fashion.

If MX resolution is not enabled for the CMN servers, messages are distributed in random round-robin fashion among all configured servers.

CMN’s Mail Connector can easily be configured to work with a hosted Exchange environment, such as Microsoft’s Office 365 services. A CMN connection with a hosted environment requires only two changes to field values in the Mail Connector Management Console (described later in this chapter), and two accommodations in server configurations, as noted in the Mail Connector Installation instructions (also later in this chapter).

There are no performance tips unique to a hosted Exchange configuration with CMN. Hosted Exchange is a slight variation in CMN’s server connection validation code; everything else is treated just like regular message traffic.

Installation

The CMN Mail Connector is part of the Quest Quest Coexistence Manager for Notes product. The CMN AutoRun installer asks you to choose the CMN component(s) you want to install. If you have already installed one or two other components, just run the AutoRun installer again to install the Mail Connector. The AutoRun installer must be run on the computer where you want to install the component.

For complete installation instructions, see the Getting Started section of the Quick-Start Guide.

Configuration

The process of configuring and activating the CMN Mail Connector consists of these general steps, all of which are explained in more detail below. This procedure begins with the assumption that the Notes and Exchange environments are operational, and that the environments conform to the system requirements specified for the current release of CMN (as documented in the most recent RTM Release Notes).

Step 1 (conditional): Create the Notes resource mapping file

When an Exchange user tries to schedule a Notes resource, Exchange identifies the resource by its SMTP address, but Notes identifies resources by resource names (not by SMTP addresses). CMN must refer to a mapping file that identifies which Notes resource names are associated with which SMTP addresses.

The Notes Resource mapping file is specified (path and filename) in the CMN Mail Connector Management Console on the Resource Mapping screen, and can be populated using the Import From MNE button on that screen. If you prefer, you could instead create the mapping file manually, as described below (following this Import from MNE topic).

The Import from MNE button is on the Mail Connector’s Resource Mapping screen in the CMN Management Console. The button lets the administrator import resource mapping information from an exported MNE User and Resource Summary exported file.

1
Click the Import from MNE button.
3
Select Yes or No.
1
Click the Add button.
This displays the Add Resource Map dialog box.
2
Enter the SMTP Address, Resource Name, and Domino Resource Type.
The Domino Resource Type column lets the administrator select the type of Domino Resource that is defined for each entry: Room; Resource; or Online Meeting. This lets CMN adjust the message so Notes stores the correct ResourceType ID in the Notes database.
3
Click OK to add the entry to the table.
Clicking the OK button prompts a validation of the information entered. If there is invalid information or a duplicate SMTP Address is entered, an error message is generated.
1
Double-click the resource map in the list displayed on the Resource Mapping screen, or click the Edit button.
This displays the Edit Resource Map dialog box.
2
Enter SMTP Address, Resource Name and Domino Resource Type.
The Domino Resource Type column lets you select the type of resource defined for each entry: Room, Resource or Online Meeting. This lets CMN adjust the message so Notes stores the correct ResourceType ID in the Notes database.
3
Click OK to edit the entry. The program then validates the information entered. If the program finds invalid information or a duplicate SMTP Address, it generates an error message.
2
Click Yes.
1
Once you have added, edited or deleted the desired resource mappings, from the File menu, click Save Configuration | Mail Connector.

If you choose to not use MNE and the Notes Management Console to create the Notes resource mapping file, you can manually create the file. The file must be a two-column .tsv-format file, with column headings named SmtpAddress and ResourceName, containing data in this form:

SmtpAddress

Resource Name

West Bldg Front Conf Rm@sitraka.com

West Bldg Main Conf Rm@sitraka.com

West Bldg Back Conf Rm@sitraka.com

Main Bldg Interview Rm@sitraka.com

Front Conference Room/West Bldg

Main Conference Room/West Bldg

Back Conference Room/West Bldg

Interview Room/Main Bldg

The ResourceName value must match the name of the resource as it appears in Notes, which ordinarily takes one of these two forms:

[Resource Name]/[Site]

[Resource Name]/[Category]/[Site]

The SmtpAddress must be the TargetAddress of the resource in Active Directory.

CMN installs an empty template .tsv file, containing the two column headings, that can be used as a template for building the file.

Related Documents

The document was helpful.

Select Rating

I easily found the information I needed.

Select Rating