
Advanced Settings tab: Name Rules
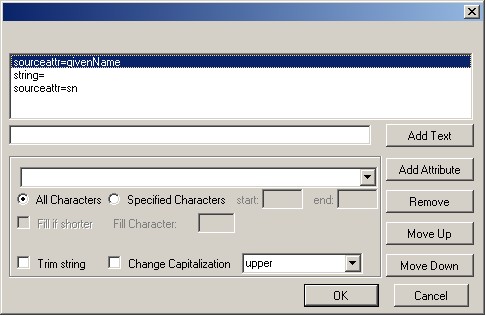
The Name Rules tab of a Directory Connector’s Advanced Settings specifies how new objects provisioned into the target directory will be named—i.e., how the unique values of their key fields will be composed, assembled or otherwise derived. The Name Rules tab displays a table, where each table row represents one method the connector may use to compose and assign a unique name (key field value) to the object.
|
• |
Add Script: Define a script to determine the values to assign to the object’s key field. (See the sample script in this screenshot.) |

|
• |
Add Rule: Define a rule to determine how object names will be composed, assembled or otherwise derived. A DC connector evaluates such a rule as an expression, and for each object assigns the result to the object’s key field. |
|
• |
Add Attribute: Select an attribute from the drop-down list box, whose value (per object) will be assigned to the object’s key field. Use the drop-down list to specify the attribute, and click OK. |
|
• |
Move Up: Move the selected method up one position in the list. |
|
• |
|
• |
Edit: Edit the definition of a selected method. (In the table: Select the method you want to edit, and click Edit.) |
|
• |
Remove: Delete the definition of a selected method. (In the table: Select the method you want to delete, and click Remove.) |
Advanced Settings tab: attribute mapping features
CMN’s Directory Connector knows how the default Domino and AD object attributes correspond to one another, and these default attribute mappings are suitable in most environments. But since many organizations customize their use of directory object attributes, the DC’s Advanced Settings tab lets you customize a connector’s attribute mappings to meet your own local needs.
The DC Advanced Settings tab for each of the four object types offers two sub- tabs for attribute-mapping features. Both tabs (features) define how attributes in the source directory will correspond to attributes in the target directory, but:
|
• |
Provision Attribute: Defines these attribute mappings for when the connector is provisioning (adding new) objects in the target. |
|
• |
Update Attribute: Defines these attribute mappings for when the connector is updating (editing) objects in the target. |
Either tab opens the same panel for attribute mappings:
The Attribute Mappings panel shows a table that lists the defined mappings for the selected connector—for either the provisioning or updating function. Each line in the table is independent of the others, since no two lines can define mapping for the same target attribute.
|
• |
Add Empty: Add an "empty" mapping, to always assign a null value to a particular Target Attribute. In the Add Empty dialog box, select the Target Attribute from the drop-down list, and click OK: |
|
• |
Add Script: Define a script to determine the values to assign to a particular Target Attribute. (See sample script in the screenshot below.) |

|
• |
Add Rule: Define a rule to determine how attribute values will be composed, assembled, processed or otherwise derived to be assigned to a particular Target Attribute for various objects. A DC connector evaluates an attribute value rule as an expression, and for each object assigns the result to the specified Target Attribute. |
|
• |
Add Map: Define a simple mapped association to assign (for each object) the value of a particular Source Attribute to the object’s particular corresponding Target Attribute. Use the drop-down lists to specify the source and target attributes, and click OK: |
|
• |
Edit: Edit the definition of a selected mapping. (In the table: Select the mapping line you want to edit, and click Edit.) |
|
• |
Remove: Delete the definition of a selected mapping. (In the table: Select the mapping line you want to delete, and click Remove.) |
Advanced Settings tab: object filtering features
A CMN DC connector can be configured to include in its operations only certain objects that meet one or more certain conditions, or that meet any of a list of conditions. These object filters are defined independently for the four object types: Users, Contacts, Groups and Resources. Then, for each object type, object filter sets also are defined independently for a connector’s different operations: provisioning objects, updating objects and deleting objects.
The Directory Connector Advanced Settings tab offers three sub-tabs to control object scope and filtering:
|
• |
Source Scope: Selects objects from the source system for processing. During synchronization, the Provision and Update filters may further refine the objects included. |
|
• |
Provision Filters: Prior to the selected connector operation, defines the objects within the source scope that will be provisioned (newly created). |
|
• |
Update Filters: Prior to the selected connector operation, defines the objects within the source scope that will be updated. |
|
NOTE: Existing target objects excluded by the Provision and Update filters do not cause deletion of corresponding target objects. Only manually deletion of source objects or changing the source scope will delete the corresponding target objects. |
Any of the three tabs opens the same panel for object filtering:
This Object Filtering panel shows a table that lists the defined filter(s) for the selected operation (tab) for the selected object type (tab) of the selected connector. Each line in the table defines a single filter, which tells the connector to include in its operation only objects that satisfy the filter’s defined condition(s).
Important: If two or more filters appear in the table, they are logically associated by the OR operator. That is, an object is included by the connector if is passes any of the individual filters in the list. Each additional filter in the list makes the overall set of filters less restrictive.
|
• |
Add Filter: Add a new filter to the table list. |
|
• |
Edit: Edit the definition of a selected filter. (In the table: Select the filter you want to edit, and click Edit.) |
|
• |
Remove: Delete the definition of a selected filter. (In the table: Select the filter you want to delete, and click Remove.) |
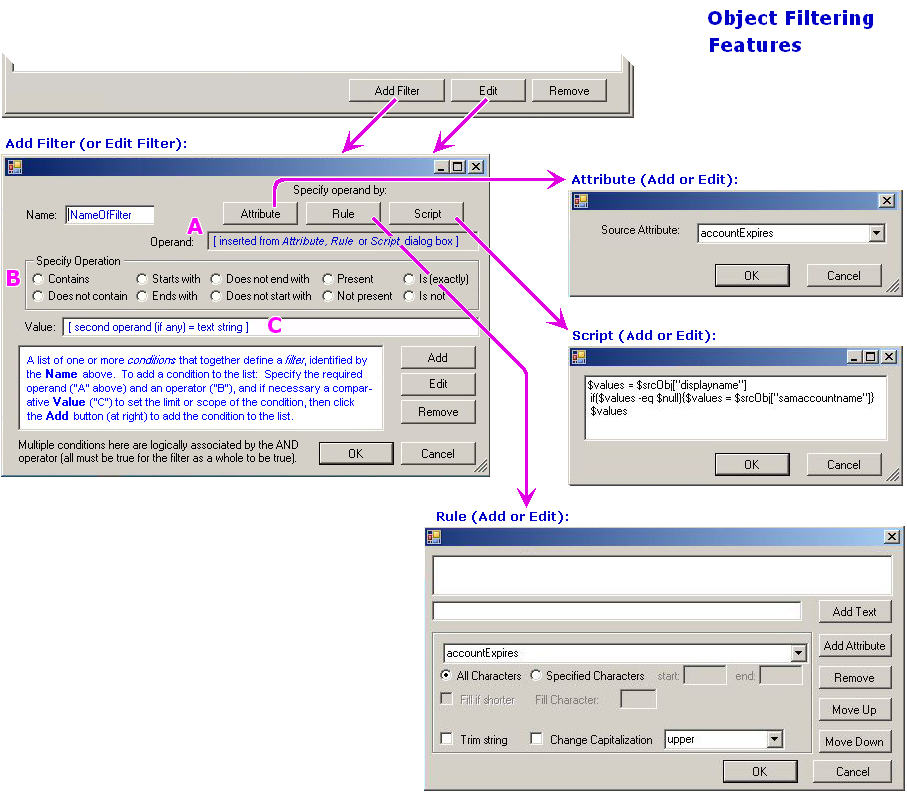
The Add and Edit buttons both open the Filter Definition dialog box (described below), which lets you define a single new filter.
|
IMPORTANT: If you are upgrading from an earlier version connector and want to update Users as well as Contacts, and have chosen to Overwrite Object Names (on the General tab of Advanced Settings): You must also remove the filter condition that excludes user objects from the Update function, here in the Update Filters tab. Select the Filter Name for the filter definition that contains this condition:
Then click the Edit button to open the Filter Definition dialog box, select the [%script% Equals,contact] line, click Remove, and click OK to save the filter. |
The Filter Definition dialog box is designed to help you compose one or more conditions to make up an object filter.
A DC connector filter condition is defined in the form of an expression that evaluates to either true or false, and that is composed of at least one operand ("A" in the illustration) with an operator ("B"). For most conditions a second operand ("C") is also required to define the limit or scope of the operator ("B").
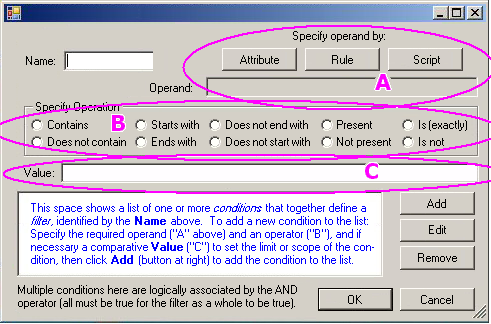
Note that a second operand ("C") is required for any operator ("B") other than Present or Not present, since only expressions with one of those two operators can be evaluated without a second, comparative operand value. Any of the other eight operators would be meaningless without a second operand to compare to the value of the first operand ("A").
The flow chart below illustrates this process.
|
1 |
|
2 |
Enter a Name for the filter, as you want it to appear in the filters table in the Object Filtering panel (for visual identification purposes only). |
|
3 |
Use the Attribute or Rule or Script feature (buttons in the top-right corner of the dialog box) to define the required operand. Clicking any of these buttons pops up the associated dialog box, in which you can define the attribute, rule or script that you want to use to determine the required operand of the expression. |
|
• |
Attribute: Select a Source Attribute from the drop-down list box, whose value (per object) will be inserted as the required operand of this conditional expression. Use the drop-down lists to specify the source and target attributes, and click OK: |
|
• |
Rule: Define a rule to determine how values will be composed, assembled, processed or otherwise derived (per object) for the required operand of this expression. A DC connector evaluates this rule as a "sub-expression," and inserts the result for each object into the conditional expression as the required operand. |
|
• |
Script: Enter a script (see sample script in screenshot below) to determine the values to assign to the required operand for the condition. Type the script into the text box, and click OK. |
|
4 |
Click one of the Specify Operation radio buttons to specify the operator to be used in this expression. |
|
5 |
If this condition requires a comparative operand (i.e., following any operator other than Present or Not present) to set the limit or scope of the condition: Type the operand value into the Value text box. |
|
6 |
Click the Add button to compile the operand(s) and operator into a conditional true/false expression. The program then inserts a one-line summary of the condition into the list to the left of the Add and Remove buttons. For example: |
Advanced Settings tab: object association features
The Object Association dialog box may contain one or more defined associations. If two or more associations are defined in the list, the connector considers them one at a time, sequentially, top to bottom. That is, for each source object, the connector first applies the first method in the list and, if no match is found, will then try the second, and then the third, and so forth until a match is found.
When a match is found, a connector configured to Update objects then compares attribute values in the source to the corresponding (mapped) attribute values in the target, and updates target values as necessary.
If no match is found in the target for an object in the source, the connector concludes it is a new source object (previously unprovisioned), and copies it to the target—if the connector is configured to Provision new objects.
In any case, the connector then advances to the next source object in the list.
When all source objects have been processed in this way, any remaining, unmatched target objects are presumed to correspond to objects that have been removed from the source. If the connector is configured to perform the Delete operation, it then deletes such objects from the target.
|
1 |
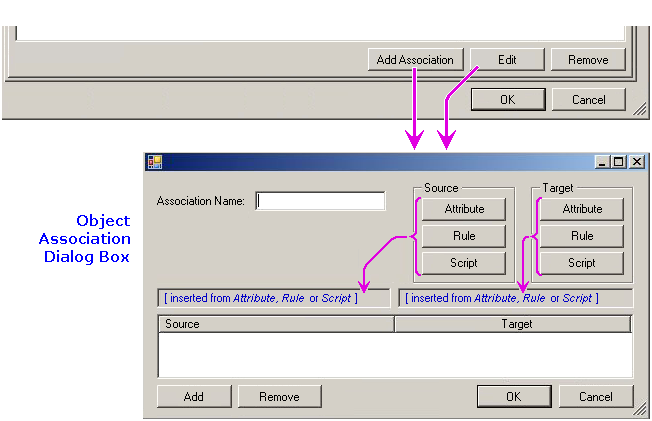
Beginning in the Advanced Settings | Association panel: Click Add Association to open the Object Association dialog box. |
|
2 |
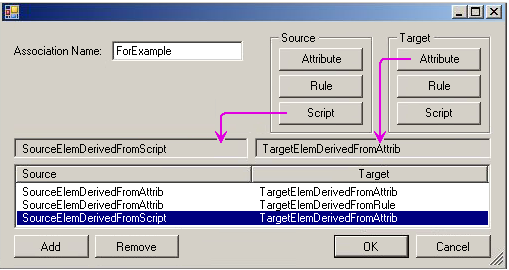
Enter an Association Name, as you want it to appear in the table list in the preceding Association panel (for visual identification purposes). |
|
3 |
Use the Attribute or Rule or Script features (top-right corner of the dialog box) to define the comparative values for both the Source (left) and Target (right) objects. Clicking any of these buttons pops up the associated dialog box, in which you can define the attribute, rule or script that you want to use to yield per-object values for comparison: |
|
• |
Attribute: Select an Attribute from the drop-down list box, whose value (per object) will be inserted as the source or target comparative element of this association. Use the drop-down list to specify the attribute, and click OK: |

|
• |
Rule: Define a rule to determine how comparative values will be composed, assembled, processed or otherwise derived (per object) for source or target comparative element of this association. A DC connector evaluates this rule as a "sub-expression," and inserts the result for each object into the conditional expression as the source or target comparative element. |
|
• |
Script: Enter a script (see example in the screenshot below) to determine the values to assign as the source or target comparative element of this association. Type the script into the text box, and click OK. |
|
4 |
Back in the Object Association dialog box: Click the Add button (bottom-left corner) to add the displayed source-target pair of comparative elements into the table list as a single condition of this association definition. |
|
6 |
Still in the Object Association dialog box: When you have defined all of the conditions (source-target pairs) you want to include in this association definition, click OK to dismiss the Object Association dialog box and add the newly defined association method into the table list on the Advanced Settings | Association panel. |