Converse agora com nosso suporte
Chat com o suporte

erwin Evolve 360 Current - User Guide

Metamodel


Navigation: erwin Evolve 360 User Help Guide >

Metamodel


Metamodel


Object Types


Navigation: erwin Evolve 360 User Help Guide > Metamodel >

Object Types


Object Types

How Do I Add A New Object Type?

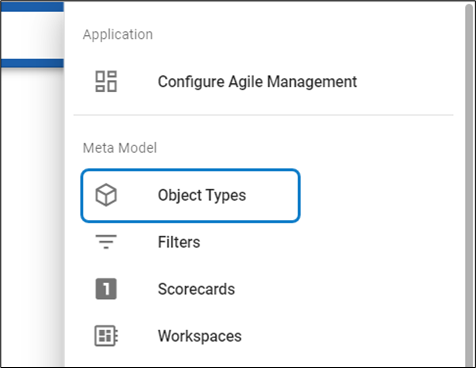
1. Click on the profile, go to Object Types
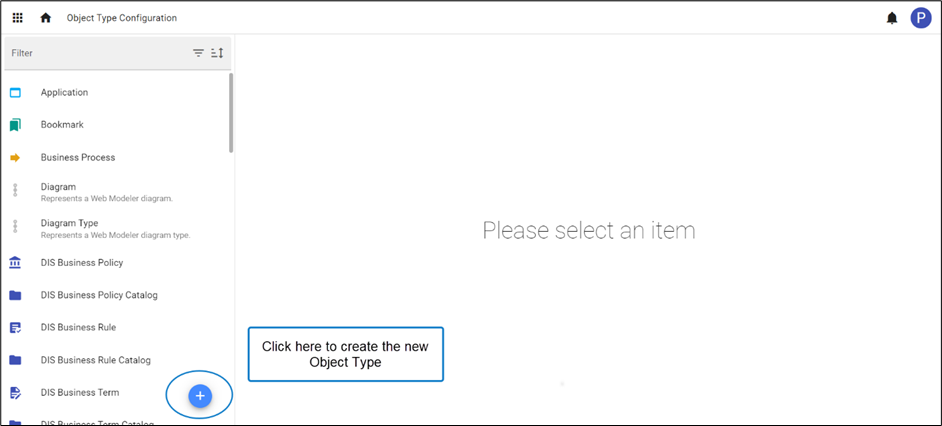
2. Click the + icon in the list view on the left-hand side of the screen, this will create a blank new Object Type.
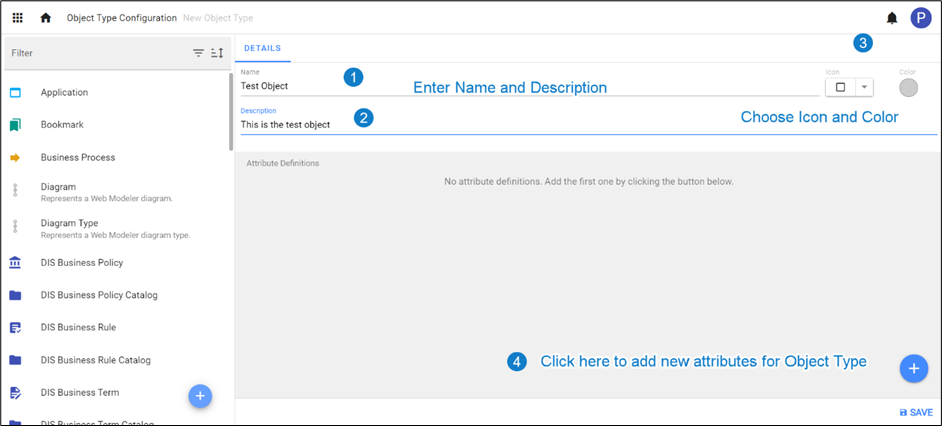
3. Enter Name and Description. Add an Icon and Color you wish to assign to the new object type.

To add Attributes and their definition, click on + icon on the right below corner of the screen.
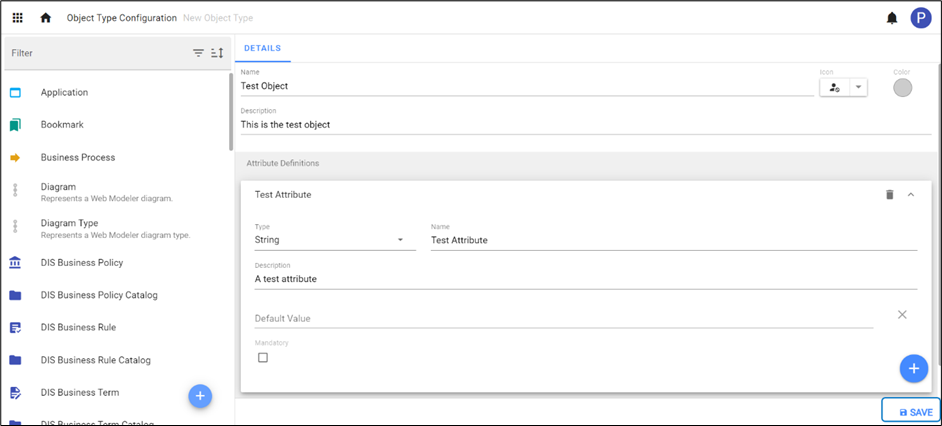
4. To add new Attributes:

a.Select type of Attribute from the list.

b.For each new Attribute you can provide a Name, Description, Default Value and choose if they are Mandatory. Some Attributes such as List or Array require additional information which are unique to that Attribute type e.g., Key

c.Click on Save.


How Do I Add an Attribute to an Existing Object Type?

Available Attribute Types

1.Boolean - Simple true/false attribute

2.Integer - A whole number not a fraction

3.Real - Whole number/fraction/positive or negative

4.String - Text with a limit of 255 characters

5.URL - Set a URL for use as a clickable hyperlink or an Item Action

6.Date Time - Set a single point in time

7.Date Time Range - Define a range of time with a start and end date

8.List (Single) - Create a single choice list

9.List (Multiple) - Create a multiple-choice list

10.Array (Single) - Set a single choice key & value array

11.Array (Multiple) - Set a multiple-choice key & value array

12.Scorecard - Allows users to use a predefined ‘scorecard’ to perform equations on numeric attributes

13.Relationship List - Create a pick-list from a defined relationship and object type

14.Numeric Rollup – Roll up numeric values through relationships

15.Date Time Rollup – Roll up date-times through relationships

16.Date Time Range Rollup – Roll up date-time range through relationships

17.Long String - Text with a limit of 16,383 characters

18.Image - Allow users to attach an image to an object instance


Configuring an Attribute

1.Click on the profile, go to Object Types.

2.Search for a specific Object Type to add an Attribute or you can manually scroll through the list.

3.Click on the Object Type in the list to bring up its details.

4.Click on the blue + button in the bottom right of the details view.
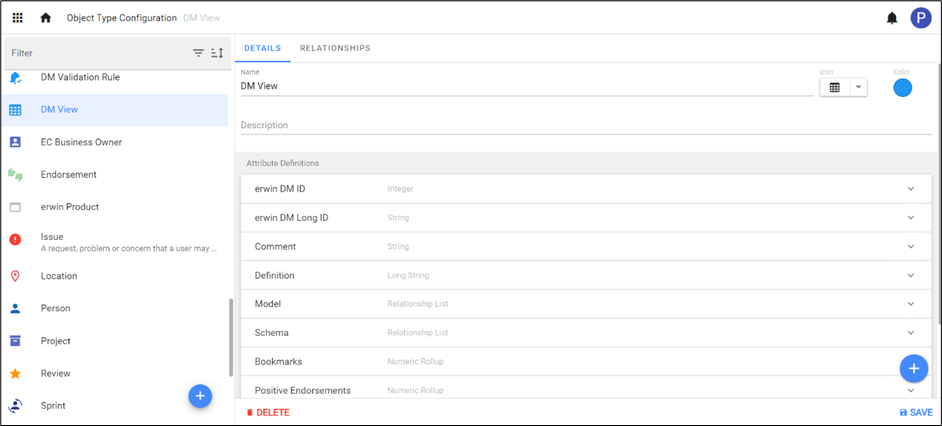


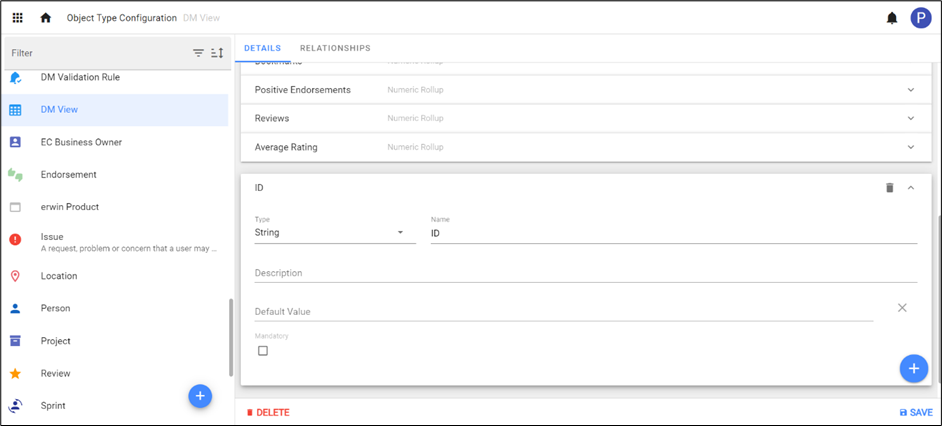
          5. This will bring up a blank Attribute. Select your Attribute Type

          6. Enter new Attribute a Name & Description.

                    You can also set a Default Value for new Instances of the Object Type

And finally, choose if your new Attribute is Mandatory by checking the box

                    Some Attributes such as List or Array require additional information which are unique to that Attributes Type e.g. Key

          7. Click Save in the bottom right of the screen to finish adding the new attribute.


A default view is required to see Object Types. To create the default view, (see topic link)


Relationships


Navigation: erwin Evolve 360 User Help Guide > Metamodel >

Relationships


Relationships

How Do I Create A New Relationship?

To add the Relationships, go to Object Types and select from the list you wish to add.

Click on the tab Relationships.


By default, every Object Type will have its wildcard Relationships that exists in the model and populated automatically.


To add a new Relationship, click on + icon at the right bottom of the screen. This will show the four types of Relationships available.

1.Create Relationship Type

2.Create Relationship Type with Object

3.Create Parent Relationship Type

4.Create Child Relationship Type


Create Relationship Type

To create a simple Relationship between the objects,

1.Go to Create Relationship Type.

2.Select Source and Target, enter Source Name and Target Name.


          3. Click on Save.

Create Relationship Type with Object

Create Relationship Type with Object works similarly as the first relationship type, but if you want an object to represent the relationship, then select Create Relationship Type with Object.

This will create an Object Type with the Relationship.

1.Go to Create Relationship Type with Object.

2.Select Source and Target, enter Source Name and Target Name.

Enter Object Name to display.

          3. Click on Save.

Create Parent Relationship Type

Create Parent Relationship Type is used to relate the parent to the Child Object Instances.

To create parent-child relationship,

1.Go to Create Parent Relationship Type

2.Select Parent and Child, enter Parent Name and Child Name.

          3. Click on Save.


Enter Parent and Child names that explains its relationship.


Create Child Relationship Type

Create Child Relationship Type is used to relate the child to the parent Object Instances.

To create child-parent relationship,

1.Go to Create Child Relationship Type

2.Select Parent and Child, enter Parent Name and Child Name.

          3. Click on Save.


Filters


Navigation: erwin Evolve 360 User Help Guide > Metamodel >

Filters


Filters

How Do I Create A New Filter ?

          1. Click on the profile, go to Filters


          2. Click the + icon in the list view on the left-hand side of the screen, this will create a blank New Filter.


          3. Enter Name and Description. Add Parameters if you wish to.

          4. Select the Object Type you wish to filter by.

          If you wish to filter only by Object Type with no further criteria, press the Trash icon on the additional criteria and click save.

          This will create a filter which display all Business Terms as shown in the below figure.

          5. To add the further criteria, press the Object Type Criteria ‘+’ icon next to the Object Type.

                    i. First additional operator will be AND, every additional operator afterwards will be an OR.

                    ii. Select the object type criteria you wish to filter by.

          There are 4 main criteria categories

‘Is Object’ – You can select individual Objects of that Object Type

‘Use Filter’ – Will only show Objects of your selected Object Type that appear as results of the selected filter

‘Generic Properties’ – Properties that are of all Object Types

‘Attribute Properties’ – Attributes of that specific Object Type

                    iii. Select the Property. Depending on the Property you select, it presents with different operators.

‘Is Object’ – Equals, Does not equal

‘Use Filter’ – Is in filter, Is not in filter

‘Generic Properties’ – Equals, Does not equal, Starts with, Does not start with, Contains, Does not contain, Ends with, Does not end with

‘Attribute Properties’ – Equals, Does not equal, Has value, Does not have value

                    iv. Enter the Value. Depending on the criteria you selected, you need to either enter a Value or select related from the pickup list.

                    v. If you wish to add another step, click on ‘+’icon next to your first operator.

                    vi. Follow the steps i to iv to add details for an additional criteria branch.

          6. If you wish to enter further Object Type Criteria to filter, click on Add New Object Type Criteria shown in blue color below the operations.

          Repeat Steps from 4 to add new filter.

          7. Once Object Type Filters are added, click on Save.


Documentos relacionados

The document was helpful.

Selecione a classificação

I easily found the information I needed.

Selecione a classificação