
eRoom Containers - Include Links
If you chose to migrate an eRoom container as a site collection, site, or document library, and you want any links within the eRoom content to be migrated, make sure the Include Links box is checked.
Any links that are found in the migration will be added to the site in a SharePoint Links list. If these links are pointing to internal data their links will be corrected, provided that Link Correction is being used.
Mapping Columns
Column mapping allow you to map one or more columns from the source to SharePoint columns on the target when you click the [Edit Mappings] button is clicked from the Document Options or Database Options tab.
The column mapping option is only available when migrating eRoom containers (rooms or folders) or documents. In the case of migrating eRoom documents, they must be migrating into an existing document library on the target.
NOTE: Mappings are saved as a separate .MLM files.
Known Limitation When Migrating an eRoom Database
When migrating an eRoom database to SharePoint, there is a limitation when migrating a Number-type column to another Number-type column. Any non-numerical characters, with the exception of a single decimal point, are stripped when migrated to the target. For example, "3.6.4" would appear as "364" on the target; "+91 #123.@456.789" would appear as "91123456789" on the target. In order to migrate the source Number-type column as-is, it must be migrated as a Text-type column on the target. For information on migrating an eRoom database to SharePoint, see Migrating an eRoom Database to SharePoint.
To configure column mappings:
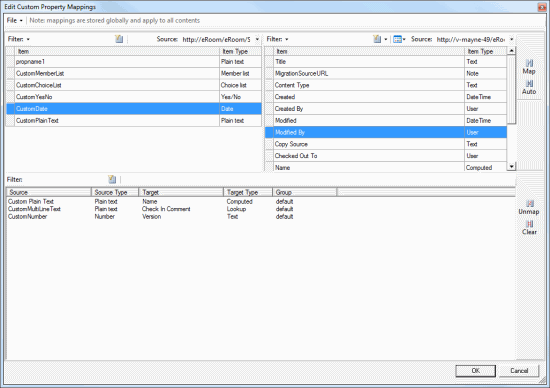
1.From the File drop-down at the top of the Edit Custom Property dialog, choose the appropriate option. Use the information in the following table for guidance.
|
If you want to ... |
Then... |
|
load mappings from a previously-saved Metalogix Mapping setting (.MLM) file |
·choose File > Load. AND ·Navigate to and open the mapping file to populate the Mappings dialog. |
|
create new mappings |
go to the next step. |
2.Use the information in the following table to determine the appropriate action to take.
NOTE: You can Filter items in each window to narrow displayed lists.
|
If you want to ... |
Then... |
|
manually map each individual source column to a target SharePoint column |
·From the left (eRoom column) pane, select the Item that you want to map. ·From the right (SharePoint column) window, select an available Item. ·Click the Map icon. |
|
have Metalogix Content Matrix automatically map source fields to matching target SharePoint columns |
·From the left (eRoom column) pane, select the Item(s) that you want to map. ·Click the Auto icon. |
The mappings you create will display in the bottom window. (Note that you can also Unmap individually-selected mappings in the bottom window or Clear all mappings from the bottom window.
NOTE: If no column currently exists on the target that you want to map to, you must manually create one in the SharePoint User Interface, then return to Metalogix Content Matrix and refresh the connection to SharePoint.
3.To save the mappings in the dialog as a Metalogix Mapping setting (.MLM) file, choose File > Save.
4.Click [OK] once all desired mappings have been made and return to the Configuration Options dialog.
Permissions Options
Users groups and permissions can be migrated from eRoom into SharePoint as part of a migration action. eRoom users and groups can be manually, and is some cases automatically, mapped to SharePoint users and groups, but permissions are automatically mapped using a special algorithm.
NOTE: Permissions options are available when migrating eRoom containers (not individual lists or items).
How eRoom Users and Permissions are Mapped to a SharePoint Target
Metalogix Content Matrix will will automatically try to map users from the eRoom source to the SharePoint target. This automatic mapping will only work in cases where the eRoom source has been configured to authenticate the user name format using Active Directory (AD), which is not a typical scenario. In all other cases, the eRoom users and groups must be mapped to users that already exist on the SharePoint target.
Metalogix Content Matrix can also use a special alogorithm try to migrate permissions by "best match" between eRoom and SharePoint permissions. A "match" is determined by comparing the explicit rights assigned to a user on the source and the rights that are included in roles on the target server.
For example, consider the scenario where "billw" has permission to read and edit a calendar in eRoom. During the migration of that calendar, eRoom Edition will analyze the available permissions on the SharePoint server and might find the Contribute role which allows view, add, update and delete permissions. If no other role is a better match, this role will be applied for the user mapped to "billw" on the migrated calendar.
Each eRoom room has four built-in principle types of permissions by default, and these four principles are a rough equivalent to the standard out-of-box SharePoint permission levels. A best practice method when migrating permissions would be to migrate them from the eRoom room level.
NOTE: These permission mappings are not set by default, and are only acting as basic guidelines.
|
eRoom Rights |
SharePoint Permissions |
|
Coordinators |
Full Control |
|
Custom Roles |
Design / Manage Hierarchy |
|
Participants |
Contribute |
|
Observers |
Read/Restricted Read/Limited Access |
To configure Permissions Options:

1.If you want to map source eRoom users to target SharePoint users, check the Map user metadata box.
If this box is not checked, or if the eRoom user does not have an equivalent user SharePoint user that it is mapped to (or if the name format does not match the format used in AD), the migrating account's information will be used instead.
2.Select the applicable sub-option(s). Use the information in the following table for guidance.
|
If you want to ... |
Then ... |
|
map eRoom users and groups to SharePoint users and groups |
Click the [Edit Mappings] button. Follow the procedure for Mapping Users. |
|
have Metalogix Content Matrix use an algorithm to a "best match" mapping of existing permissions between eRoom and SharePoint |
check the Migrate permissions by best-match box. NOTE: No new permission levels will be created on the SharePoint target. |
Mapping Users
You can set user and group mappings for migrating content when you click the [Edit Users] button from the Permissions Options tab.
Users can also be mapped as a separate action.
All user mappings are globally set, so once a mapping is created it will always be used unless removed.
NOTE: If the source eRoom environment has a large number of users/groups, it is recommended that the XML user mapping method be used instead, to help improve performance, and for better control over user mapping.
To map users:
NOTE: Metalogix Content Matrix supports many-to-one mappings between source and target.
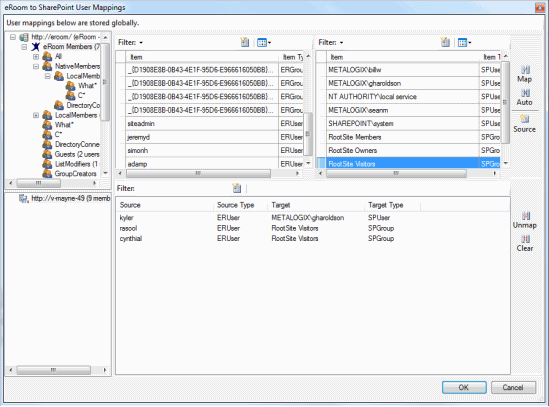
1.In the top left pane, select the top level eRoom community or group that contains the users and groups that you want to map.
The source list becomes populated with all of the users and groups that exist under the selected node.
2.In the lower left pane, select the SharePoint site collection to which you want to map the users and groups.
The target list becomes populated with all of the users and groups that exist under the selected node.
3.Use the information in the following table to determine the appropriate action to take.
NOTE: You can Filter items in each window to narrow displayed lists.
|
If you want to ... |
Then... |
|
manually map individual users or groups on the source to a target SharePoint user or group |
·From the source list, select the Item(s) that you want to map. ·From the target list, select a target Item. ·Click the Map icon. |
|
have Metalogix Content Matrix automatically map source users/groups to target SharePoint users/groups |
·From the source list, select the Item(s) that you want to map. ·Click the Auto icon. NOTE: Metalogix Content Matrix will only map users automatically if the source and target side names match, or if the emails match, and the source and target environments are using the same AD. |
The mappings you create will display in the bottom window. (Note that you can also Unmap individually-selected mappings in the bottom window or or Clear all mappings from the bottom window.
4.Click [OK] once all desired mappings have been made and return to the Copy Options dialog.