2-D Shapes
Toad Data Modeler allows you to insert the following 2-D shapes to your ER diagram:
- Note
- Line
- Stamp
- Categories
- Image
- Rectangle
- Ellipse
- Text
- Label Quadrangle
- Label Ellipse
The objects are available on Graphics Objects Toolbar and in the Objects Menu| Add New for both physical and logical model.
To change format of these objects
Right-click the object and select Format.
Note and Line
A note can refer to a model, Workspace, particular entity, attribute, relationship etc.
To add a note to your model
- Click
 icon on Graphics Objects Toolbar or select Objects | Add New | Note and click the work area.
- Double-click the Note to edit it.
- Write a text on tab General. The automatic word wrap function is available.
|

|
TIP: To change a format of Note, right-click it and select Format. To adjust the size of a Note to a length of text contained, click the Shape tab and select Recalculate Size. |
Note Shortcuts
You can also create shortcuts of Notes:
|
Scenario
You have a Note which describes your Customer entity. The entity is places on multiple Workspaces. You would like to have the Note on every Workspace where is the entity.
Solution: Create multiple shortcuts of your Note object and place each onto a different Workspace. |
To make a connection between a Note and an object that the note relates to, you can use a Line.
Lines
To add a Line
- Click
 or select Objects | Line.
- Click the object and then click the Note.
To change the look of the lines on the Workspace
- Right-click the WS and select Workspace Format.
- Click the Line tab and select the line end type.
- Right-click the line and select Line Style.
Image
You can add logos and other images to your ER diagrams and then relate them to any object on Workspace using a Line.
To insert an image
- Click
 icon on Graphic Objects Toolbar (or select Objects | Add New | Image).
- Click on the Workspace where you want to insert the image.
- Select the image from the Open dialog and click Open.
|
|
Note: Images that you insert to your ER diagrams aren't saved together with your model. |
To edit an image
Double-click the image on the Workspace.
Image in Model Explorer
Take notice of the Image item in Model Explorer. From here, you can manage your images as well.
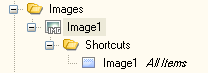
Image and Shortcuts
You can create shortcuts of an Image on every Workspace of your model or create multiple shortcuts on one Workspace.
Stamp
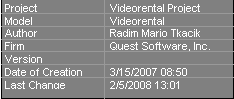
Add a Stamp to the Workspace to display information about your model such as Author, Company, Date of Creation etc.
To add a stamp
- Click
 icon on Model Objects Toolbar (or select Objects | Add New | Stamp), and click anywhere on Workspace.
- To change the format of the Stamp, right-click it and select Format.
To edit a stamp
Double-click the Stamp on Workspace. Model Properties dialog displays, here you enter the information which is shown in Stamp.
Stamp and Shortcuts
You can create shortcuts of a Stamp on every Workspace of your model or create multiple shortcuts on one Workspace.
