サポートと今すぐチャット
サポートとのチャット

Toad Data Modeler 7.3 - User Guide

Introduction User Interface Models and Model Objects
Physical Data Model
Entity Relationship Diagram Objects Basic Database Design Advanced Database Design
Universal Data Model Logical Data Model Working with Model Objects
Features and Tools
Application Variables Export/Import DDL Script Generation Graphics Model Actions Print Create New Project Reports Reverse Engineering Scripting and Customization About Templates Tips and Tricks Toad for Oracle Integration Toad Intelligence Central (TIC) Integration Tools Version Control
Options and Configuration Databases
Amazon Redshift 1.0 IBM DB2 LUW 9.5 IBM DB2 LUW 9.7 IBM DB2 LUW 10.1 IBM DB2 LUW 10.5 IBM DB2 LUW 11.1 IBM DB2 z/OS 10 IBM DB2 z/OS 11 Greenplum 4.1 Greenplum 4.2 Ingres 9.3 Ingres 10.0 EDB Postgres Advanced Server 10 Microsoft Access 2007/2010 Microsoft Azure SQL Database V12 Microsoft SQL Server 2005 Microsoft SQL Server 2008 Microsoft SQL Server 2012 Microsoft SQL Server 2014 Microsoft SQL Server 2016 Microsoft SQL Server 2017 Microsoft SQL Server 2019 MySQL 5.0 MySQL 5.1 MySQL 5.5 MySQL 5.6 MySQL 5.7 MySQL 8.0 Oracle 10g Oracle 11g Release 1 Oracle 11g Release 2 Oracle 12c Release 1 Oracle 12c Release 2 Oracle 18c Oracle 19c PostgreSQL 9.0 PostgreSQL 9.1 PostgreSQL 9.2 PostgreSQL 9.3 PostgreSQL 9.4 PostgreSQL 9.5 PostgreSQL 10 PostgreSQL 11 PostgreSQL 12 SQLite 3.7 Sybase ASE 15.5 Sybase ASE 15.7 SAP ASE 16.0 Sybase IQ 15.2 Sybase SQL Anywhere 11 SAP SQL Anywhere 17 Teradata 13 Vertica Database 8.0
Copyright Legal Notices

Edit Menu


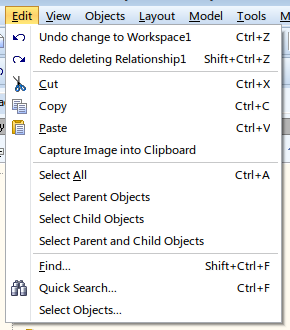
The Edit menu mostly contains basic actions such as Copy, Cut, Paste, Undo and Redo and also several options to select objects on Workspace.

Option Description

Undo

Undoes the last action.

Redo

Redoes the last undid action.

Cut

Cuts selected object to clipboard.

Copy

Copes selected object to clipboard.

Paste

Pastes the copied/cut object from clipboard.
Capture Image into Clipboard Choosing this option allows you to select an area on your Workspace. This area will be captured as an image and stored in your clipboard (can be pasted to somewhere else).

Select All

Selects all objects on current Workspace.

Select Parent Objects Selects all Parent objects of the currently selected object.
Select Child Objects Selects all Child objects of the currently selected object.
Select Parent and Child objects Selects both Parent and Child objects of the currently selected object.

Find

Opens the Find dialog.

TIP: Use wildcards - example: "*user" or "?ser".

* - replaces unlimited number of characters

? - replaces any single character

Quick Search

Opens Quick Search dialog which allows you to search through all objects in a model.

Select Objects

Allows you to select objects based on their Owner and Category.


View Menu

Display modes, display levels, used notation and icons are all configured in this menu.

 
Option Description

Zoom

Zoom options:

Zoom In Turns your cursor into a magnifier glass that allows you to zoom in.

Zoom Out Turns your cursor into a magnifier glass that allows you to zoom out.

Note: To deactivate zoom tools, press Esc, or right-click the work area.

Zoom Box - Turns your cursor into a magnifier glass that allows you to draw a selection box. The area will be then zoomed in.

Fit to Screen - Sets the display level so the whole diagram can be seen completely.

See Designer and Workspace for more tips on navigation on Workspace.

Grid

Show Grid - Shows/hides the Grid.

Snap to Grid - Toggles Snap to Grid function on/off. When on, it helps you to align objects while moving by snapping them to the Grid.

Align Objects to Grid - Aligns already existing objects to the Grid.

Grid Settings - Allows you to set properties of Grid.


Minimal Size of Displayed Grid - Determines how big the Grid must be to be displayed at all.

Grid Size - Sets the horizontal and vertical distance between points of Grid.

Move/Pan Activated the Move/Pan tool. Drag your mouse to move around workspace. Deactivate by right-clicking or pressing ESC.

Display Mode

Determines which property is shown in object headers - captions/names/full names
(eg. Customer/T_CUSTOMER/SCOTT.T_CUSTOMER)

Display Level

In Physical model sets the level of details displayed:

  • Entities
  • Primary Keys
  • PK and FK Keys
  • All Keys
  • Attributes

In Logical model determines the objects you want to display:

  • Entities
  • Primary Identifiers
  • Unique Identifiers
  • Attributes
  • Descriptions
Notation

Allows you to switch between two types of notations used in ER Diagram:

  • IE
  • IDEF1X

Icons Theme

Allows you to use Toad Data Modeler icons or Toad for Oracle icons.

Minimize Forms

Minimizes all currently opened forms and dialogs.

Full Screen Mode Displays Toad Data Modeler in full screen mode (F11).

Objects Menu

The Objects menu is model dependent. Different items appear in different Models.

 
Option Description
Add New

Adds a new object to the currently selected Workspace.

Database objects:

  • Entity
  • Relationship
  • Non-identifying Relationship
  • Self Relationship
  • Inheritance (logical)
  • M:N Relationship (universal, physical)
  • View (universal, physical)
  • View Relationship (universal, physical)
  • Materialized View (physical)

Diagram objects:

  • Note
  • Line
  • Stamp
  • Categories
  • Image
  • Rectangle
  • Ellipse
  • Text (universal, physical)
  • Label
  • Label Quadrangle
  • Label Ellipse

Note: If not followed by parentheses containing Model type, the object is available in all Models.

Edit Edits currently selected object.
Object Format Opens Object Format dialog of the currently selected object.
Add to New Workspace Creates new Workspace and adds the selected object to it.
Add to Existing Workspace Adds object to an already existing Workspace.
Add to Category Adds object to new or existing Category.
Add to Gallery Adds object to new or existing Gallery.
Delete Object Deletes selected object from Model.
Remove Object from Workspace

Removes selected object from Workspace.

Note: The object still remains in the Model, only its graphical representation is removed.

Arrange

Contains various options for arranging objects into layers:

  • Bring to front - brings the object to the top layer.
  • Bring forward - brings the object one layer up.
  • Send backward - sends the object one layer down.
  • Send to back - sends the object to the bottom layer.
  • Setting - opens the Object Format dialog where you can specify Z-Order - number which determines the layer arrangement of objects on workspace (objects with higher Z-Order are shown on top of objects with lower Z-Order)
Align

Aligns multiple selected objects:

  • Top
  • Left
  • Right
  • Bottom
  • Horizontal Center
  • Vertical Center
Match size

Matches sizes of multiple selected objects:

  • Width
  • Height
  • Width and Height
Space

Offsets selected objects by the same amount:

  • Vertical Equally
  • Horizontal Equally
  • Anchor Points - Offsets anchor points of an object by the same amount)

Layout Menu

Layout Menu contains various tools to organize your objects on Workspace.

Option Description
Left to Right Autolayout Automatically organizes all objects from left to right hierarchically.
Top to Bottom Autolayout Automatically organizes all objects from top to bottom hierarchically.
Alphabetic/Square Autolayout Automatically organizes all objects to square shape and sorts them alphabetically.

TIP: Not selecting any objects will organize all objects on Workspace. You can select multiple objects before choosing Autolayout style. In that case a prompt will show up and you will be asked to choose the area where the selected objects should be organized. Draw a rectangle and the objects will move into the drawn area. The other way is to simply click, which defines the upper left corner of autolayout area.

Line Style

Changes relationship and note lines into shapes of letters:

  • Optimal Style
  • U Style
  • A Style
  • C Style
  • D Style
  • Vertical Style
  • Horizontal Style
  • Z Style
  • L Style
Optimal Style On Move As you move the object shapes on Workspace, all lines will automatically change their style to the most optimal one. This function can change the number of break points on lines.
Line Autolayout Automatically tries to reorganize lines on Workspace to the most optimal variant.
Fill Relationships Adds missing relationships between entities in Workspace. The relationships already have to be a part of the Model, this function does not create new ones.
Relationship Captions

Moves or hides the relationship captions:

  • Move to Parent
  • Move to Child
  • Move to Center
  • Hide
Align Self-Relationships Resets Self-Relationship lines into their default position.
Unhide Lines Displays lines hidden behind object shapes.


関連ドキュメント

The document was helpful.

評価を選択

I easily found the information I needed.

評価を選択