Essentials for Drives provides a simplified, wizard driven experience to migrating content in, out, or between various drive management systems (local or cloud based). It can also provide additional functionality to managing some or all OneDrive for Business sites within a specific Office 365 tenant.
A simple Administrator driven wizard is provided to bulk migrate the Documents library content from the OneDrive for Business sites in one Office 365 tenant into the appropriate OneDrive for Business Documents library in another Office 365 tenant. In order to successfully configure and run this operation, you will need to be able to authenticate against both SharePoint Admin Center portals in Office 365 using a Global Administrator login. A mapping file may also be needed in order to resolve the user accounts between the source and destination tenants.
This operation has the following requirements for use:
·The account used to perform the migration needs to be a Site Collection Administrator in the source Office 365 tenant.
·The account used to perform the migration needs to be a Site Collection Administrator in the target Office 365 tenant.
·The person performing the migration will need to know the relationship (mapping) between the user accounts in the source and target Office 365 tenants.
·Each user account must have either a SharePoint or OneDrive license assigned to it in Office 365.
Once the requirements above are satisfied, you can proceed with utilizing the bulk upload functionality.
1.Switch to the Drives tab in the Essentials console and click the button "Copy Tenant" located in the ribbon, and select Copy OneDrive to OneDrive.
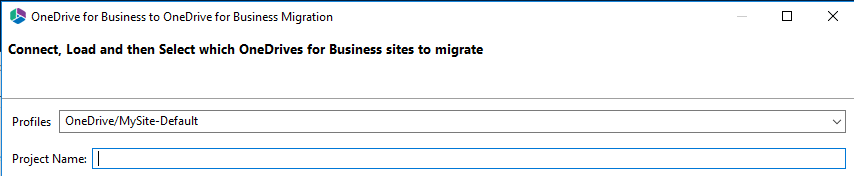
2.When the wizard appears, select a Profile and give your project a name.
3.Enter a SharePoint Admin Center URL for the source Office 365. Once the URL is entered, click the Connect button, enter a valid Admin account and click Connect.
|
|
NOTE: that the Claims option is not supported for this operation. |
When you receive a successful connection message proceed to the next parameter. You may also choose to add additional Admin accounts by selecting the "+Admin" button.
4.Enter a SharePoint Admin Center URL for the target Office 365. Once the URL is entered, click the Connect button, enter a valid Admin account and click Connect.
|
|
NOTE: that the Claims option is not supported for this operation. |
When you receive a successful connection message proceed to the next step. You may also choose to add additional Admin accounts by selecting the "+Admin" button.
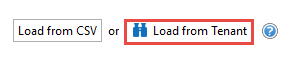
5.Click the Load from Tenant button or Load From CSV. Note that Load from CSV will allow you to load users from a CSV file (see user mapping for more information on user mapping report), which is the faster option as only the listed users are loaded.
If you've selected Load from Tenant, then the table will be populated with a list of currently provisioned OneDrive for Business sites.
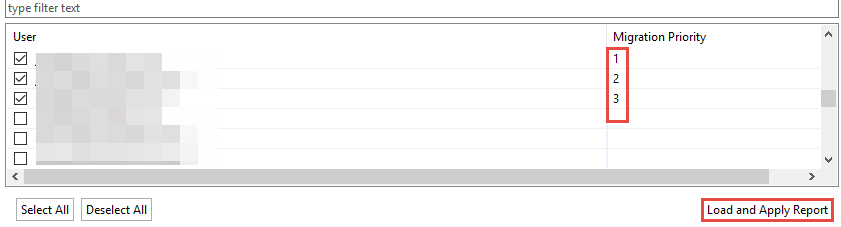
6.You can also choose the Load and Apply report option, which allows you to load and apply an Analyze OneDrive report, which then sets the Migration Priority for each user mentioned in the report. Click Next to continue.
|
|
NOTE: Each Migration Priority value can be changed if you click on the value in the Migration Priority columns (without user selection). It changes the migration queue but does not change the original report file. Priority in the wizard is not saved after the wizard has been closed. |
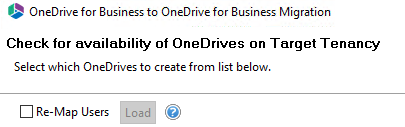
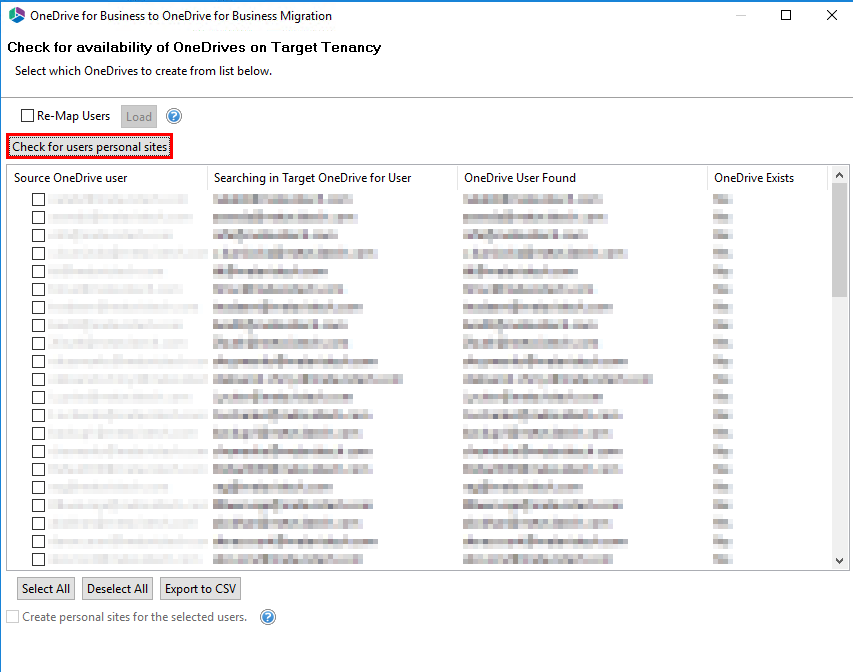
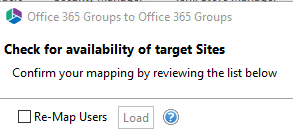
7.On the second page of the wizard, if a user mapping file is required, check the box next to Re-Map Users and then load the mapping file (For an overview on how to create a CSV mapping file for your users, please see the User Mapping section).
8.Click the Check for users personal sites button. This operation will verify that the user account listed in the mapping file was found in the target Office 365 and it will also determine if the user's OneDrive for Business site is currently provisioned.
If the user is valid in Office 365 but does not currently have a OneDrive for Business site, please check the option labeled "Create personal sites for the selected users" which will instruct the software to provision the necessary sites.
9.Click Next to continue.
10.The final page provides a few options to configure how the content portion of the operation should be configured.
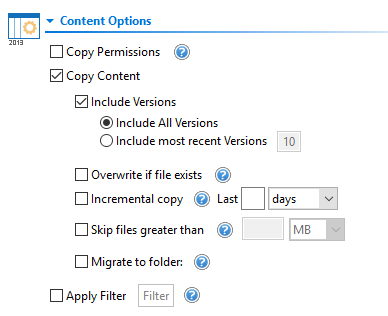
Content Options
Copy Permissions - This option will enable the transfer of internally shared permissions from the source to OneDrive for Business. For source Google Drive migrations, this will include internally shared folder and item-level permissions. For source SharePoint My Site migrations, this will include internally shared site, list and item level permissions. For source Box migratons, this will include internally shared folder collaborators. For source Dropbox migrations, this will include internally shared folder permissions. |
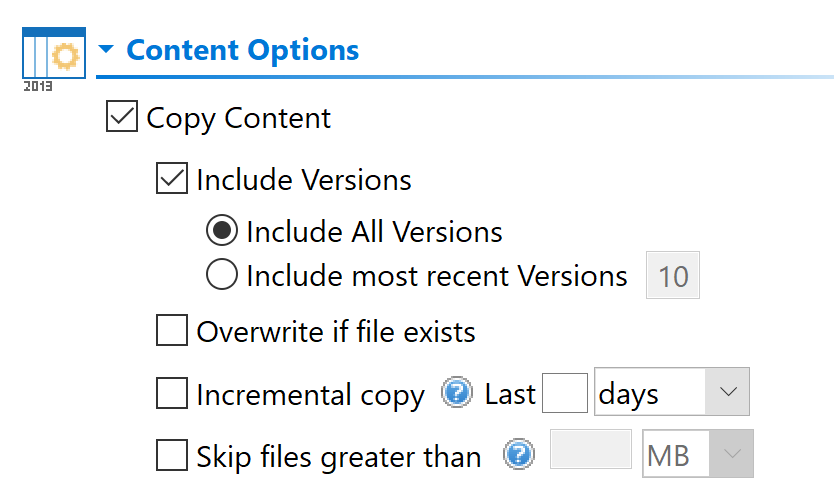
Copy Content - Enabling this option will copy all of the content from your Source to your Target. You can further specify if you would like to include all versions of the content from your source, or only the specified most recent versions. |
Overwrite if file exists - In a version library, selecting the "Overwrite if File Exists" option does not overwrite the files already in SharePoint. SharePoint will append these to the list as new versions.
Incremental Copy - Incremental or delta migrations are an important and powerful option for large or ongoing projects and migration validation. Once enabled this option will migrate new, modified or versioned content from the source to the destination, capturing changes made by users during the previous migration. The value entered into the "Last" field will limit the amount of content examined to the time period specified, starting at present time. To perform an incremental migration, enter the amount of time to include and select the appropriate time period in days, weeks or months. Incremental migration is designed to be used in scenarios where the destination is not being modifed. To perform a delta migration, enter zero in the field and select days as the time period. Delta migration is designed to be used in scenarios where both the source and destination may be modified during the course of the migration. Please note that a delta migration compares dates between source and destination to determine which content to include, so it will take more time to process than an incremental migration.
NOTE: The Overwrite if File Exists parameter will be disabled if this option is selected.
Skip files greater than - When enabled, this option will skip any source files that are greater than the value specified (in MB or GB). An entry will be added to the post-migration log indicating which file(s) were skipped due to this configuration. Migrate to Folder - When this option is enabled, you can create a (or use an existing) root folder structure in the destination library where your source content will be migrated. You will need to define the path like this example: /My Source Content/2017 In the above example, the folder "My Source Content" and subfolder "2017" will be created in the root library of your destination and all source content will be migrated to this folder location. Apply Filter - This feature allows the inclusion or exclusion of items by user defined criteria, such as date, size, file extension, file name, or file owner. Note: the Apply Filter functionality is only applied to selected containers (i.e. site, lists or folders). If you select specific content (documents or items) then those objects will be included with the operation regardless of the filter applied. If you want to selectively include content, please select the container that this content resides in and apply the filter or apply the filter against the container first, then select the remaining content. For the File Extension and Exclude Folders parameters only, you can use "," to set more than 1 criteria. For example, use this format "png,docx,pptx" to include multiple file extensions. "Size" filter should have a whole number without decimals. It is recommended that users not use the operators "Equal" and "Not Equal" to avoid difficulties with accurate file size, if the file size is greater than 1 MB. Use the "Save Filter" option to save filter settings to a file and load them in different wizards or the Profile Manager. 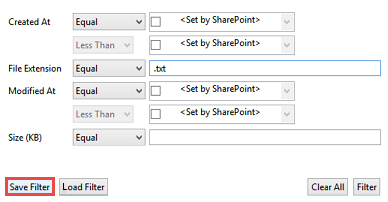 |
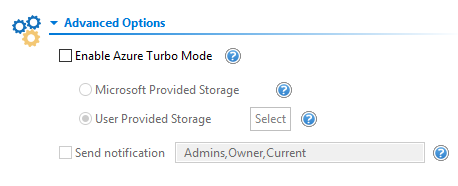
Advanced Options
Enable Azure Turbo Mode: When enabled, this option utilizes Microsoft's SharePoint Online Migration API to increase the migration performance and throughput. A recommendation for optimal use of this API is larger sets of data; the more content, the better the throughput. Please review the User Manual for additional information as well as recommended configuration as this process is a resource intensive operation.
Because this API uses Azure storage as a staging area for the migration, it requires that you provide an Azure storage location. The options are to either utilize Microsoft supplied storage or to provide your own Azure storage location. If you wish to use your own Azure account, you must provide both the Azure Account Name as well as the corresponding Acces Key. If you cannot supply this information, please search our online Knowledge Base, User Manual or contact Support for additional information before proceeding or consider using the Microsoft Supplied Storage option. For more information please see the Azure Turbo Mode section.
|
|
NOTE: this function is optional and is only used to increase the migration performance to SharePoint Online or OneDrive for Business in Office 365. It does not provide any additional functionality that is not available when this option is disabled. |
·Microsoft Provided Storage: This option allows you to use Microsoft provided Azure storage instead of providing your own for the purpose of utilizing Azure Turbo Mode.
·User Provided Storage: This option allows you to provide your own Azure Storage instead of using one provided by Microsoft for the purpose of utilizing Azure Turbo Mode. It requires that you provide both your Azure Blob Storage Account Name as well as its corresponding Access Key by clicking the "Select" button to the right. If you cannot supply this information, please search our online Knowledge Base, User Manual or contact Support for additional information before proceeding.
|
|
NOTE: User Provided storage will give you access to Azure logs for a longer period of time than Microsoft provided storage. It will also allow you to perform the migration faster with less throttling. |
Send Notification: When selected, this feature will send emails to the listed recipients once Migrations are completed. Enter a specific user email address. For two or more, separate each email address with a comma. Set up User Notifications here in order to use this feature.
11. Click Finish to begin the migration.
A simple Administrator driven wizard is provided to bulk migrate the Office 365 Group sites from one Office 365 tenant to another Office 365 tenant.
|
|
NOTE: This migration will migrate content only, it will not migrate Exchange emails or calendars. |
In order to successfully configure and run this operation, you will need to be able to authenticate against both SharePoint Admin Center portals in Office 365 using a Global Administrator login. A mapping file may also be needed in order to resolve the user accounts between the source and destination tenants.
This operation has the following requirements for use:
·The account used to perform the migration needs to be a minimum of a Site Collection Administrator in the source Office 365 tenant.
·The account used to perform the migration needs to be a minimum of a Site Collection Administrator in the target Office 365 tenant.
·The person performing the migration will need to know the relationship (user mapping) between the user accounts in the source and target Office 365 tenants.
·Each user account must have either a SharePoint or OneDrive license assigned to it in Office 365.
Once the requirements above are satisfied, you can proceed with utilizing the bulk upload functionality.
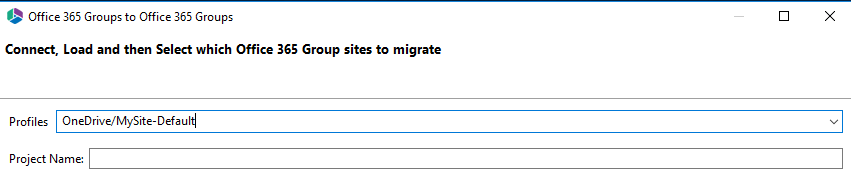
1.Switch to the Drives tab in the Essentials console and click the button "Copy Tenant" located in the ribbon, and select Copy Office 365 Groups to Office 365 Groups.
2.Select a Profile and give your project a name.
3.Enter a SharePoint Admin Center URL for the source Office 365. Once the URL is entered, click the Connect (or Claims) button, enter a valid Admin account and click Connect.
When you receive a successful connection message proceed to the next parameter. You may also choose to add additional Admin account by selecting the "+Admin" button.
4.Enter a SharePoint Admin Center URL for the target Office 365. Once the URL is entered, click the Connect button, enter a valid Admin account and click Connect.
When you receive a successful connection message proceed to the next step. You may also choose to add additional Admin account by selecting the "+Admin" button.
5.Click the Load from SharePoint button or Load From CSV. Note that Load from CSV will allow you to load users from a CSV file, which is the faster option as only the listed users are loaded. (You can also choose to load from CSV and use a user mapping report)
6.In the table, a list of currently provisioned domain users will be loaded. Check the box next to each user that will be included with this operation. Click Next to continue.
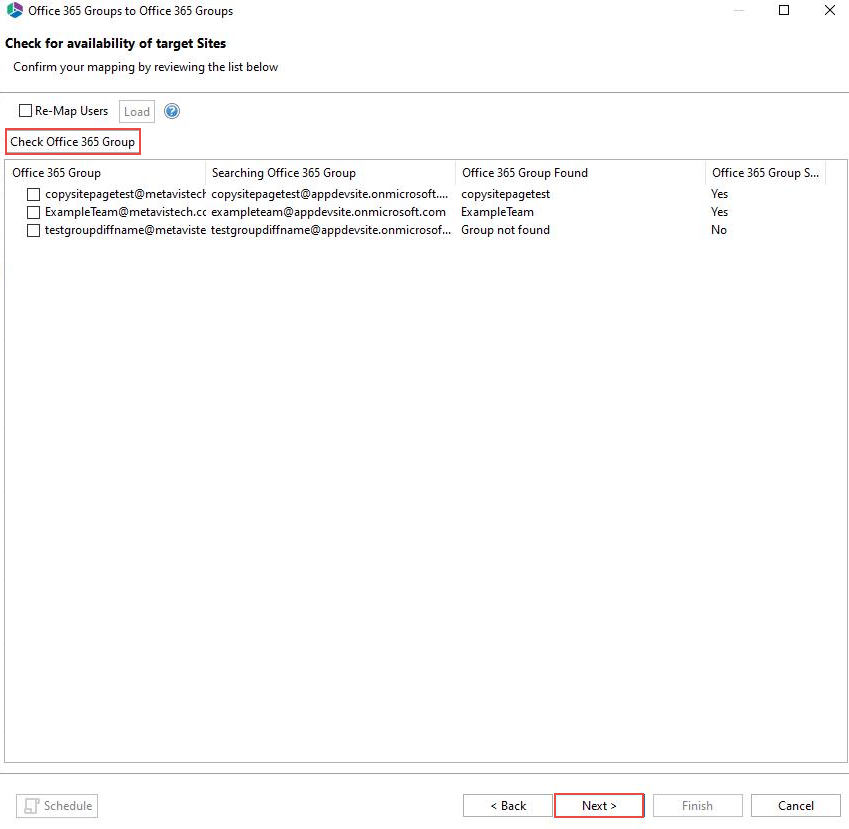
7.On the second page of the wizard, if a user mapping file is required, check the box next to Re-Map Users and then load the mapping file (For an overview on how to create a CSV mapping file for your users, please see the User Mapping section).
|
|
NOTE: In order to migrate users, you must have them mapped in the same CSV mapping file with the groups mapping. |
8.Click the Check Office 365 Group button. This operation will verify that the user accounts listed in the mapping file were found in the target Office 365.
|
|
NOTE: If a Group does not exist on the target then it will be created based on the original group membership from source to target. If the list of users is empty Essentials will use the migration administrator as the owner. |
9.You can choose to remap your source O365 Groups to specified target 0365 Groups by selecting Remap. This will allow you to use a saved CSV file for remapping. Once your CSV has uploaded and your mapping is visible, click Next to continue.
10.The final page provides a few options to configure how the content portion of the operation should be configured.
Content Options
Copy Content - Enabling this option will copy all of the content from your Source to your Target. You can further specify if you would like to include all versions of the content from your source, or only the specified most recent versions. |
Overwrite if file exists - In a version library, selecting the "Overwrite if File Exists" option does not overwrite the files already in SharePoint. SharePoint will append these to the list as new versions.
Incremental Copy - Incremental or delta migrations are an important and powerful option for large or ongoing projects and migration validation. Once enabled this option will migrate new, modified or versioned content from the source to the destination, capturing changes made by users during the previous migration. The value entered into the "Last" field will limit the amount of content examined to the time period specified, starting at present time. To perform an incremental migration, enter the amount of time to include and select the appropriate time period in days, weeks or months. Incremental migration is designed to be used in scenarios where the destination is not being modifed. To perform a delta migration, enter zero in the field and select days as the time period. Delta migration is designed to be used in scenarios where both the source and destination may be modified during the course of the migration. Please note that a delta migration compares dates between source and destination to determine which content to include, so it will take more time to process than an incremental migration.
|
|
NOTE: The Overwrite if File Exists parameter will be disabled if this option is selected. |
Skip files greater than - When enabled, this option will skip any source files that are greater than the value specified (in MB or GB). An entry will be added to the post-migration log indicating which file(s) were skipped due to this configuration.
Advanced Options
Enable Azure Turbo Mode: When enabled, this option utilizes Microsoft's SharePoint Online Migration API to increase the migration performance and throughput. A recommendation for optimal use of this API is larger sets of data; the more content, the better the throughput. Please review the User Manual for additional information as well as recommended configuration as this process is a resource intensive operation.
Because this API uses Azure storage as a staging area for the migration, it requires that you provide an Azure storage location. The options are to either utilize Microsoft supplied storage or to provide your own Azure storage location. If you wish to use your own Azure account, you must provide both the Azure Account Name as well as the corresponding Acces Key. If you cannot supply this information, please search our online Knowledge Base, User Manual or contact Support for additional information before proceeding or consider using the Microsoft Supplied Storage option. For more information please see the Azure Turbo Mode section.
|
|
NOTE: this function is optional and is only used to increase the migration performance to SharePoint Online or OneDrive for Business in Office 365. It does not provide any additional functionality that is not available when this option is disabled. |
·Microsoft Provided Storage: This option allows you to use Microsoft provided Azure storage instead of providing your own for the purpose of utilizing Azure Turbo Mode.
·User Provided Storage: This option allows you to provide your own Azure Storage instead of using one provided by Microsoft for the purpose of utilizing Azure Turbo Mode. It requires that you provide both your Azure Blob Storage Account Name as well as its corresponding Access Key by clicking the "Select" button to the right. If you cannot supply this information, please search our online Knowledge Base, User Manual or contact Support for additional information before proceeding.
|
|
NOTE: User Provided storage will give you access to Azure logs for a longer period of time than Microsoft provided storage. It will also allow you to perform the migration faster with less throttling. |
Send Notification - enter specific user email addresses to denote who will receive notifications. Set up User Notifications here in order to use this feature.
11.Click Finish to begin the migration.
The following are supported features and requirements for the migration of Modern Pages when doing an Office 365 Group to Office 365 Group Migration:
·Functionality works only for modern pages (Inherits="Microsoft.SharePoint.WebControls.ClientSidePage" )
·Pages should be published on source.
·Works only through CSOM. If migration was started with azure -pages migration would go in to CSOM and can be done only in sync mode.
·Functionality works only for out-of-box Pages, library automatically created when group site is created or team site is created.
·Overwrite of pages is not supported. Overwrite and Incremental/Delta works the same - Target pages would be deleted and new pages with web-parts would be created.
·Pages history for modern pages is not supported and will not be preserved.
·Core properties for modern pages should be preserved for last page version.
·Web part ID should be updated after it was created on the target page.
·Link inside web part referencing on lists should be updated after it was created on the target page.
·If reference object is missing on target (was not copied because of errors, was excluded from migration, deleted from target before migration) the web part is copied as close as it can be. There will be no errors logged for the web part or for the page migration in post migration log.
·app.log in job log must have the line :
"Create modern page :: :: page name.aspx has web parts: updated: list- webpart id , list - webpart id, image - id and not updated: map id". For example : Create modern page :: :: page Home.aspx has web parts: updated: Image-edbf790c-7047-4f81-9893-c90e35eaf3db List-9d86e730-a1ff-4631-aeb2-6f52a097e339 List-e6158eca-b230-42d3-a5a8-7ca7840e44c3 DocumentEmbed-459d5426-ed40-4031-accb-d33f59006f98 and not updated: ContentRollup-66046009-2f07-40e0-b3da-28d4196f956b LinkPreview-e6195746-3090-46c2-8c94-ff31fc009d9f.
This info will give an explanation about supported web parts and not supported web parts. Web parts next to not updated were not modified by the tool and will not work on the page.
·Section layout should be the same as on the source. List of supported layouts: one column, two column, thee columns, one-third left column, one-third right column. Section background is not supported
·Web part should be placed on the same section and same zone as on the source page.
·Tool will create a .txt file with original page history just to save this information somewhere and share it with end-users.
List of supported Web Parts
·Text (Supported properties: simple text without formatting)
·Image (Supported properties: link to image; only for current site - sub sites and other site are not supported)
·Highlighted content (Supported properties: Source - this site , Type - documents , Document Type - any)
·Document Library (Supported properties: Document lib link reference)
·List (Supported properties: List link reference)
·File Viewer (Supported properties: File link reference)
·Link (link reference)
·Tasks
·Picture Library
·Survey