Examples of Workflow Configurations
Loading data from external sources into a model
This example describes the following use case: application and vendor data stored in different external tools must be loaded consistently in a CE repository.
Let us suppose that:
a CMDB manages the application data, stored in a MySQL database table. The application table identifies the item with a “COD_APPLICATION” field, which has a different erwin ID for the model for the same item:
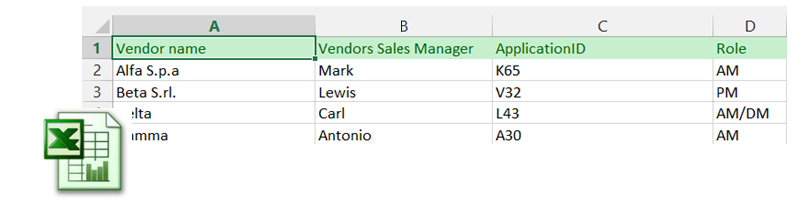
Vendor data for any application are provided by another APM tool, via an Excel report. The file relates the Vendor and the Sales Contact with an Application through its CMDB code:
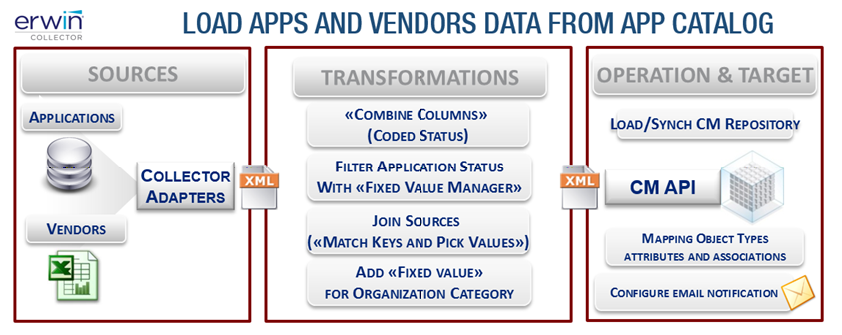
A DT workflow importing and refreshing application and vendor data can be configured with the following steps:
CREATE MODEL CONFIGURATION
Log in to DT and create a model configuration, for instance on model “Framework Example”. To load data into a model choose the specific model configuration.
CREATE DATABASE ADAPTER FOR SAMPLE APPLICATION CATALOG DB
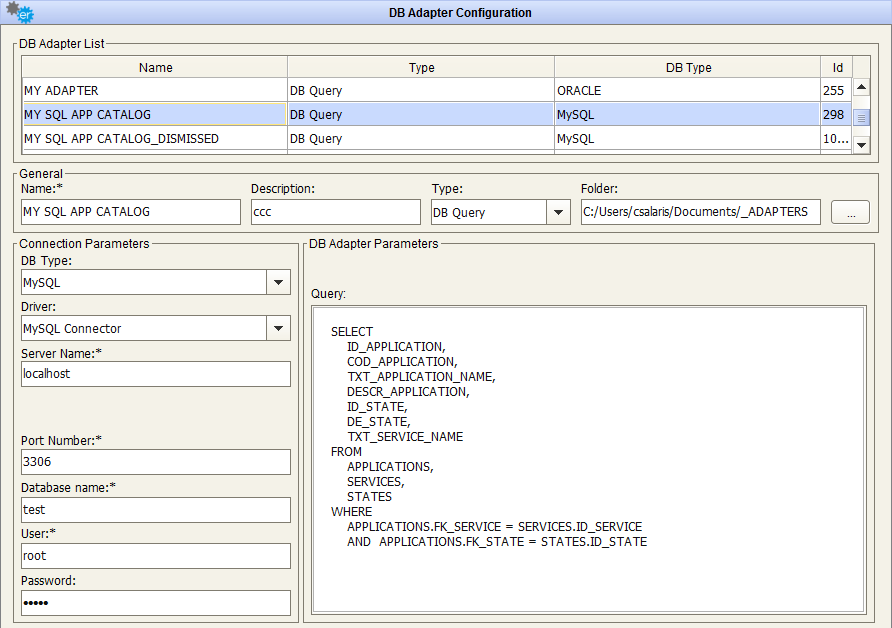
Press the “DB Adapter” button on the Home Page and configure the following adapter:
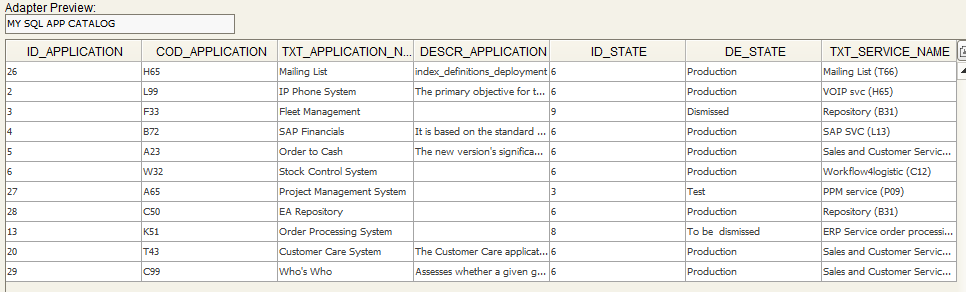
having the database type equal to “MySQL”, server, port, database name, user, password and query producing the desired data (preview with the “Test” button):
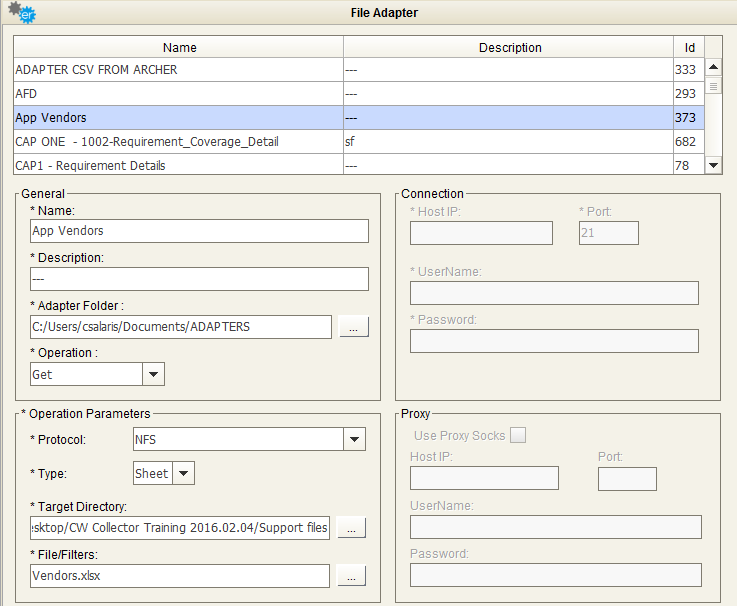
CREATE FILE ADAPTER FOR VENDORS INFORMATIONS FILE
Press the “File Adapter” button on the Home Page and configure the following adapter:
CREATE WORKFLOW TO LOAD APPLICATIONS AND VENDOR DATA
Press the “Workflow configuration” button on the Home Page and configure the following workflow choosing the model configuration set in the previous steps:
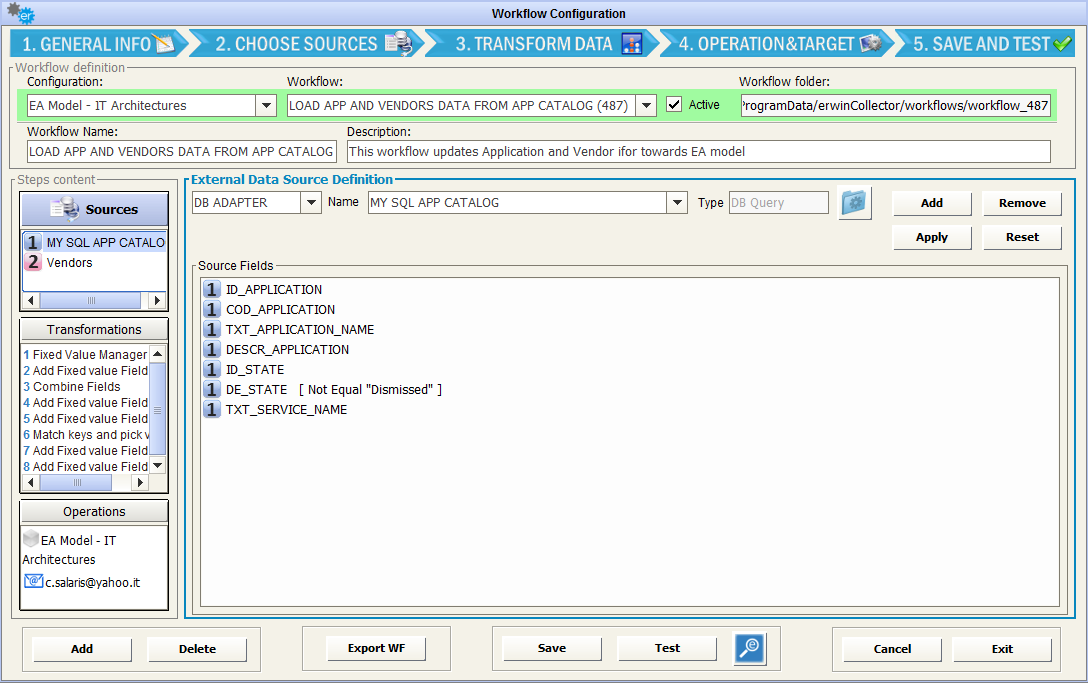
SOURCE DEFINITION – Source 1
Choose previously configured DB adapter on MYSQL:
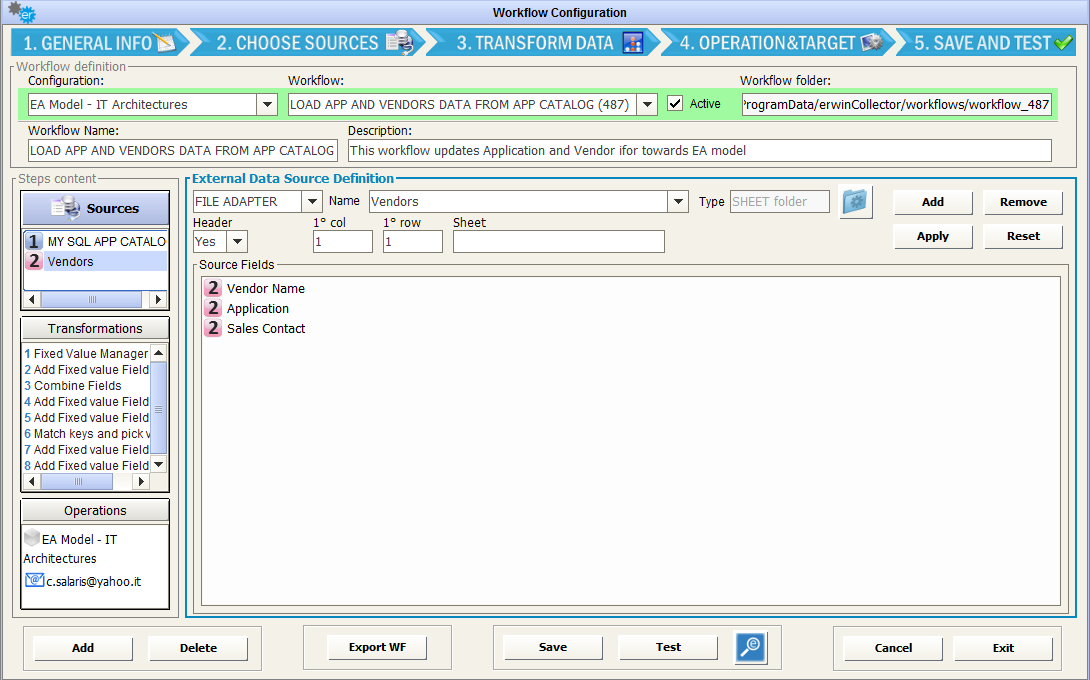
SOURCE DEFINITION – Source 2
Choose previously configured file adapter for vendor info:
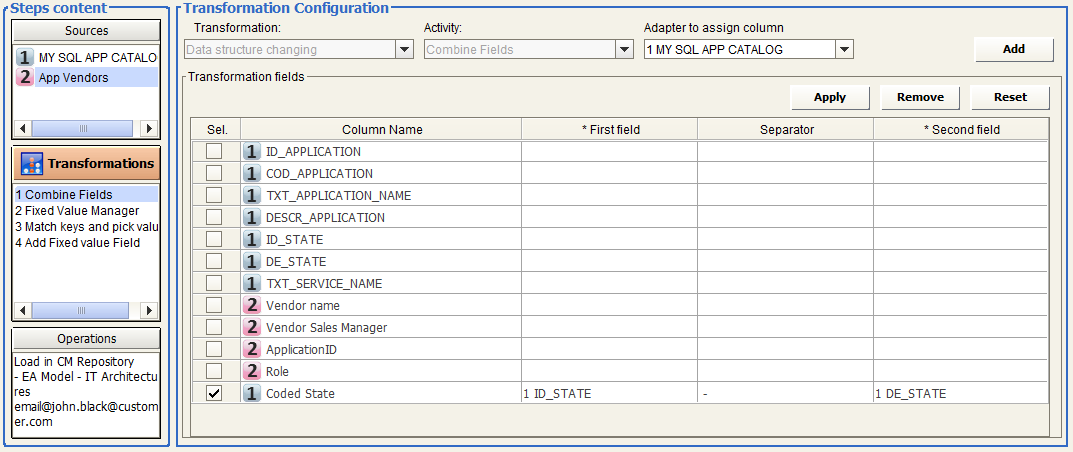
TRANSFORMATION 1 – Combine field
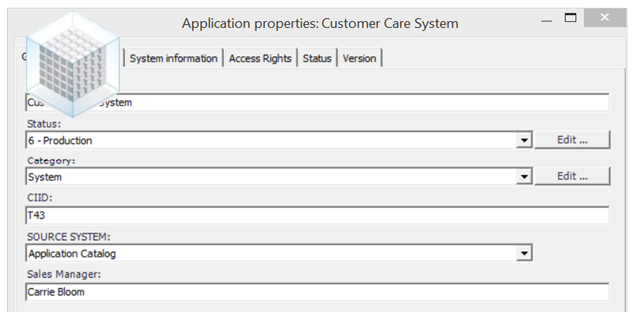
Let us suppose that “Status” field in CM model is coded, combining the status id with the status description (for example “6 - Production”). Combine the application status code and application status description (columns “1 ID_STATE” and “1 DE_STATE”) in a new column named “1 Coded state” with a given separator according to target model conventions:
TRANSFORMATION 2 – Filter Status Values
CM model manages only active applications: choose “DATA FILTER”, “Expected fixed Value Manager” to manage only application with a status different from “Dismissed”:
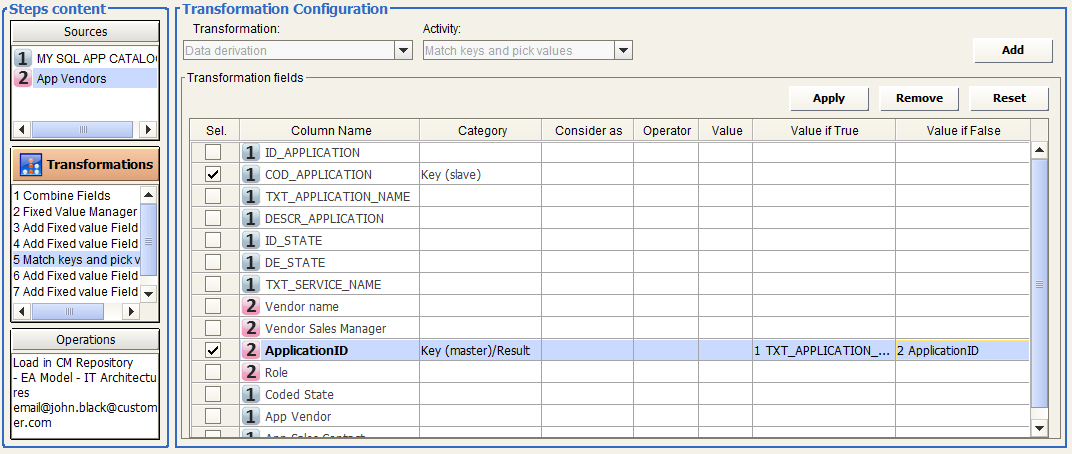
TRANSFORMATION 3 – Pick the application name from the App catalogue dataset, given its id
The “Data derivation” activity “Match keys and pick values” applies if it is required to join values from different data sets and have a different result column value if the keys are matched or not. For the purposes of this exercise:
Set the ‘Category’ field to “Key (slave)” for “COD_APPLICATION” and “Key (master/result)” for “ApplicationID” in the Vendor dataset: pick “TXT_APPLICATION_NAME” column from app catalogue dataset to get the application name, when the keys match (“Value If True”) and the column itself, otherwise (“Value If False”).
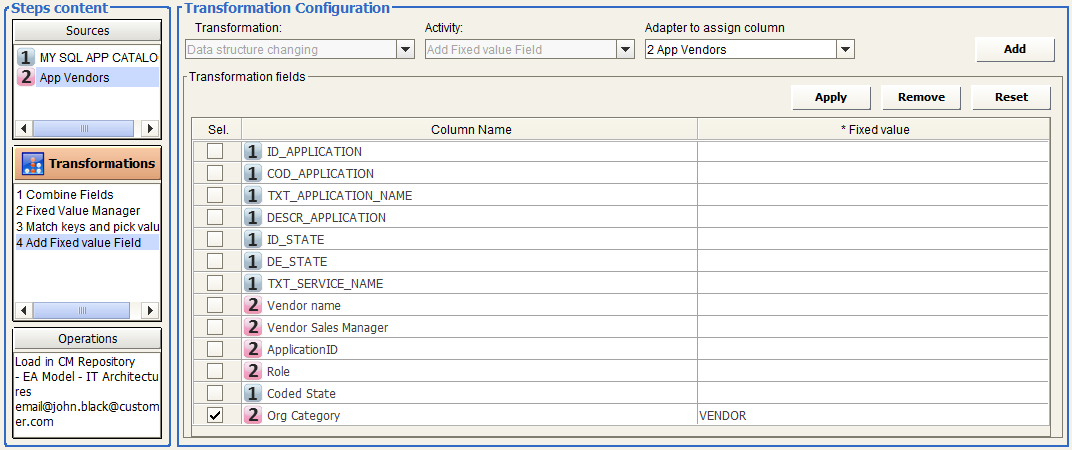
TRANSFORMATION 4 – Set Vendor Category.
Choose “DATA STRUCTURE CHANGING” and “Add fixed value Field”, with name “Vendor Category” and value “VENDOR” and assign to Adapter “2 App Vendors”:
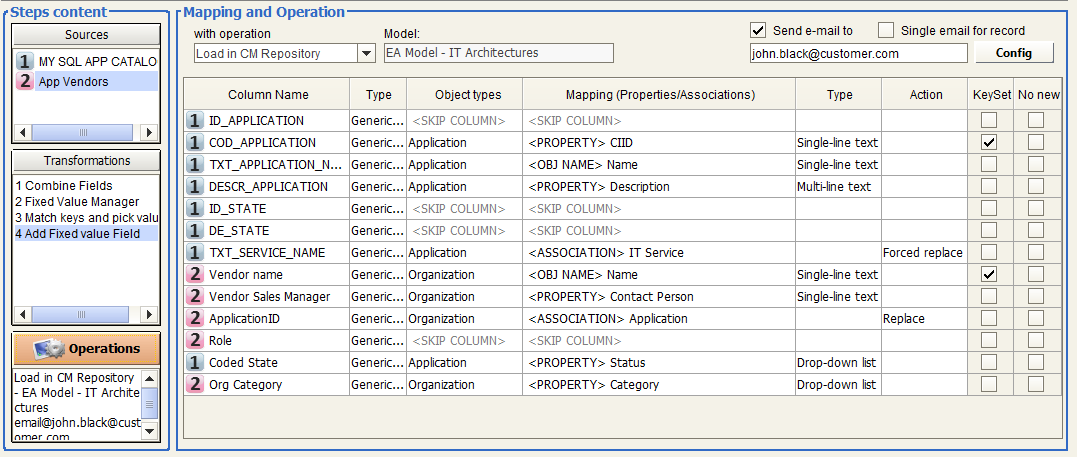
OPERATION – Load in CM Repository
Load application and vendor data in to model, as in the next picture.
Note that the keyset for operation is set to “<Property> CIID” to manage the renaming of applications. The “Forced replace” option under ‘Action’ for “TXT_SERVICE_NAME” will make the association between “applications” and “IT services” be replaced even when associations are diagrammed.
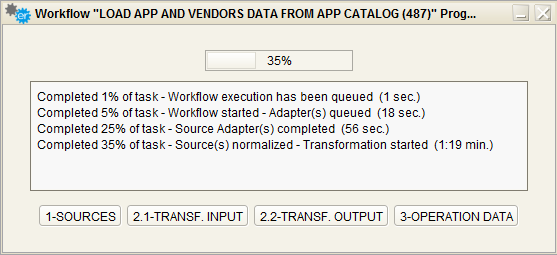
TEST THE WORKFLOW
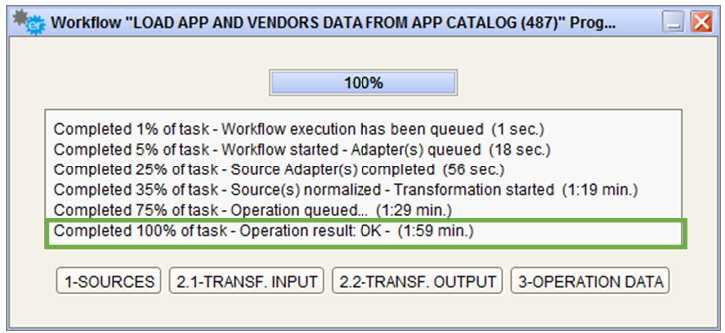
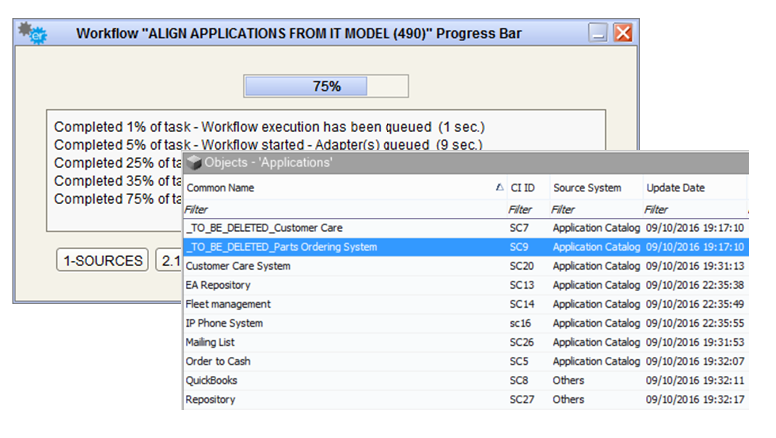
Test the configured workflow with the “Test” button, and follow its execution through the progress bar or Logs and email notifications.
At the end of workflow transformation if operation data is available and ready, the user may choose whether to execute the operation or not:
CHECK RESULT
Moreover, you can check the result:
ofrom the test workflow progress bar:
oin CM, accessing the tool through the CM icon provided in the button bar.
owith the email notification, if configured for the single workflow:
ofrom the DT Log Viewer:
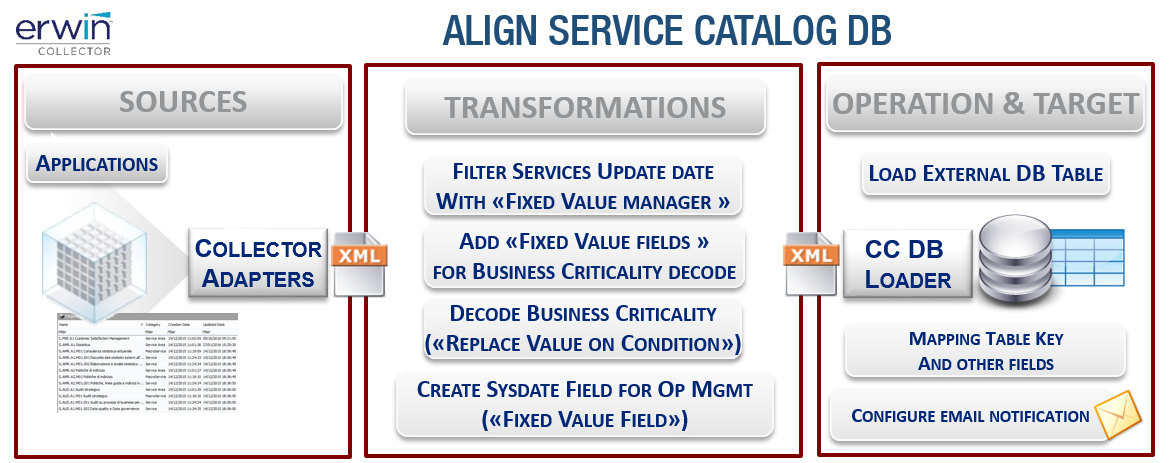
Align External DB with Model Contents
The example describes the following use case: business service data, managed natively into a CE repository, must be loaded consistently in a MS SQL database, hosting a third party Service Catalogue.
Let us suppose that:
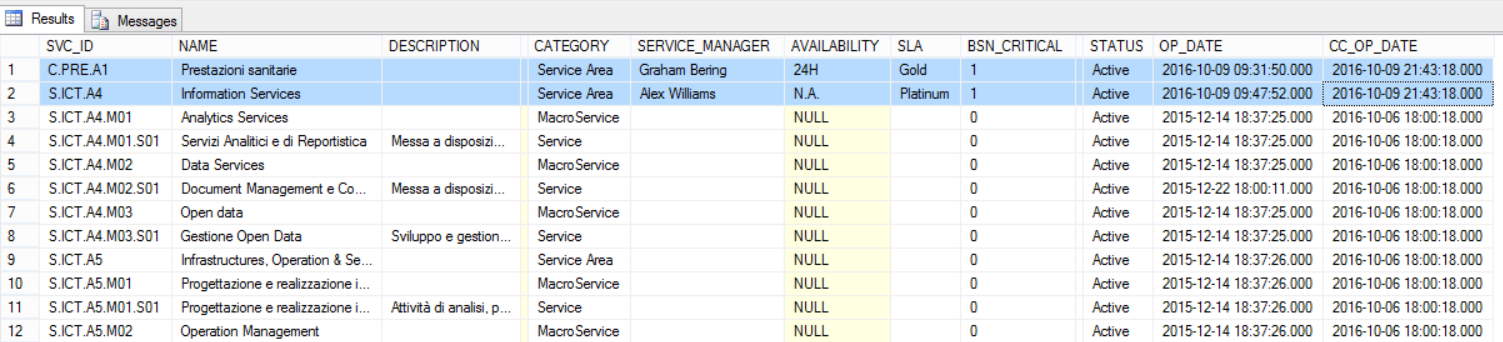
Business service data are into the CM model, in a dedicated object type
a Service Catalogue manages enterprise services data, stored in a MS SQL database table. The service table identifies the item with a “COD_APPLICATION” field, which is differentiated by the Erwin ID of the model for the same item:
A DT workflow aligning Business Services data from Erwin to the Service Catalogue database can be configured with the following steps:
CREATE MODEL CONFIGURATION
Log in to DT and create a model configuration for the model involved in the use case
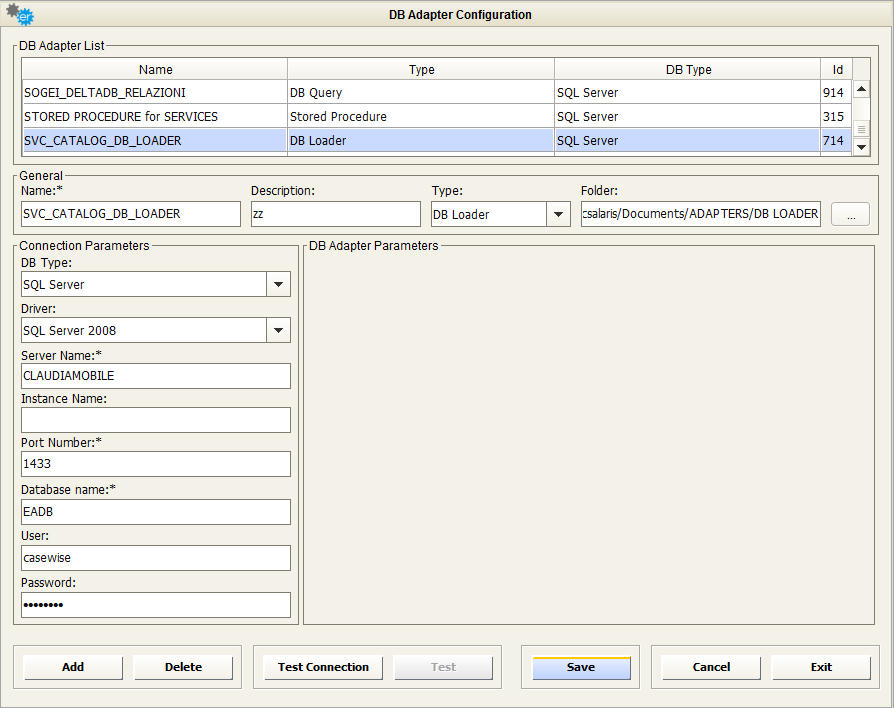
CREATE DATABASE ADAPTER TO LOAD SERVICE CATALOG DB
Press “DB Adapter” button in Home Page and configure the DB Loader Adapter:
with the proper DB type, server, port, database name, user, password for the target
CREATE WORKFLOW TO ALIGN SERVICE CATALOG DATABASE
Press the “Workflow configuration” button on the Home Page and configure the following workflow choosing the model configuration according to requirements (please note that the model configuration is mandatory for a given model, only for “Load, Sync or Delete” operation against that model)
|
|
Please note that the model configuration is mandatory for a given model, only for “Load, Sync or Delete” operation against that model. |
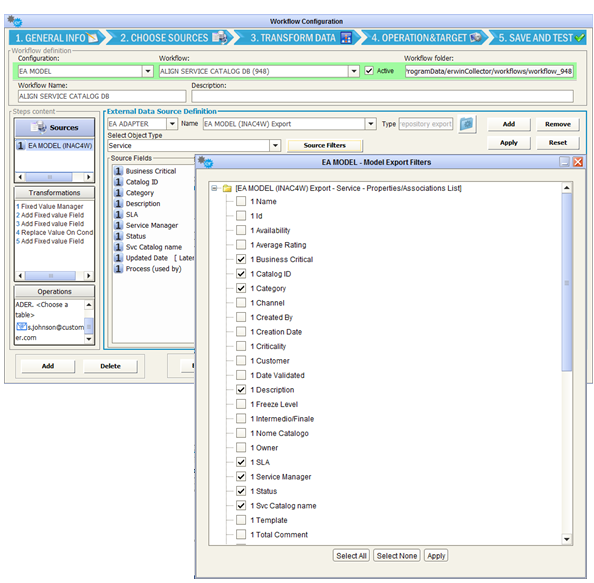
SOURCE DEFINITION – Source 1
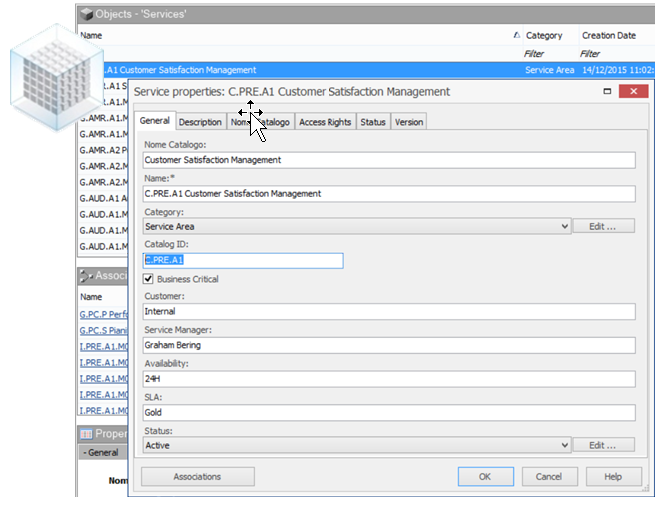
Choose CM Adapter and the specific CM Model Export adapter from the dropdown list; then pick the “Service” object type from the list and check the desired properties / associations from the “CM Filters” interface:
TRANSFORMATION 1 – Filter services at export time
To optimize the data flow, filter source data in order to export only the more recently updated. Use then a “Data filtering”, “Fixed Value Manager” to manage only services with “Updated Date” up to 3 days before the operation (i.e. running the workflow every 3 days, they will be only needed services, if updated in the last 3 days).
|
|
Please note that filters defined as the first transformation will be shown in the source field list (see picture above) and executed at export time (if a CM Adapter is the source for filter fields) |
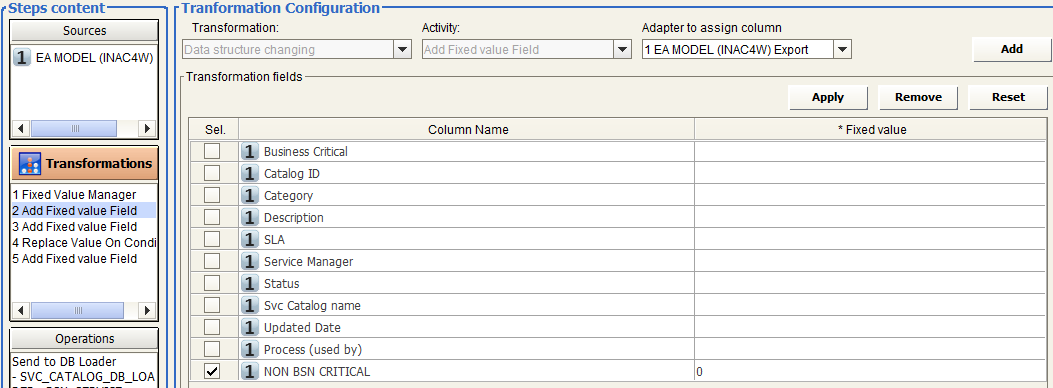
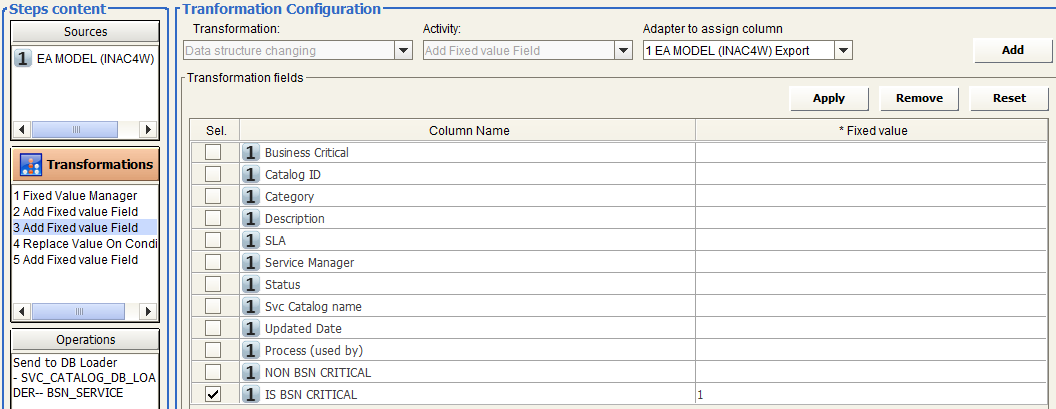
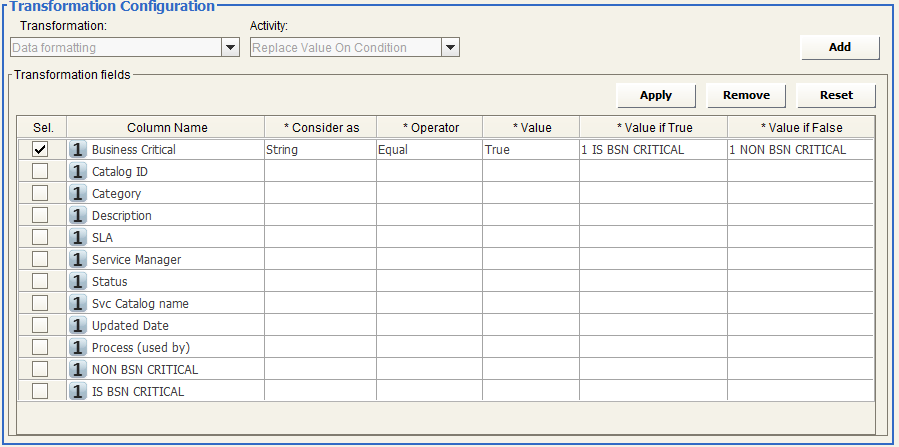
TRANSFORMATION 2/3 – Add Fixed Value fields for target Business Critical fields
The target database stores the Business Criticality information in a bit field, with “0” or ”1” values. In CM there is a checkbox field, exported by CM Adapter as “True” / “False” values.
A text conditional replace is then needed so that two different fixed value fields, with values 0 and 1 respectively, replace “False” and “True” in the following replace transformation (see later):
TRANSFORMATION 4 – Prepare Application name column into Vendor dataset
Vendors are to be imported as Application associated objects, but the Vendor file does not contain the application name, which is needed to execute the operation.
A “Replace Value on Condition” is needed to decode the “True”/”False” value for the source field hosting Business Criticality information in Modeler to the target 1/0 format:
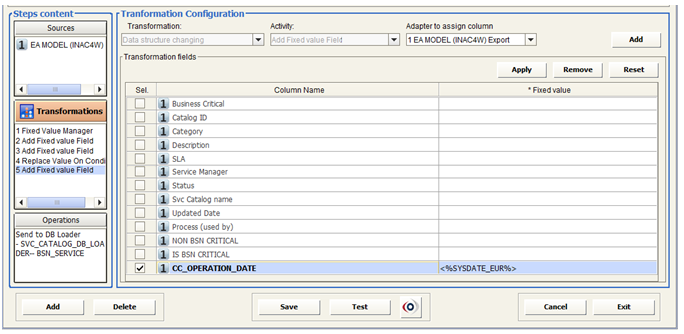
TRANSFORMATION 5 – Add Fixed Value to fill a datetime target field
Let’s suppose that a datetime field in the target table is uploaded with the DT execution datetime, for any created/updated record.
In such a case, a fixed value field, with value equal to parameter “<%SYSDATE_EUR%>” (to get a European “DD/MM/YYYY” format, or “<%SYSDATE_USA%>” for a “MM/DD/YYYY” format or “<%SYSDATE%>” for a standard “DDDD/MM/YY” UTC format):
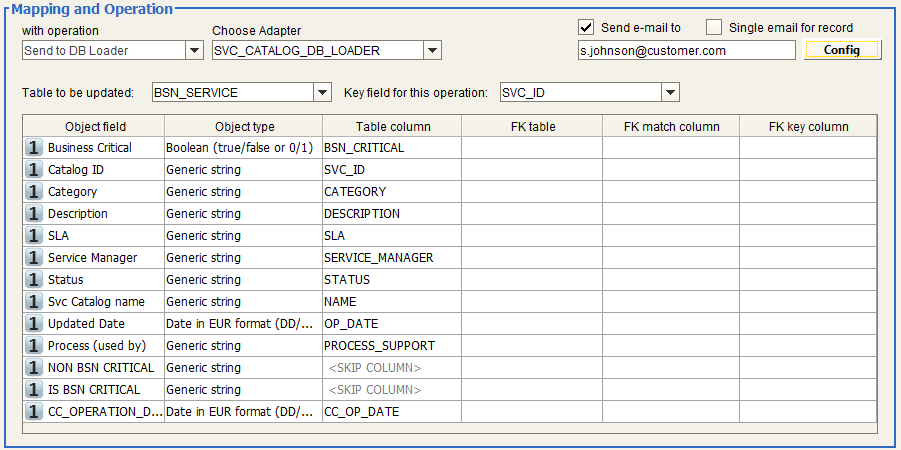
OPERATION – Send to DB Loader
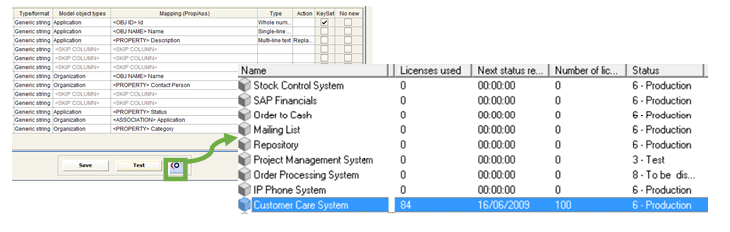
In the “Mapping and Operation” step, choose the previously configured DB Loader, the target table, and the target field to be used as a key for the operation. Then map all the relevant source fields to target fields. In case of datetime, boolean or numeric target fields, the source datatype must be specified to ensure a correct data transfer:
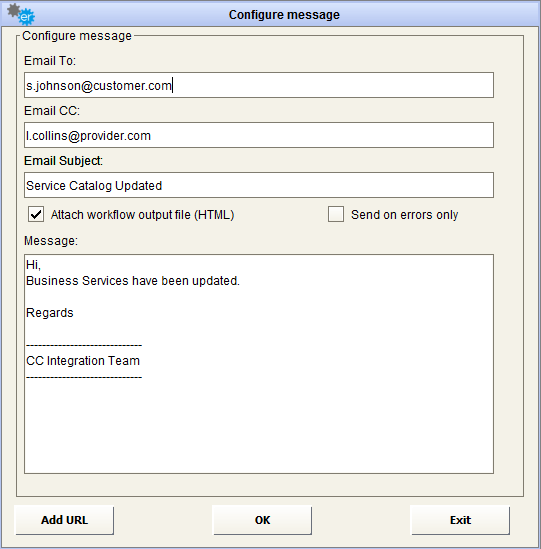
Email can be configured with default text (simply filling the “email to” field) or with custom properties (“Conf”). Please refer to the “Email configurations” for a detailed description on the email configuration options.
TEST THE WORKFLOW AND CHECK RESULT
Test the configured workflow with the “Test” button, and follow its execution through the progress bar or Logs and email notifications. At the end of the workflow execution, check the result in the target database:
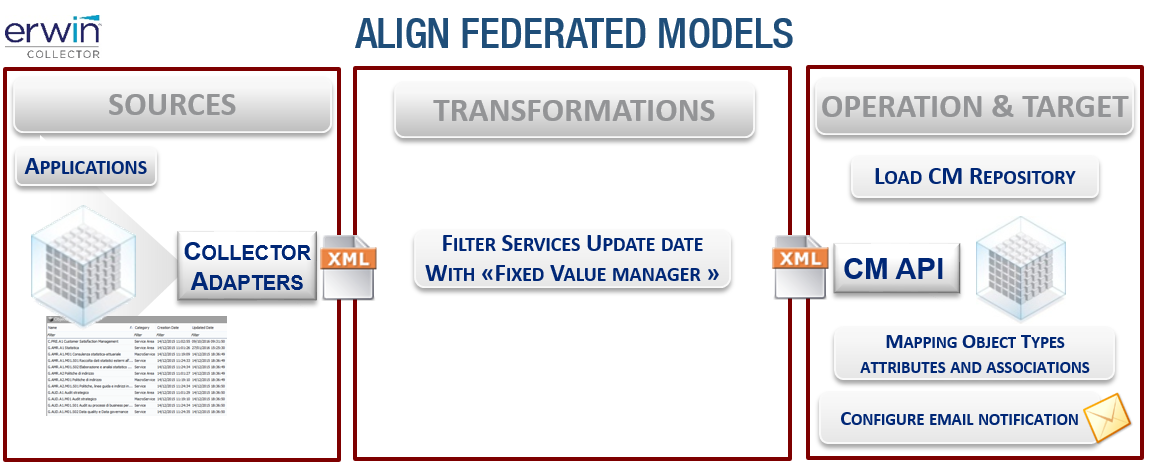
Align Federated Models
This example describes the following use case: an enterprise organized its EA information in two federated models, one specifically aimed to support IT and the second for more general business analysis purposes. The two models partially share the same metamodel, given to different IT and business teams requirements.
The first model is used to synchronize the second about application data, but only for a specific subset of applications, i.e. applications with a given lifecycle status (“production”) and only for those coming from the enterprise application catalogue (the source of application information for IT models, while the second hosts applications from other sources, relevant for the business).
Let us suppose that:
Application data are in the source CM model in a dedicated object type:
a second CM Model hosts application data, which is needed to execute Business Analysis in a dedicated object type, and a slightly different metamodel from the IT Model:
A DT workflow aligning the database of two CM models can be configured with the following steps:
CREATE WORKFLOW TO ALIGN FEDERATED MODELS
Press the “Workflow configuration” button on the Home Page and configure the following workflow choosing the model configuration according to requirements (please note that the model configuration is mandatory for a given model, when the “Load, Sync or Delete” operation must be executed on that model)
|
|
Please note that the model configuration is mandatory for a given model, when the “Load, Sync or Delete” operation must be executed on that model) |
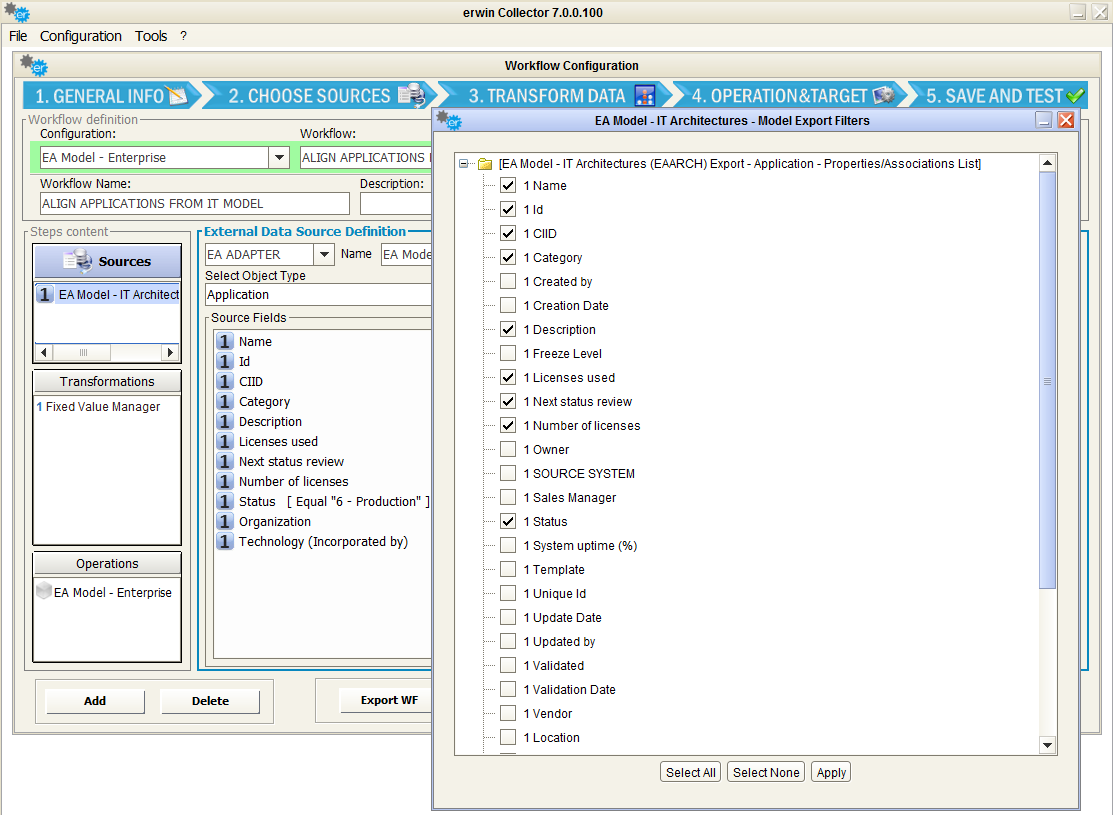
SOURCE DEFINITION – Source 1
Choose the CM Adapter and specific CM Model Export adapter (i.e. the IT Model one) from the dropdown list; then pick the “Application” object type from the list and check the desired properties/associations from the “Source Filters” interface:
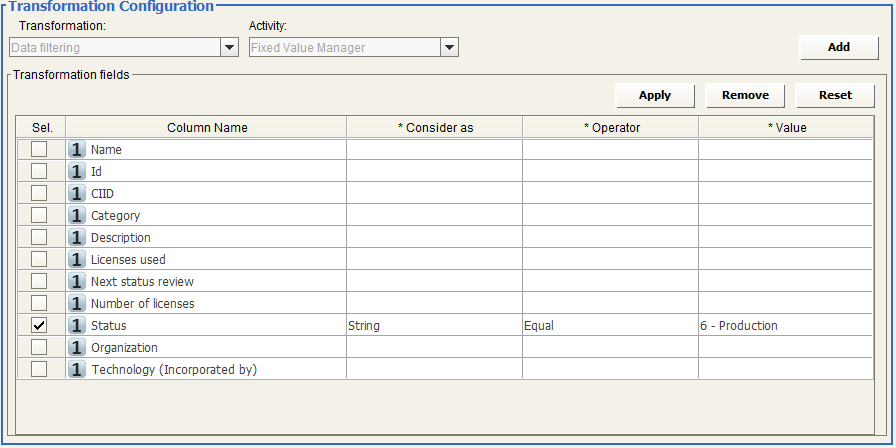
TRANSFORMATION 1 – Filter Application in “Production”
To optimize the data flow, filter source data in order to export only the more recently updated. Use then a “Data filtering”, “Fixed Value Manager” to manage only services with “Status” equal “6 – Production”.
|
|
Please note that filters defined as the first transformation will be shown in source fiels list (see picture above) and executed at export time (if an EA Adapter is the source for filter fields) |
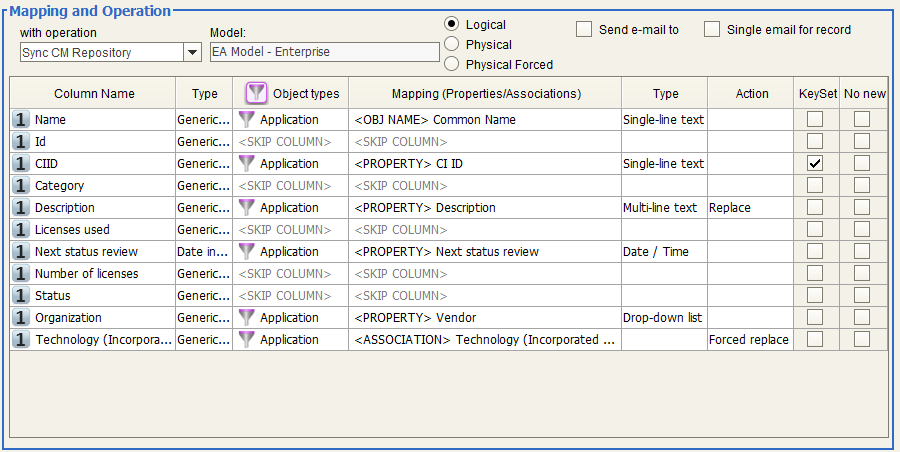
OPERATION – Sync CM Repository
In the “Mapping and Operation” step, choose “Sync CM Repository”. The target model is the one related to the Model Configuration the workflow has been assigned to. Then map all the relevant source fields to the target fields for “Application” object type. Define the desired synchronization action (“Logical”, “Physical” or “Physical Forced” deletion, which will affect redundant objects in the target model in comparison with the exported list from the source model):
|
|
Please note the keyset on the operation defined to be the CI ID of the applications is a reasonable setting because the second model receives application data from various sources. For object types with instances coming only from the source model, it can be also used the Erwin Id. |
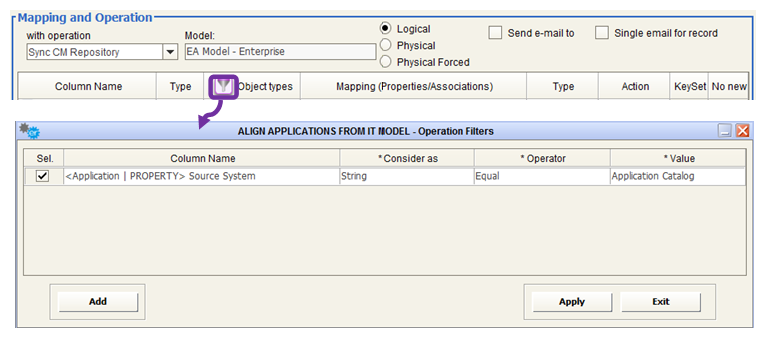
To apply the synchronization within requirements (it must occur only for applications with a specific source system - the Application Catalogue) configure a filter for the synch operation, by double clicking on the filter icon on the “Object Type” column:
TEST THE WORKFLOW AND CHECK RESULT
Test the configured workflow with the “Test” button and follow its execution through the progress bar, Logs and email notifications. At the end of workflow execution, check the result in the target CM Model: