
Scheduling a ControlPoint Operation
The ControlPoint scheduler lets you set up ControlPoint operations to run in the background at a specified date and time, such as when system resource usage is low. Depending on your ControlPoint permissions, you can schedule:
·an Advanced Search
·any ControlPoint analysis
·most ControlPoint actions.
This feature is especially useful for:
·operations that might take a significant amount of time to complete (such as a an analysis run on a large farm)
·operations that you want to run during off-peak hours (such as moving an active site)
·enforcing corporate or regulatory policies (for example, by ensuring that user permissions are always set at the proper levels)
·analyses that you want to run and distribute on a regular basis (such as weekly site activity or storage usage).
Results of scheduled ControlPoint analyses can be sent to email distribution lists and/or posted to a SharePoint document library as a .pdf, an Excel formatted spreadsheet, or a csv file. Individual data sets within analyses can also be saved as SharePoint lists for use in creating dashboards.
ControlPoint uses a different (typically larger) limit on the number of line items that can be returned when an analysis is run on a scheduled basis than when run interactively. ControlPoint Application Administrators can, however, modify this limit.
NOTE: In a multi-farm installation, operations can only be scheduled for the home farm.
How Scheduled Jobs are Handled
The ControlPoint scheduler is driven by a Windows scheduled task This task both checks for and initiates the running of scheduled jobs. The task performs these activities every time it runs. (For information on updating the ControlPoint Online Scheduler, see the ControlPoint for Microsoft 365 Administration Guide.)
Scheduling a Recurring Analysis for Which a Specific Date Range or Time Period was Selected
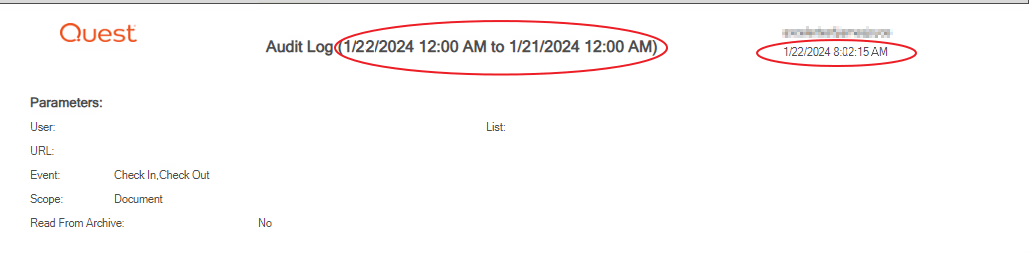
If a ControlPoint analysis is scheduled to run on a recurring basis and includes a date range or time period, the ControlPoint scheduler will interpret it as a relative date range or time period (that is, relative to the date when the scheduled job is run). The first time the scheduled job runs, the analysis will cover the date range specified in the Parameters section. For subsequent job runs, the date range will be updated accordingly.
EXAMPLES:
·If you initiate an Audit Log analysis on a Monday for a date range that covers the the previous week, then schedule it to run on a recurring basis:
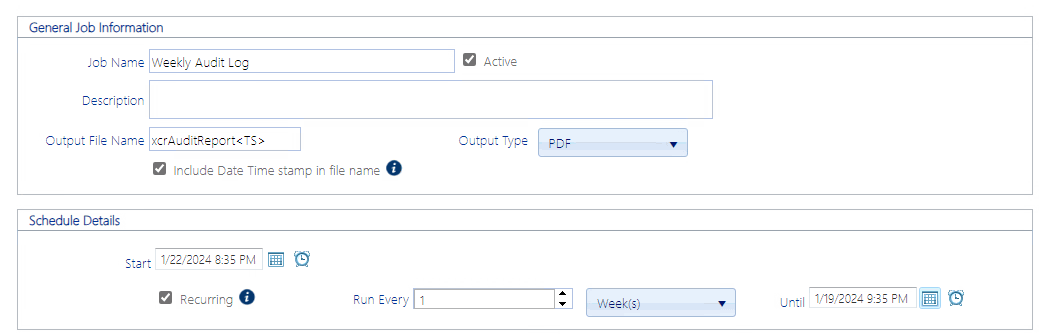
§the first time the scheduled job runs, the analysis will include data for the the week you specified it the analysis parameters
§the second time the scheduled job runs (at the end of the following week), the analysis will include data for the following week
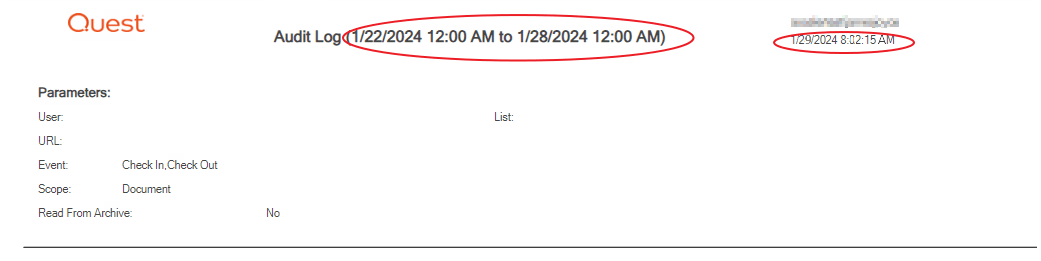
§and so on.
·If you schedule a SharePoint Summary Report to run every 30 days, the analysis will include activity that occurred 30 days ending on the date the scheduled job runs, regardless of the date on which the report was initiated.
Creating a Scheduled Job
To schedule a ControlPoint operation:
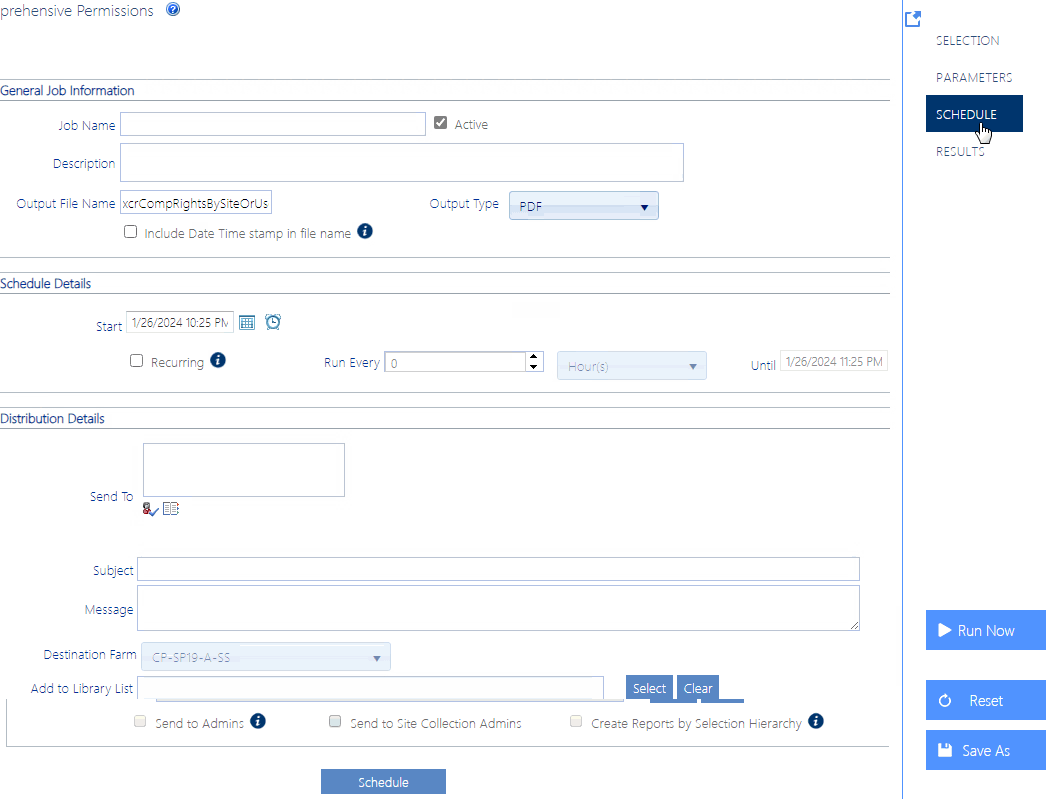
1After initiating and specifying the parameters for a ControlPoint operation, open the Schedule section.
Note that, for some ControlPoint operations that are likely to be scheduled for purposes of compliance with corporate or regulatory policy, this section is labeled Enforce Policy.

2Enter a Job Name and Description.
TIP: Choose a brief but descriptive name that uniquely identifies the job. This will make it easier for you to identify it in the Schedule Monitor and Scheduled Jobs Report. If you choose to have the output posted to a SharePoint document library, the Job Name will also be used as the document Title.
3If you want the job to be active, make sure the Active box is checked.
NOTE: Once a scheduled job has been added, it can be activated or deactivated as needed.
4If you want to change the Output File Name, overwrite the default name.
CAUTION: The same default Output File Name is used for every action or analysis of a particular type. For example, whenever you schedule a Site Permissions by Site analysis, the default output file name is xcrRightsBySite, regardless of its scope, or who requested it. It is possible to have more than one job with the same output file name. Keep in mind, however, if more than one job with exactly the same output file name is posted to the same document library, an existing document will be overwritten with a more recent document with the same name.
5For ControlPoint analyses only:
a) If you want the date and time that the job is run to be appended to the file name, click the Include Date Time stamp in the file name box. (This will enable you to retain a historical record of analysis results that may be used as a record of compliance with policies or regulations.)
b)If different than the default, select an Output Type from the drop-down.
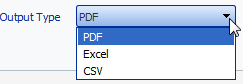
NOTE: If you choose CSV, output will be in the form of raw analysis data that can be imported into another program for further examination.
6Complete the Schedule Details as follows:
|
If you want to ... |
Then ... |
|---|---|
|
run an operation one time only |
Enter or select a Start date ( |
|
run an operation at regular intervals |
a.For Start, enter the first date ( b.Click the Recurring box. c.For Run every: ·enter the interval (as a positive integer) at which you want the job to run ·select an interval type (Hour, Day, or Month) d.For Until, enter or select the last date ( |
 ) and time (
 ).
).NOTE: Dates and times correspond to those of the server on which the ControlPoint scheduler is running.
7Complete the Distribution Details. Use the information in the following table for guidance.
|
If you want to ... |
Then ... |
|---|---|
|
have a notification email sent to one or more recipients when the job completes* (and, in the case of an analysis, have output included in the email as an attachment) |
complete the Send to:, Subject, and Message fields. (The From field will automatically be populated with the email address specified when the ControlPoint Online application was originally installed.) NOTE: You can either use the SharePoint People Picker as you would when selecting users on which to perform a ControlPoint action or analysis, or enter one or more email addresses (separated by semicolons), in the Send to field. |
|
have analysis results posted to a SharePoint document library |
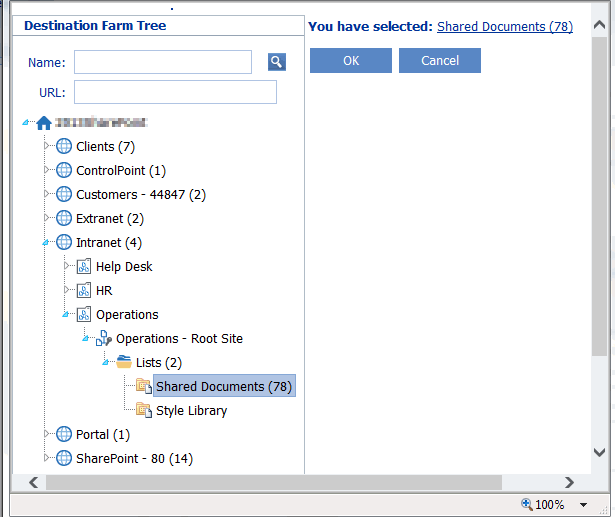
Complete the Add to Library or List field as follows: ·Click [Select] to display the Destination Selection Page pop-up dialog, and select a document library from the Destination Farm Tree. (Note that only lists and libraries within the current farm for which you have Full Control access display). ·Select a library from the tree (You can also enter a full or partial Name or URL to narrow your selection). ·Click [OK] to dismiss the dialog and populate the field with the full url path to the selected library. NOTE: When a document is placed into a SharePoint document library, the Output Filename becomes the document Name, and the Job Name becomes the document Title. |
8To save the job, click [Schedule].
Once a scheduled job has been created, it can be accessed via the Schedule Monitor.