To view the Job properties in the SQL Scanner window
Right-click the Job and select Properties.
Review the following for additional information:
| Item | Description |
|
Name |
Job name. |
|
Type |
Type of Job scanned (text/binary file, COBOL file, abstract plan group, Collectors from SQL Collector for Monitor Server, SQL Inspector file, database object). |
|
Description |
Job description. |
|
Last modified |
Last modified date and time. |
|
Size |
The amount of disk space required to store the job. |
|
Data Directory |
Directory where the SQL Scanner files are stored. |
|
Status |
Job status. |
|
Version |
Version number of SQL Optimizer when the Job was last scanned. |
Displays a pie chart showing the number and percentage of Problematic, Complex, Simple and invalid SQL statements.
To open the Group Manager
Click.
After scanning is completed, you can review the scanned SQL statement in the SQL Scanner window. The SQL classification types (Problematic, Complex and Simple) highlight which SQL needs attention first. Is it recommended that you look at Problematic SQL, followed by Complex SQL. After you have reviewed a scanned SQL statement you can mark the SQL as checked. This indicates that the SQL statement had been reviewed and does not need any more attention.
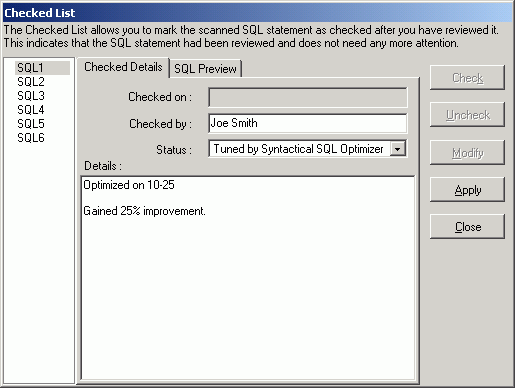
To mark a SQL statement as checked
From the SQL Scanner window, right-click and select Checked List.
All the valid SQL statements are listed on the left pane (e.g.) SQL1, SQL2 … SQLn. Select the SQL you want to check. You can view the SQL text by selecting the SQL Preview tab. After you have ensured that the SQL statement is the one you want to check, select the Checked Details tab and click Check. All editable fields are changed to edit mode, which you can modify accordingly.
To mark a SQL statement as checked
Enter the following:
| Item | Description |
| Checked on | Read-only field display the current date and time. |
|
Checked by |
Enter the user name that checked the SQL. By default, the PC user name is entered. |
|
Status |
Select the reason why you checked the SQL. |
|
Details |
Enter a short comment. |
Click Apply. A blue checkmark displays next to the SQL name at the left pane to indicate that the SQL statement is checked.
To unmark a checked Scanned SQL statement, select the SQL statement you want to unmark from the left pane of the Checked List window and click Uncheck. The blue checkmark is removed from the SQL name on the left pane.
You can automatically add a scanned SQL statement to the Checked List when you use the Send to SQL Optimizer function. In the Preferences window on the SQL Scanner tab under General button, select Always Add SQL.
You can specify to preserve the Checked SQL information when you rescan a Job by selecting the Do not remove Checked SQL information when rescanning option in the General SQL Scanner Preferences.
The black checkmark is used to indicate that the job is marked; any appended symbol is removed to indicate that the job is unmarked in the SQL Scanner window.
To mark or unmark all Jobs
Select Group | Mark All [Ctrl + M] or select Group | Unmark All [Ctrl + U].

 View Checked Scanner SQL Window