Use this page to specify default values for options used in the Partitioning Wizard. Default settings are saved for the Space Manager client and used for all tables on the Partitioning Wizard’s Object list. You can override default settings for individual tables. Most are displayed in the Partitioning Method and Partitioning Parameters pages.
Note: Specify options for each database connection, separately.
See also:
To specify Partitioning Wizard defaults
Specify default values for the Partitioning Wizard options. Review the following for additional information:
| Default Locality |
Specify a default method to use in the Partitioning Wizard for index partitioning:
You can override the default in the Partitioning Wizard. |
| Default Partition Names |
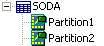
Use these fields to specify default prefixes for Space Manager to use when creating names for new partitions and subpartitions. Prefix for default partition names—Enter the default name to use for partitions. (P is the default.) A sequential partition number is added to the end of each partition name. If you enter Partition as the default name, new partition names look like this in the wizard’s Object list:
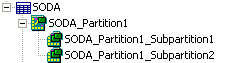
Prefix for default subpartition names—Enter the default name to use for subpartitions. (SP is the default.) A sequential subpartition number is added at the end of each name; the parent partition name is added at the beginning. If you enter Subpartition as the default name, new subpartition names look like this in the wizard’s Object list:
Include base object name in default partition names—Select this checkbox to include the name of a parent table or index in the names of new partitions and subpartitions.
You can override the default values in the Partitioning Wizard. |
Note: Names are stored in uppercase characters if you do not enter them with double quotes. Each name can have up to 30 characters. That maximum is shared by all parts of a name, including numbers and parent names. If all parts add up to more than 30 characters, certain parts are truncated. However, sequential numbers are always included.
Use this page to specify default values for partitioning key options used in the Partitioning Wizard.
Note: Specify options for each database connection, separately.
To specify partitioning key options
Specify default values for the partitioning key options. Review the following for additional information:
| Automatic Key Values |
Selecting these options instructs Space Manager to select them by default in the Partitioning Wizard.
Note: Partitioning key values can be set automatically for objects that contain at least one row per partition or subpartition. |
| Validate Partitioning Key Values |
Select this option if you want the Partitioning Wizard to automatically check partitioning key values against existing data. This ensures that a table and its local indexes contain partitions or subpartitions for all rows when MAXVALUE or DEFAULT is not used as a partitioning value. |
Use this page to specify default values for options used in the Partitioning Wizard.
Note: Specify options for each database connection, separately.
To specify partitioning estimates default values
Specify default values for these partitioning options. Review the following for additional information:
| Estimate Partition Sizes |
Estimate partition sizes based on row count—Select if you want the Partitioning Wizard to automatically calculate partition sizes based on expected row count. Use the estimate sizes option to automatically size partitions and subpartitions. The Partitioning Wizard calculates segment sizes based on the number of rows they are expected to contain. This ensures that the space allocated to each partition or subpartition is sufficient for its data. Note: The estimate sizes option should not be used when the option for automatically setting partitioning key values is selected. When both are selected, space allocation is estimated twice. |
| Table Scan Options |
Table scan options determine whether tables are scanned or sampled when the Partitioning Wizard sets key values or estimates sizes. You can choose to scan entire tables, sample a percentage of table rows, or dynamically determine whether to scan or sample based on table size. A full table scan may take a long time, depending on table size. Sampling a table takes less time and may be the best choice for very large tables. Although all rows are not read, they are evenly sampled so that results accurately represent a table. |