
Recovering Group Policy
Recovery Manager for Active Directory enables the recovery of Group Policy data from corruption or inadvertent modification, which can be caused by either hardware failure or human error.
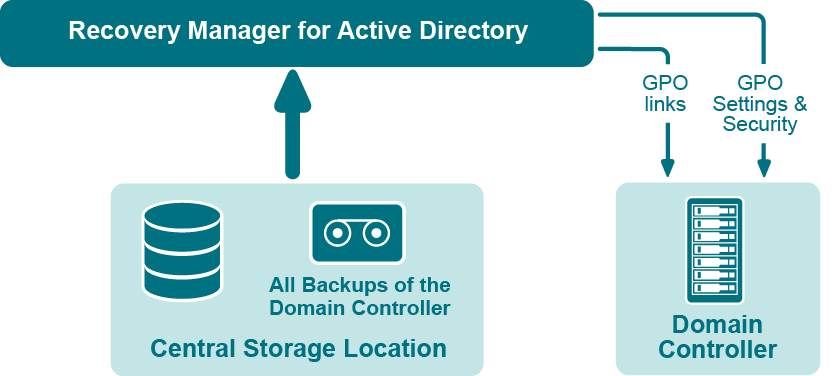
Figure: Group Policy Recovery
If specific Group Policy objects or links are inadvertently deleted or modified, they can be restored from a backup of a domain controller’s Active Directory components, without restoring the entire Active Directory, restarting the domain controller, or affecting other objects.
Recovery Manager for Active Directory includes the following options for Group Policy recovery:
-
Policy settings restore. If the Group Policy object was modified since the backup was created, this option restores all policy settings to the state they were in at the time of the backup. If the Group Policy object was deleted, this option creates a new object with the same name and policy settings as the backed-up object.
-
Security settings restore. Restores all security information contained in the Group Policy object. As a result, all users and security groups receive the access permissions that were specified in the Group Policy object at the time it was backed up.
-
GPO links restore. Restores all links associated with the Group Policy object to the state they were in at the time the backup was created. As a result, the object is once again used by the same sites, domains, and organizational units that were linked to it at the time the backup was created.
-
Comparison reports. Shows whether Group Policy object was deleted or modified since the backup time.
You can use any combination of these options. For example, suppose some links to a Group Policy object are accidentally deleted. If your backup contains an outdated version of the Group Policy object, you can restore only the links, without restoring the policy settings or security settings.
Group Policy restore
To eliminate downtime when recovering Group Policy, Recovery Manager for Active Directory provides the Group Policy Restore method. This method allows individual Group Policy objects to be restored to a selected domain controller. The operation can be performed on any domain controller that can be accessed remotely. Using this method, domain controllers do not need to be restarted, and only those objects selected for recovery are affected.
For this type of restore, it is not necessary to create any special backups; you may use any regular backup of domain controller’s Active Directory components.
A Group Policy Restore is particularly helpful when critical Group Policy objects or links have been inadvertently deleted or changed. To recover from such situations, you may carry out a Group Policy Restore to a domain controller using a Active Directory backup that was created before the objects in question were deleted or modified.
Group Policy Restore allows you to roll back changes made to Group Policy information, and return individual Group Policy objects to the state they were in when the backup was created. It is important to note that a Group Policy Restore only affects the object selected for recovery, and optionally, the links to that object. Any objects that are not involved in the operation remain unchanged in the domain.
Comparison reports
Recovery Manager for Active Directory provides comparison reports to assist with isolating deletion or changes to Active Directory or AD LDS (ADAM), and troubleshooting the resulting problems. These reports are based on per-attribute comparisons of Active Directory, AD LDS (ADAM), or Group Policy objects selected from a backup, with their counterparts in Active Directory, AD LDS (ADAM), or another backup.
By comparing the state of the directory objects or Group Policy objects in Active Directory with those in a backup, comparison reports improve the efficiency of recovering objects, by allowing you to specify precisely which objects should be restored.
By showing the changes that would be made to Active Directory or AD LDS (ADAM) during a restore operation, comparison reports help to highlight possible side effects that could result from restoring data. If such side effects are indicated in the report, you may then reconsider whether to apply the changes to the “live” directory data.
Comparison reports may also be used to monitor changes that occurred in Active Directory or AD LDS (ADAM) since the backup was created, or within the period between two backups. Comparison reports assist with troubleshooting Active Directory, and resolving problems that may result from the deletion of critical objects in Active Directory. The reports also help you monitor changes made to Active Directory or AD LDS (ADAM) by third party applications.
The ability to compare the current state of objects in Active Directory or AD LDS (ADAM) with their state in a backup helps when troubleshooting problems that may result from the deletion or modification of a user account or an Organizational Unit, or modification of more critical objects. Comparison reports show whether critical objects were deleted or modified since a backup was made.
The deletion of critical objects such as a domain controller’s computer account or the "NTDS Settings" object is one of the most common causes of Active Directory problems.
Other critical, equally sensitive objects include all objects in the System container, such as FRS subscription objects, trusted domain objects (TDO), and DNS objects. By comparing the current state of objects in the System container with the state of the objects in a backup, it is possible to isolate problems that result from the absence or incorrect modification of critical objects.
Recovery Manager for Active Directory serves as a valuable tool when implementing a change management process. The importance of testing changes to Active Directory is paramount, whether you are changing configurations, installing new software, or implementing service packs and patches. The product has the ability to report changes, and if necessary, roll back changes made to Active Directory. This improves the effectiveness of testing application deployment scenarios in a laboratory environment, and monitoring changes made to Active Directory by third-party applications.
Getting started
-
Permissions required to use Recovery Manager for Active Directory
-
Managing Recovery Manager for Active Directory configuration
Permissions required to use Recovery Manager for Active Directory
| Note |
From version 8.8, Recovery Manager for Active Directory supports environments with disabled NTLM authentication and the Protected Users security group. |
The following user account permissions are required to perform some common tasks with Recovery Manager for Active Directory.
Install Recovery Manager for Active Directory
The account must be a member of the local Administrators group on the computer where you want to install Recovery Manager for Active Directory. If during the installation you specify an existing SQL Server instance, the account with which Recovery Manager for Active Directory connects to that instance must have the following permissions on the instance:
-
Create Database
-
Create Table
-
Create Procedure
-
Create Function
Open and use the Recovery Manager Console
The account must be a member of the local Administrators group on the computer where the Recovery Manager Console is installed. The account must also have the following permissions on the SQL Server instance used by Recovery Manager for Active Directory:
-
Insert
-
Delete
-
Update
-
Select
-
Execute
Preinstall Backup Agent manually
The account you use to access the target computer must be a member of the local Administrators group on that computer.
Upgrade Backup Agent
The account you use to access the target computer must be a member of the local Administrators group on that computer.
Discover preinstalled Backup Agent instances
The account used to access the target domain controllers must:
-
Have the Write permission on the folder %AllUsersProfile%\Application Data\Quest\Recovery Manager for Active Directory that is located on the Recovery Manager for Active Directory computer.
-
Be a member of the Backup Operators group on each target domain controller.
Uninstall Backup Agent
The account used to access the target domain controllers must:
-
Have the Write permission on the folder %AllUsersProfile%\Application Data\Quest\Recovery Manager for Active Directory that is located on the Recovery Manager for Active Directory computer.
-
Be a member of the Backup Operators group on each target domain controller.
Update information displayed about Backup Agent in the Recovery Manager Console
The account used to access the target domain controllers must:
-
Have the Write permission on the folder %AllUsersProfile%\Application Data\Quest\Recovery Manager for Active Directory that is located on the Recovery Manager for Active Directory computer.
-
Be a member of the Backup Operators group on each target domain controller.
Automatically install Backup Agent and back up Active Directory data
To automatically install Backup Agent, the account must have:
-
Write permission on the folder %AllUsersProfile%\Application Data\Quest\Recovery Manager for Active Directory located on the Recovery Manager for Active Directory computer.
-
Local Administrator permissions on the target domain controller.
To back up data, the account must be a member of the Backup Operators group on the target domain controller.
Back up Active Directory using preinstalled Backup Agent
The account used to access the target domain controllers must:
-
Have the Write permission on the folder %AllUsersProfile%\Application Data\Quest\Recovery Manager for Active Directory that is located on the Recovery Manager for Active Directory computer.
-
Be a member of the Backup Operators group on each domain controller to be backed up.
Perform a complete offline restore of Active Directory by using the Repair Wizard
If you restore data to a domain controller where User Account Control (UAC) is not installed or disabled:
- The account you use to access the domain controller must be a member of the Domain Admins group.
If you restore data to a domain controller where User Account Control (UAC) is enabled:
- The account you use to access the domain controller must be the built-in Administrator on that computer.
In both these cases, the account you use to access the domain controller must have the Write permission on the folder %AllUsersProfile%\Application Data\Quest\Recovery Manager for Active Directory located on the Recovery Manager for Active Directory computer.
Perform a selective online restore of Active Directory objects
Agentless restore (used by default in Online Restore Wizard)
The account used to access target domain controllers must have:
-
Write permission on the folder %AllUsersProfile%\Application Data\Quest\Recovery Manager for Active Directory that is located on the Recovery Manager for Active Directory computer.
-
Reanimate Tombstones extended right in the domain where objects are to be restored.
-
Write permission on each object attribute to be updated during the restore.
-
Create All Child Objects permission on the destination container.
-
List Contents permission on the Deleted Objects container in the domain where objects are to be restored.
For more details, see Agentless method.
Agent-based restore
- The account used to access target domain controllers must have domain administrator rights.
For more details, see Agent-based method.
Restore a Group Policy object
The account used to access the target domain controller must:
-
Be a member of the Group Policy Creator Owners group.
-
Have Full Control privilege on the Group Policy object.
-
Be a member of the Backup Operators group.
-
Have sufficient permissions to read/write Active Directory objects linked to the Group Policy object.
Automatically install Backup Agent and back up an AD LDS (ADAM) instance
The account used to access the computer hosting the instance must:
-
Have the Write permission on the folder %AllUsersProfile%\Application Data\Quest\Recovery Manager for Active Directory that is located on the Recovery Manager for Active Directory computer.
-
Be a member of the local Administrators group on the computer hosting the AD LDS (ADAM) instance
Back up an AD LDS (ADAM) instance using preinstalled Backup Agent
The account used to access the computer hosting the instance must:
-
Have the Write permission on the folder %AllUsersProfile%\Application Data\Quest\Recovery Manager for Active Directory located on the Recovery Manager for Active Directory computer.
-
Be a member of the local Administrators group on the computer hosting the AD LDS (ADAM) instance.
Restore an AD LDS (ADAM) instance
The account used to access the computer hosting the instance must:
-
Have the Write permission on the folder %AllUsersProfile%\Application Data\Quest\Recovery Manager for Active Directory located on the Recovery Manager for Active Directory computer.
-
Be a member of the local Administrators group on the computer hosting the AD LDS (ADAM) instance.
Install or uninstall Recovery Manager Portal
To install the Recovery Manager Portal, you can use a domain user account, MSA, or gMSA account that is a member of the local Administrators group on the target computer. All account requirements and limitations are described in the table below, where
-
Step 1. Access web site - user account that is specified on the "Specify Web Site Settings" step of the Recovery Manager Portal setup wizard.
-
Step 2. Create a database on the SQL server instance - user account that is specified on the "Specify Preinstalled SQL Server Instance" step of the Recovery Manager Portal setup wizard.
-
Step 3. Access a database on the SQL server instance - user account that is specified on the "Specify SQL Server Access Account" step of the Recovery Manager Portal setup wizard.
| Step 1. Access web site | Step 2. Create a database on the SQL server instance | Step 3. Access the database on the SQL server instance | Supported or not |
|---|---|---|---|
| AD user | Windows authentication (dbcreator) | Windows authentication any type of user | NOT Supported |
| Windows authentication (dbcreator) | SQL authentication any type of user | Supported | |
| SQL authentication (dbcreator) | Windows authentication any type of user | NOT Supported | |
| SQL authentication (dbcreator) | SQL authentication any type of user | Supported | |
| Windows authentication (sysadmin) | Windows authentication any type of user | Supported | |
| Windows authentication (sysadmin) | SQL authentication any type of user | Supported | |
| SQL authentication (dbcreator) | Windows authentication any type of user | Supported | |
| SQL authentication (dbcreator) | SQL authentication any type of user | Supported | |
| MSA/gMSA | Windows authentication (dbcreator) | Windows authentication MSA/gMSA | NOT Supported |
| SQL authentication (dbcreator) | Windows authentication MSA/gMSA | NOT Supported | |
| Windows authentication (sysadmin) | Windows authentication MSA/gMSA | Supported | |
| SQL authentication (sysadmin) | Windows authentication MSA/gMSA | Supported |
Access Recovery Manager Remote API Access service
To access a Recovery Manager for Active Directory instance, the Recovery Manager Portal requires the Recovery Manager Remote API Access service to be installed and running on the Recovery Manager for Active Directory computer. This service enables the following Recovery Manager for Active Directory features: integration with Recovery Manager Portal, full replication of RMAD console, consolidation of backup information and support for hybrid environment.
For information about minimum permission requirements for the service, refer Step 1: Install Recovery Manager Remote API Access Service.
Start and use the Recovery Manager Portal
Recovery Manager Portal can be run under Managed Service Account (in Windows Server 2008 or higher) or Group Managed Service Account (in Windows Server 2012 or higher). If you specify the MSA or gMSA account, add the '$' character at the end of the account name (e.g. domain\computername$) and leave the Password field blank (on the Specify Web Site Settings step of the wizard).
For more details about required permissions, see the Install or uninstall Recovery Manager Portal section above.
For more information about MSA/gMSA, see Using Managed Service Accounts.
To perform restore or undelete operation in Recovery Manager Portal
User must be a member of the "Recovery Manager Portal - Recovery Operators" security group on the computer where the Recovery Manager Portal is installed.
If you want to use the agentless recovery method, select the Configure a list of delegates that can perform the restore and undelete operations option on the Portal Settings tab. For more information about delegation, see Delegating restore or undelete permissions.
To perform the undelete operation in Recovery Manager Portal
User must be a member of the "Recovery Manager Portal - Undelete Operators" local security group on the computer where the Recovery Manager Portal is installed.
If you want to use the agentless recovery method, select the Configure a list of delegates that can perform the restore and undelete operations option on the Portal Settings tab. For more information about delegation, see Delegating restore or undelete permissions.
To modify the Recovery Manager Portal configuration and delegate restore permissions to other Recovery Manager Portal users
User must be a member of the "Recovery Manager Portal - Configuration Admins" local security group on the computer where the Recovery Manager Portal is installed.
To view the health summary and backup creation history for the Recovery Manager for Active Directory instances in Recovery Manager Portal
User must be a member of the "Recovery Manager Portal - Monitoring Operators" local security group on the computer where the Recovery Manager Portal is installed.
Access the SQL reporting database
To access the SQL reporting database (%ProgramData%\Quest\Recovery Manager for Active Directory\DBReporting\RecoveryManager-Reporting-<host name>), the account must be assigned to db_datareader, db_datawriter roles and have rights to execute all the usp_* procedures, as follows:
-
usp_GetSummaryReportBody
-
usp_GetSessionErrors
-
usp_GetReportsList
-
usp_GetReportsHeader
-
usp_GetReportBody
-
usp_GetReplicationHistory
-
usp_GetOptionalObjects
-
usp_GetOptionalAttributes
-
usp_GetObjectChildren
-
usp_GetObjectAttributes
-
usp_GetAllObjects
-
usp_GetAllChildObjects
-
usp_GetAllAttributes