
Logging tab
The Logging tab is used to enable the extended logging during backup.
The following options are available:
-
Global settings - Use the default logging settings from the Recovery Manager Console root node: Recovery Manager for Active Directory->Settings…>Logging.
-
Enable - If you select this option, extended logging will be enabled for all domain controllers within the collection during the backup operation.
-
Disable - If you select this option, the log will contain only Warnings and Error messages.
The log files will be created in the %ProgramData%\Quest\Recovery Manager for Active Directory\Logs folder:
-
Agent side (domain controller): ErdAgent.log
-
Recovery Console: ErdServer.log
Performance tab
| NOTE |
The options on this tab are not supported for BMR backups. |
The Performance tab is used to configure the throttling and performance tuning settings to be applied when creating backups for the given Computer Collection.
On this tab, you can use the following elements:
-
Enable bandwidth throttling. Limits the total bandwidth used by Backup Agent when transferring data over network links. Use bandwidth throttling to prevent excessive network traffic Backup Agent may cause.
-
Maximum network use. Provides a space for you to specify the maximum total bandwidth Backup Agent can use when transferring data over network links.
-
Enable backup agent CPU throttling. Limits the percentage of CPU processing time Backup Agent can use on each computer.
-
Maximum CPU use. Provides a space for you to specify the maximum percentage of CPU processing time Backup Agent can use on each computer.
-
Create backups on at most <Number> computers in parallel. Specifies the maximum number of computers serviced in parallel when creating backups. Increasing this number can speed backup creation. However, network saturation problems may occur. Symptoms of network saturation include slow network response when transferring data by Backup Agent, and possibly “RPC server unavailable” error messages when connecting to Backup Agent.
-
Data compression. Specifies the compression method Backup Agent uses when processing the data before sending it over network links. Using higher compression reduces network traffic, but increases CPU load on the computers being backed up. If you are planning that backups created with Recovery Manager for Active Directory be used by other MTF-compliant backup tools, set data compression to None.
Advanced tab
| NOTE |
The options (except Run Scripts settings) on this tab are not supported for BMR backups. |
The Advanced tab is used to configure a number of advanced backup settings.
On this tab, you can use the following elements:
-
Limit maximum backup time This option limits the maximum backup session time.
-
Limit maximum DC backup time This option limits the maximum backup session time for a single DC.
-
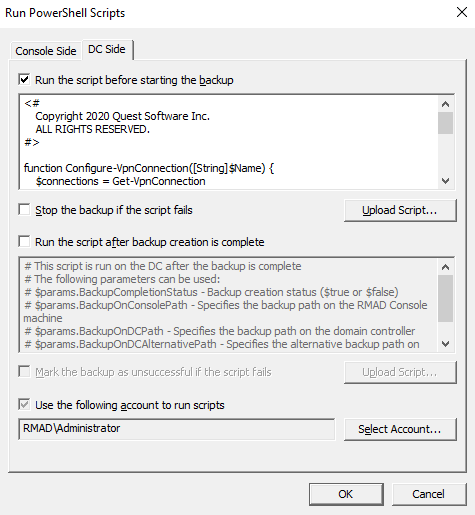
Run Scripts This option allows you to customize your environment by running PowerShell scripts before and/or after creating a backup. Custom scripts can be launched either on the Recovery Manager for Active Directory Console machine or on the domain controller side.
In the Run PowerShell Scripts dialog, the following options can be specified:
-
Run the script before starting the backup - Launches specified PowerShell scripts before the backup creation process is started.
-
Stop the backup if the script fails - Stops the backup process if the script cannot be run without errors.
-
Run the script after backup creation is complete - Launches specified PowerShell scripts after backup is created.
-
Mark the backup as unsuccessful if the script fails - If the script fails, the backup process will be shown as failed with error in the RMAD console.
-
Upload Script - Using this option you can upload an existing PowerShell script file (.ps1). After the script is uploaded, the contents of the script will be displayed in the dialog and you can edit it if necessary.
-
Select Account - Here you can select an account under which the scripts will be running. For the "Console scripts", by default, the account under which the console is launched will be used. For the "DC scripts", there is no default value, and the user has to select an account. Otherwise, the settings will not be saved.
-
| NOTE |
If the script is run on a domain controller, we strongly recommend using an account with the minimum rights required only to perform the actions specified in the script. |
| NOTE |
The "Console scripts" are launched only once for each run of backup creation on the console machine. The "DC scripts" are run on each DC for which the backup is created. If the "script for DC" fails, the corresponding DC will have an error or warning. If the "console script" fails, then all DCs for which the backup process was started will have an error or warning. |
Recovery Manager for Active Directory provides an option to set the maximum timeout during which a script can run (the default value is 60 seconds). To change this value, set the HKEY_LOCAL_MACHINE\SOFTWARE\WOW6432Node\Quest\Recovery Manager for Active Directory\Options\ScriptExecTimeoutInSeconds (DWORD) registry key to <required value>.
Failed script can lead to both Warning and Error results. It depends on the specified settings:
| Option Name | Scenario 1 | Scenario 2 | Scenario 3 | Scenario 4 |
|---|---|---|---|---|
| Run the script before starting the backup | ✔ | ✔ | ||
| Stop the backup if the script fails | ✖ | ✔ | ||
| Run the script after backup creation is complete | ✔ | ✔ | ||
| Mark the backup as unsuccessful if the script fails | ✖ | ✔ | ||
| Result | Warning | Error | Warning | Error |
Script security
Running scripts can be dangerous - especially on a domain controller. Recovery Manager includes the following security measures for scripts:
- Scripts are stored in the Recovery Manager database in an encrypted form.
- Scripts are sent from the Recovery Manager console to the Backup Agent using a secure RPC channel.
- Scripts are run in memory and no temporary files are created on the disk. When running scripts, the -EncodedCommand parameter of powershell.exe is used.
- For scripts run on the domain controller, specifying a custom account under which the script will run is required. Using an account with minimum rights is recommended.
- All scripts have a timeout when running. If the timeout is exceeded, the script will be forcibly stopped.
- The result of the script running is recorded in the Windows Event Log.
Agent Settings tab
| NOTE |
For Recovery Manager for Active Directory 10.1 or higher: Make sure that you use the Backup Agent version supplied with this release of Recovery Manager for Active Directory. |
The Agent Settings tab is used to specify settings for Backup Agent and Forest Recovery Agent.
| Note |
To install Forest Recovery Agent, the account under which Recovery Manager Console is running must be added to the Builtin\Administrators domain local group. |
-
Use the following account to access Backup Agent. Allows you to explicitly specify a user account under which you want the Recovery Manager Console to access Backup Agent. When this check box is cleared, the Recovery Manager Console uses the account under which it is running to access Backup Agent. To explicitly specify a user account, select this check box, and then click Select Account to specify the account credentials.
-
Use preinstalled Backup Agent. Allows you to enable or disable the automatic installation of the Backup Agent. The next table explains how Recovery Manager for Active Directory behaves when this check box is selected or cleared.
Product behavior
When this check box is selected
-
Recovery Manager for Active Directory backs up only those computers where the Backup Agent is preinstalled manually.
-
Recovery Manager for Active Directory does not automatically install the Backup Agent on the computers in the Computer Collection.
When this check box is cleared
-
Recovery Manager for Active Directory automatically installs the Backup Agent before backing up a computer where the agent is not preinstalled manually.
-
When the backup operation completes, Recovery Manager for Active Directory removes the automatically installed Backup Agent.
-
If the Backup Agent was manually preinstalled on the computer to be backed up, Recovery Manager for Active Directory will use that agent to back up data on the computer. Recovery Manager for Active Directory does not remove preinstalled Backup Agent after the backup operation completes
For more information on how to install, update, and uninstall the Backup Agent or discover the Backup Agent instances that were manually preinstalled in your environment, see Managing Backup Agent.
-
Automatically configure Windows Firewall. Select this check box to have Recovery Manager for Active Directory automatically configure Windows Firewall on target Windows Server 2008-based or Windows Server 2012-based DCs, so that Recovery Manager for Active Directory can back up these DCs.
-
Ensure Forest Recovery Agent is deployed. Select this check box if you want the application to verify whether Forest Recovery Agent is installed on each domain controller the Collection includes. The application reinstalls Forest Recovery Agent, if necessary. For more information, see Using Forest Recovery Agent.