
Specifying recovery project settings
Each recovery project has a number of project-specific settings that allow you to control the various aspects of recovery. For example, you can use these settings to select how to handle the global catalog during recovery, configure balloon notifications displayed in the Forest Recovery Console and e-mail notification settings, select the Active Directory domains you want to recover, and enable or disable the Recovery Persistence feature that provides protection from an inadvertent shutdown of the Forest Recovery Console.
To specify the recovery project settings
-
Open or create a recovery project.
-
On the menu bar, select Tools | Recovery Project Settings.
-
Use the tabs described in the table below to view or modify the recovery project settings.
Recovery project settings
Recovery Mode
Displays a list of all domains in the current recovery project.
On this tab, you can use the following options:
-
Specify which type of restore operation you want to perform:
-
Specify the domains you want to selectively recover in the forest. For more information on how to selectively recover domains, see Selectively recovering domains in a forest.
-
For each domain, you can configure the domain controller where authoritative restore of SYSVOL will be performed.
-
You can specify default credentials to access domain controllers in the selected domain.
Global Catalog
Allows you to select how to handle the global catalog during recovery. This tab provides the following options:
-
Rebuild GC, advertise normally. Uses a standard Active Directory mechanism to remove and add the global catalog. By removing and then adding the global catalog you ensure that it contains no lingering objects and thus can avoid replication inconsistencies.
To advertise the rebuilt global catalog servers in DNS, this option uses the existing Global Catalog Partition Occupancy level specified in the system registry.
By default, a global catalog server is considered as ready to be advertised in DNS when all read-only directory partitions have been fully replicated to the new global catalog server. However, your particular forest may use a different setting. For this reason, it is recommended that you check the Catalog Partition Occupancy level specified in the system registry. If the default setting is used, then the Rebuild GC, advertise normally option is the safest and most reliable way to rebuild and advertise the global catalog during the recovery.
This option rebuilds the global catalog in the entire forest regardless of how many domains you are recovering.
-
Rebuild GC, advertise fast. Uses a standard Active Directory mechanism to remove and then add the global catalog. This option offers a faster way to advertise the rebuilt global catalog servers in DNS. As a result, this option can help you make a number of forest-wide services (for example, user logon and Exchange Server messaging) available to the users more quickly after the recovery.
When you select this option, the rebuilt global catalog servers will be advertised in DNS without waiting for the read-only directory partitions replication to fully complete. The trade-off of using this option is that the global catalog may include some inconsistencies until the global catalog servers have received the complete information from all the other domains in the forest.
This option rebuilds the global catalog only in the domains that you recover by using Recovery Manager for Active Directory.
-
Keep GC intact. Does not rebuild or change the global catalog in any way during the recovery. With this option, the global catalog servers will remain either in the state in which they were before the recovery started (this is true for the servers that are located in the domains you selected not to recover) or in the state to which they were restored from backup during the recovery.
In certain situations, this option might help you avoid global catalog downtime and make some forest-wide services available to the users more quickly. However, using this option greatly increases the risk of introducing lingering objects into the global catalog, which can lead to a corrupt forest. It might happen if you use a set of backups for the domain controllers with large age difference. That is, backups may contain inconsistencies that will lead to introducing lingering object.
If you use this option, it is recommended that you manually reset the global catalog to ensure it does not include inconsistencies.
Notifications
You can use this tab to configure balloon notifications displayed in the Forest Recovery Console and e-mail notification settings.
Console notifications
Allows you to configure balloon notifications in the Forest Recovery Console to inform you if the backups selected for recovery were created at different points in time or if your recovery project is outdated.
-
Age difference of selected backups exceeds <Number> hours. When selected, notifies you if the age difference of backups selected for recovery exceeds the number of hours you specify in this option. This option helps you ensure that the backups you select are created at a similar point in time and therefore hold similar Active Directory states.
-
Recovery project was updated more than <Number> days ago. When selected, notifies you if the current recovery project was last updated more than the number of days you specify in this option.
-
Forest topology has changed (only checked at console startup). When selected, causes the Forest Recovery Console to check if the forest topology information in the current recovery project is outdated. This check is performed each time the Forest Recovery Console starts up.
E-mail notifications
Allows you to send e-mail notifications to specific recipients when the verification or recovery process is completed.
-
Verification process is completed When the option is selected, the specified recipients will be notified that the verification process has been completed.
-
Recovery process is completed When the option is selected, the specified recipients will be notified that the recovery process has been completed.
-
E-mail address to send notifications Use this text box to specify e-mail recipients.
-
Sender email address Specify the return address for your e-mail notification messages. It is recommended that you specify the e-mail address of the Recovery Manager for Active Directory administrator.
-
SMTP server Specify the SMTP server for outgoing messages.
-
SMTP port Specify the port number that will be used to connect to your SMTP server.
-
SMTP server requires authentication When the option is selected, you will be prompted to provide credentials to log on to the SMTP server.
-
User name Specify the account name used to log on to the SMTP server.
-
Password Specify the user password.
-
Use Secure Socket Layer (SSL) to encrypt the connection Enables the SSL data encryption for email notifications.
-
Test settings Sends a test notification message to the address specified in the Sender email address text box. Use this button to verify that the specified e-mail notification settings are valid.
Agents
On this tab, you can specify TCP ports that will be used by Forest Recovery Console to communicate with Forest Recovery Agent and Management Agent.
-
Connect to Management Agent using a specific TCP port. This agent is used to deploy other agents to the target server. Allows you to specify the TCP port number that will be used to connect to Management Agent installed on a target domain controller. If the option is not selected, RPC dynamic port range is used by default.
-
Management Agent will configure Windows Firewall exceptions. If this option is selected, Windows Firewall settings will be configured automatically for Management Agent.
-
Connect to Forest Recovery Agent using a specific TCP port. Allows you to specify the TCP port number that will be used to connect to Forest Recovery Agent installed on a target domain controller. If the option is not selected, RPC dynamic port range is used by default.
-
Forest Recovery Agent will configure Windows Firewall exceptions. If this option is selected, Windows Firewall settings will be configured automatically for Forest Recovery Agent.
Verifying recovery project settings
To ensure you can recover your Active Directory forest with minimum downtime, it is recommended that you regularly run the verify settings operation on your recovery project. When you run this operation, Recovery Manager for Active Directory connects to the domain controllers in the project, collects their configuration parameters, and then saves these parameters in the recovery project (.frproj) file. The verify settings operation does not modify any data in your Active Directory forest.
After the configuration parameters have been collected, Recovery Manager for Active Directory checks the recovery project settings against these parameters for any incompatibilities that may affect the forest recovery process. When the verify settings operation completes, you can view a report providing details about any problems found in your recovery project.
Running the verify settings operation on a regular basis allows you to promptly reveal any potential recovery problems and proactively prevent them by making appropriate adjustments to the recovery project settings.
When you run the verify settings operation, Recovery Manager for Active Directory collects and saves the following information from each domain controller in the project:
-
IP addresses of all network adapters
-
IP addresses of all DNS servers on all network adapters
-
DNS names of all FSMO role holders in the Active Directory forest
-
Forest Recovery Agent version installed on the domain controller (if any)
-
Whether the domain controller is read-only (RODC)
-
Operating system version installed on the domain controller
NOTE:
-
Check that the Administrative Share Admin$ exists and is accessible on the target domain controllers to perform the remote Forest Recovery Agent installation.
-
If the backup is located on the Recovery Manager Console machine: Check that the Administrative Share 'DriveLetter$' exists and is accessible for the disk where the backup is stored .
Otherwise, the Forest Recovery will fail. For more information, see Installing Backup Agent automatically.
To verify the settings of your recovery project
-
Create or open a recovery project.
-
Specify recovery settings in the project.
-
On the toolbar, click the drop-down toggle next to Verify Settings, select Verify Settings and wait for the operation to complete.
-
To perform the verify settings operation for the particular domain controller(s), use the Verify Selected DCs option from the drop-down list.
After the verify settings operation completes, you can view a report on the operation results: from the menu bar, select View | Report.
Scanning backups for viruses
| Note |
Recovery Manager for Active Directory Forest Edition does not support scan of BMR backups, only Active Directory backups can be checked. |
Recovery Manager for Active Directory scans BMR and Active Directory backups for malware as a part of the verification process (not recovery). The anti-virus checks are performed on the Forest Recovery Console machine running Windows Server 2016 or higher by means of antivirus software installed on the machine. The best practice is to use the scheduled verification to have up-to-date backup scan results and to run anti-malware checks in the background because this process is time-consuming. To configure the verification schedule, refer Scheduling project verification.
Supported antivirus software
-
Microsoft Defender
-
FEATURE PREVIEW Symantec Endpoint Protection 14.x; Broadcom Endpoint Security (former name: Symantec Endpoint Protection 15)
Virus scanning general recommendations
-
The scan performance highly depends on the network speed to the remote backup storage.
-
It is not recommended to scan more than 5-10 BMR backups in parallel - this means that only 5-10 DCs should be configured to restore from the BMR backup. It is a risk to restore some DC from scanned BMR backup, and others from not scanned backups that can potentially contain malware.
-
If you have remote sites with slow network connection, consider installing other instances of RMAD there, and configure backup metadata replication. For details, see Consolidating backup registration data.
-
In some cases, depending on a host environment and the size of the backed-up data, the host machine can experience a high CPU load while scanning a backup. To avoid this, a user can limit CPU utilization in the antivirus software settings. For example, a user can change the ScanAvgCPULoadFactor setting if Windows Defender Antivirus is used. For details, see https://docs.microsoft.com/en-us/windows/security/threat-protection/windows-defender-antivirus/configure-advanced-scan-types-windows-defender-antivirus. You can use this formula to estimate a possible setting value: (number of parallel backups) * ScanAvgCPULoadFactor < (desired overall CPU usage by RMAD scan process).
-
For all antivirus vendors, real-time protection mode can affect Active Directory backup scans.
Symantec Endpoint Protection limitations
-
A parallel backup scan is not yet supported for Symantec Endpoint Protection. Therefore, the scan operation with Symantec may take longer than a scan using Windows Defender.
-
Make sure that AD backup checks are not run together with any other file system scans on the Forest Recovery Console machine.
-
For Symantec Endpoint Protection: If you cancel the project verification, the virus scan will continue running due to the Tamper Protection feature of Symantec Endpoint Protection (SEP). To resolve this problem, there are two workarounds:
- Stop the current antivirus scan from Symantec Endpoint Protection Manager.
- Disable the Tamper Protection feature. Then, kill ccSvcHst.exe. This process is a common scanning process for the SEP client, so this action will drop all scanning tasks on the machine.
Features supported by different anti-virus scanners
| Supported features | Backup type | Windows Defender | Symantec Endpoint Protection, Broadcom Endpoint Security |
|---|---|---|---|
| Single backup scan | BMR backup, AD backup | ✔ | ✔ |
| Bulk backups scan | BMR backup, AD backup | ✔ | ✔ |
| Scan with enabled Real-Time Protection mode | BMR backup, AD backup | Supported for BMR backup only* | Supported for BMR backup only* |
| Completely abort the verification process | BMR backup, AD backup | ✔ | ✖ |
| Warn if the anti-virus database is outdated | BMR backup, AD backup | ✔ | ✔ |
* If Real-Time Protection is disabled, Active Directory backups can also be scanned.
How to enable virus scanning in Recovery Manager for Active Directory
To specify the antivirus software, open the %ProgramFiles%\Quest\Recovery Manager for Active Directory\Management\AntivirusConfiguration.json configuration file and set the AntivirusToUse parameter to "Windows Defender" or "Symantec Endpoint Protection". Make sure that the path to the antivirus software executable file is correct.
| IMPORTANT |
If you upgrade or reinstall Recovery Manager for Active Directory, the settings from AntivirusConfiguration.json will be reset to the default settings. |
To enable scan for viruses
In Forest Recovery Console, select the Scan the selected backup (and Active Directory backup if applicable) for malware during the project verification option on the General tab.
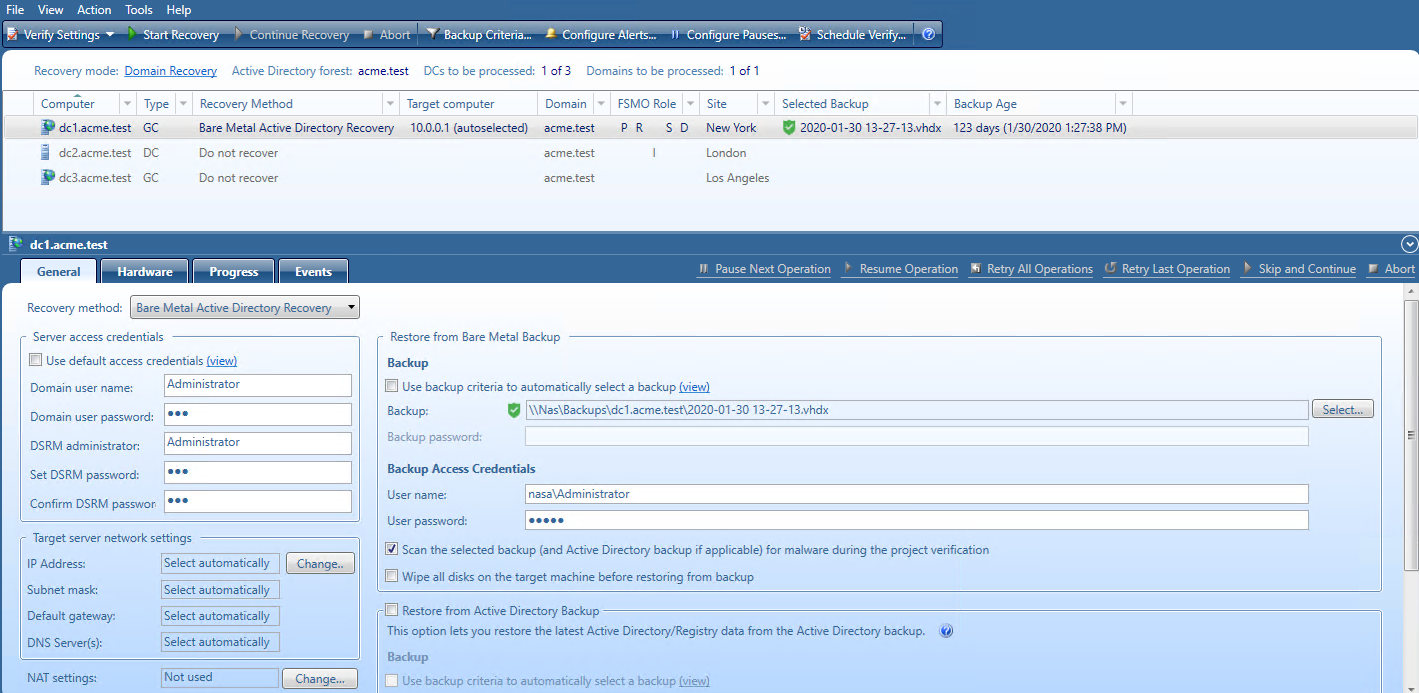
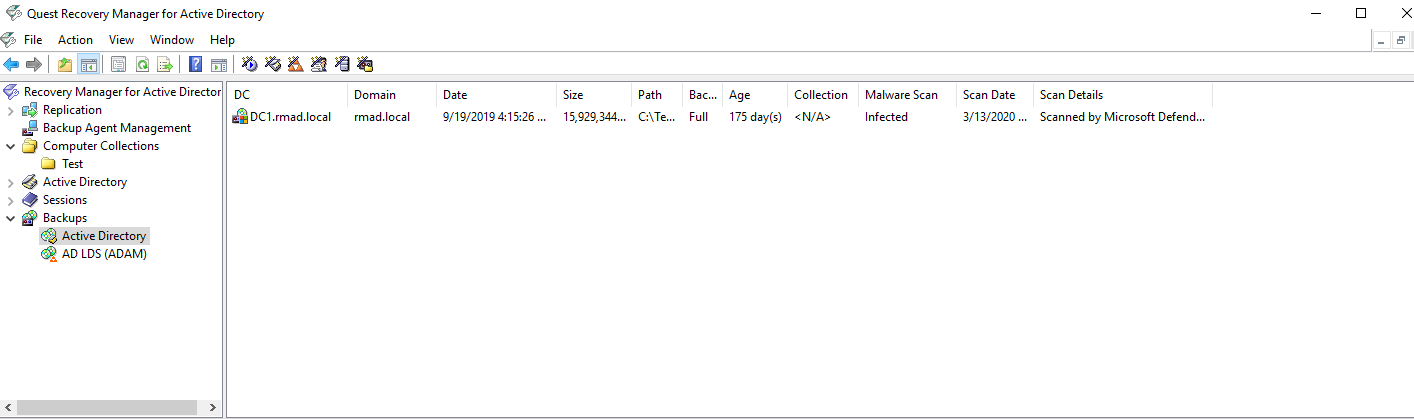
The backup scan status is shown next to the backup in Recovery Manager for Active Directory Console and Forest Recovery Console. Also, Recovery Manager for Active Directory Console gives a better representation of scan results. Anti-virus check statuses:
-
Passed - All antimalware checks have passed successfully.
-
Passed with warnings - This status appears if antimalware checks have passed successfully but with minor issues.
-
Infected - The backup is infected.
-
Corrupted - This status appears when malware checks are not performed because the selected backup cannot be mounted or unpacked by RMAD.
-
-
Unknown - The backup has not been checked yet but the check operation is enabled on the General tab for this DC.
| Note |
You can get the Passed with warnings status if your antivirus database is older than the specified time limit. According to security best practices, this limit is set to 3 days by default. Depending on the policies of your organization, you can configure this parameter in the AntivirusConfiguration.json file that is mentioned above. Change the AntivirusSignatureAgeThresholdInDays property to the desired value. In case of any security incident or data breach, it is recommended that you run an antivirus scan using the latest database for your antivirus software. |
If you use the backup criteria to automatically select a backup
If you set the project to automatically select backups using the backup selection criteria, the following logic is applied:
| Backups, #3 is the latest backup |
Backup selected and scanned for Verify |
Backup selected for Recovery |
Comments |
|---|---|---|---|
| #3 Not scanned | X | X | The latest backup will be used for the settings verification or recovery. You will get a warning before the recovery process. |
| #2 Not scanned | |||
| #1 Not scanned | |||
| #3 Passed | X | X | The latest backup with the "Passed" status will be rescanned and will be used for the settings verification or recovery if there are no newer backups. |
| #2 Not scanned | |||
| #3 Not scanned | |||
| #3 Infected | If only the latest backup is scanned and has the "Infected" status, the latest not scanned backup will be selected for settings verification or recovery. | ||
| #2 Not scanned | X | X | |
| #1 Not scanned | |||
| #3 Infected | If the latest backup is scanned and is infected, and there are several scanned backups that have passed the virus checks - the latest backup with the "Passed" status will be selected for settings verification or recovery. | ||
| #2 Passed | X | X | |
| #1 Not scanned | |||
| #3 Not scanned | X | X | If there are a scanned backup with the "Passed" status and the newer non-scanned backup, the latest not scanned backup is selected for settings verification or recovery. You will get a warning before the recovery process. To avoid this scenario, configure the regular anti-virus scan in accordance with the BMR backup schedule. |
| #2 Passed | |||
| #1 Not scanned | |||
| #3 Infected | X | If all the existing backups are infected, an anti-virus scan can be skipped, and the latest backup is selected for recovery. You will get a warning before the recovery process. | |
| #2 Infected | |||
| #1 Infected | |||
| #3 Not scanned | X | X | The latest backup will be used for the settings verification or recovery. You will get a warning before the recovery process. |
| #2 Infected | |||
| #1 Not scanned |
| Note |
It is still possible to select a backup manually, even it is marked as infected. In this case, you can add a recovery pause and mitigate viruses manually, during the recovery process, when all restored DCs are isolated from each other. |
Scheduling project verification
To automate running of the verify settings operation on a regular basis, you can schedule this operation for the recovery project.
To create a schedule for the verify settings operation
-
In Forest Recovery Console, create or open an existing recovery project.
-
Click Schedule Verify… on the tool bar.
-
In the Configure Schedule dialog box, click Modify….
-
In the dialog that appears, click New… and configure the schedule.
-
Then you will be able to see a list of configured schedules in the Configure Schedule dialog. The Enable schedule option is selected by default.
-
To specify a user account for the project verification, click Select account… in the Configure Schedule dialog. If you skip this step, you will be prompted for a user name and password when saving the schedule. You must use the Administrator user account.
-
Click OK to save the schedule.
To change the project schedule settings
-
In Forest Recovery Console, open an existing recovery project.
-
Click Schedule Verify… on the tool bar.
-
To enable or disable the schedule, use the Enable Schedule check box in the Configure Schedule dialog.
-
To change the schedule, click Modify…..
-
In the dialog box that opens, configure the new schedule and click OK.
-
To change the schedule account, click Select account… in the Configure Schedule dialog.
-
Enter new credentials, then you will be prompted for the account which is currently used for this schedule. Enter the current credential and click OK.
-
Click OK to save the changes in the Configure Schedule dialog. If you have not changed the account, you will be prompted for the current credentials.
To remove a schedule for the project:
-
In Forest Recovery Console, open an existing recovery project.
-
Click Schedule Verify… on the tool bar.
-
Click Modify….
-
Delete all schedules and click OK.
-
Click OK in the Configure Schedule dialog and you will be prompted for the current schedule account.
-
Enter the current credentials and click OK.