
Configuring Windows Firewall
A firewall enabled in your environment may block traffic on ports used by Recovery Manager for Active Directory, preventing you from backing up or restoring data. Before you start using Recovery Manager for Active Directory, make sure your firewall does not block traffic on ports used by Recovery Manager for Active Directory. For more information about these ports, see the Deployment Guide supplied with this release of Recovery Manager for Active Directory.
This section provides instructions on how to configure the built-in Windows Firewall enabled on Windows Server 2008 R2 or higher domain controllers in a domain or forest you want to recover, so that Recovery Manager for Active Directory could recover that domain or forest. To ensure a successful recovery, create the following Windows Firewall security rules on all Windows Server 2008 R2 or higher domain controllers in the domain or forest (leave the default values for settings not mentioned below):
Rule 1 (inbound)
-
Rule type: Custom
-
Program path: %SystemRoot%\System32\Svchost.exe
-
Service settings: Windows Management Instrumentation (Winmgmt)
-
Protocol: TCP
-
Local ports: Any
-
Remote ports: Any
-
Local IP addresses: Any
-
Remote IP addresses: Any
-
Action: Allow the connection
-
Rule profile: Domain, private, and public
-
Allowed users: Any
-
Allowed computers: Any
Rule 2 (inbound)
-
Rule type: Custom
-
Program path: System
-
Service settings: Apply to all programs and services
-
Protocol: TCP
-
Local ports: 445
-
Remote ports: Any
-
Local IP addresses: Any
-
Remote IP addresses: Any
-
Action: Allow the connection
-
Rule profile: Domain, private, and public
-
Allowed users: Any
-
Allowed computers: Any
Rule 3 (inbound)
-
Rule type: Custom
-
Program path: <Product installation folder>\FRRestoreService64.exe
The default product installation folder is %ProgramFiles%\Quest\Recovery Manager for Active Directory.
-
Service settings: Apply to all programs and services
-
Protocol: TCP
-
Local ports: RPC dynamic port range
-
Remote ports: Any
-
Local IP addresses: Any
-
Remote IP addresses: Any
-
Action: Allow the connection
-
Rule profile: Domain, private, and public
-
Allowed users: Any
-
Allowed computers: Any
Rule 4 (inbound)
-
Rule type: Custom
-
Program path: %SystemRoot%\System32\Svchost.exe
-
Service settings: Remote Procedure Call (RpcSs)
-
Protocol: TCP
-
Local ports: RPC dynamic port range
-
Remote ports: Any
-
Local IP addresses: Any
-
Remote IP addresses: Any
-
Action: Allow the connection
-
Rule profile: Domain, private, and public
-
Allowed users: Any
For more information about RPC dynamic port range, refer to the following Microsoft Support Knowledge Base articles at https://support.microsoft.com:
-
How to configure RPC to use certain ports and how to help secure those ports by using IPsec
-
How to configure RPC dynamic port allocation to work with firewall
-
The default dynamic port range for TCP/IP has changed in Windows Vista and in Windows Server 2008
Developing a custom forest recovery plan
When planning for Active Directory forest recovery, you should first have a detailed topology map of your forest. The map should list all the information about the domain controllers, such as their names, FSMO roles, backup status, and the trust relationships between them.
| IMPORTANT |
Make sure that Forest Recovery Agents are installed and function properly on all domain controllers in the forest. |
Because of the complexity and critical nature of the forest recovery process, it is strongly recommended that Active Directory administrator observe the following rules to prevent the forest failure:
-
Use only reliable and tested hardware, such as hard disks and uninterruptible power supply.
-
Test any new configuration in a test lab before deploying it in your environment.
-
Ensure that each domain in the forest has at least two domain controllers.
-
Keep detailed logs about the health state of Active Directory on a daily basis, so that in case of a forest-wide failure the approximate time of failure can be identified.
-
Regularly back up all domain controllers in the forest with Recovery Manager for Active Directory.
-
Use the Forest Recovery Console to create a recovery project for your forest. Verify the settings of your forest recovery project on a regular basis, especially when there are membership changes to the Enterprise Admins or Domain Admins group. This helps ensure that the IT staff fully understands the forest recovery plan.
Recovery Manager for Active Directory allows you to restore a domain in the forest to its state at the time of the last trusted backup. Consequently, the restore operation will result in the loss of at least the following Active Directory data:
-
All objects (such as users and computers) that were added after the last trusted backup.
-
All updates made to existing objects since the last trusted backup.
-
All changes made to either the configuration partition or the schema partition in Active Directory (such as schema changes).
-
Additionally, any software applications that were running on the domain controllers will need to be reinstalled on the domain controllers after the forest is recovered.
Backing up domain controllers
To restore domain controllers, you can use backups created with Recovery Manager for Active Directory. For this reason, you should back up domain controllers in the forest on a regular basis using one of these applications.
It is a good practice to create a Computer Collection that includes all domain controllers in the forest and back up the Collection each time you make changes to the forest infrastructure. Besides, you can use the Computer Collection to ensure that Forest Recovery Agent is installed on each domain controller in the Collection.
For more information about using the Forest Recovery Agent and Computer Collections, see the User Guide supplied with this release of Recovery Manager for Active Directory.
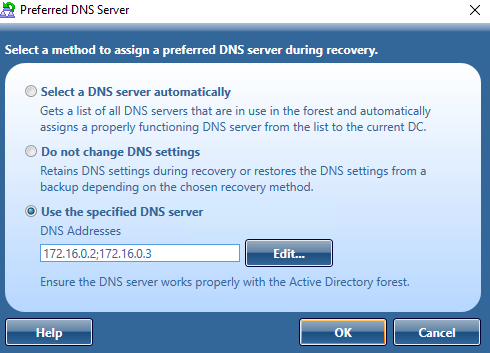
Assigning a preferred DNS server during recovery
Before starting a forest recovery operation, you should specify a method for selecting a preferred DNS server for each domain controller in your recovery project. You can choose one of the following DNS server selection methods:
-
Select a DNS server automatically
Let Recovery Manager for Active Directory automatically select a DNS server (used by default). -
Do not change DNS settings
Recovery Manager for Active Directory retains client DNS settings during recovery or restores the DNS settings from a backup depending on the chosen recovery method. -
Use the specified DNS server
Specify a DNS server manually - here you can specify one DNS address or a list of DNS servers separated by semicolons or using the Edit button.
For more information on how to specify a DNS server selection method, see Domain controller recovery settings and progress.
When you choose to select a DNS server automatically, Recovery Manager for Active Directory retrieves a list of DNS servers used by domain controllers. In live Active Directory, Recovery Manager for Active Directory connects directly to domain controllers to get DNS servers that are currently in use. For Bare Metal Recovery, DNS servers are retrieved from computer settings that are stored in the RMAD BMR backup. For every recovery method that uses clean OS, current DNS client settings are ignored. With the exception of the Restore Active Directory on Clean OS recovery method which installs the DNS server on the target machine.
For every domain controller, the list of automatic DNS servers is ordered. First come the IP addresses that are included in the DNS client settings on this domain controller. Then, the list includes preferred DNS addresses of other domain controllers in the same domain and their DNS client settings. Then, the same approach is used for domain controllers in the parent domain hierarchy, then in sibling domains, and finally, for direct child domains. Then, during recovery, Recovery Manager for Active Directory automatically selects a properly working DNS server from the received list and assigns that DNS server to the domain controller.
If a domain controller is a DNS server itself, then a loopback address is included in the DNS server list (see the note below). When you choose to select a DNS server automatically, Recovery Manager for Active Directory contacts the domain controllers in the forest to get a list of all DNS servers they use. Then, Recovery Manager for Active Directory automatically selects a properly working DNS server from the received list and assigns that DNS server to the domain controller.
By default, the number of DNS servers that can be selected automatically is limited to 3. You can change that number using the MaxAutomaticDnsCount property in advanced settings.
The automatic DNS selection method is recommended in the following cases:
- Your DNS is not Active Directory-integrated.
- Your DNS is Active Directory-integrated and you restore from backups the DNS servers (domain controllers) that act as the primary source for each DNS zone.
| Important |
It is not recommended to uninstall or reinstall Active Directory on the DNS servers that act as a primary source for an Active Directory-integrated DNS zone. Also, it is not recommended to remove such DNS servers from Active Directory during recovery . |
The Do not change DNS settings option lets you retain DNS settings during recovery so you do not need to reconfigure DNS settings for each domain controller within the forest after the recovery operation is completed.
When you specify a DNS server or list of DNS servers manually, Recovery Manager for Active Directory first tries to assign the specified DNS server(s) to the domain controller. If the specified DNS server does not function properly or is inaccessible, Recovery Manager for Active Directory automatically selects DNS servers (primary and alternate) that were set on this domain controller before the recovery. If this action is also unsuccessful, Recovery Manager for Active Directory selects DNS servers from a list of all DNS servers that are in use in the forest.
How does Recovery Manager for Active Directory determine that the DNS server is available for use?
Recovery Manager for Active Directory sets a DNS server on all the network adapters on the domain controller and checks if it is enough to register DC Locator resource records and A-type (host) records. If the test succeeds, then this DNS server is set as the preferred DNS server on all network adapters.
| NOTE |
According to Microsoft recommendations, DNS servers should include their own IP addresses in the lists of DNS servers. The loopback address (127.0.0.1) should be configured only as a secondary or tertiary DNS server on a domain controller. If you specified the loopback address in the wrong sequence, the order will be corrected automatically when the list of DNS servers is configured on a domain controller. For more details, see https://docs.microsoft.com/en-us/previous-versions/windows/it-pro/windows-server-2008-R2-and-2008/ff807362(v=ws.10). |
If you want to use the manual DNS server selection method, it is recommended to make sure you have one or more DNS servers properly configured for working with the domain controllers being recovered. All these DNS servers must support dynamic updates and have DNS zones configured for each domain in the forest you want to recover. Make sure you specify one of these DNS servers for each domain controller in your recovery project.