Chat now with support
Chat with Support

Migrator for Notes to SharePoint 6.16 - User Guide

Migrator for Notes to SharePoint Migrator for Notes to SharePoint Console
Overview Console configuration using the setup wizard Advanced configuration options Database discovery QuickPlace/Quickr discovery Domino.Doc discovery Discover directory entries Import database records Notes databases Applications Classification Rules Classification Rule Properties SharePoint Targets Scheduled tasks Reports Task history Link Analyzer/Updater/Finalizer License
Migrator for Notes to SharePoint Designer Migration jobs

Creating/Editing source data definitions

Previous Next


Creating/Editing source data definitions

You can also create your own Source Data Definitions for any non-standard or customized database, including databases you built yourself or databases from third-party products.

To create a Source Data Definition

The Source Data Definition editor opens.

NOTE: To load an existing Source Data Definition, select Load, and select a data definition.

Definition tab

Record Selection tab/Document Selection tab

Data Fields tab

Preview Data Query tab

Definition tab

Previous Next


Definition tab

If you want to permanently associate this Source Data Definition with one or more templates, you can enter them in the Templates supported field.

If you want to associate this Source Data Definition with corresponding SharePoint List Types, you can enter them in the Maps to list types field.

Table 54. Types

Type

Then go to

Notes

Step 5, then go to Step 8

QuickPlace or Quickr

Step 6, then go to Step 8

Domino.doc

Step 7

Record Selection tab/Document Selection tab

Previous Next


Record Selection tab/Document Selection tab

Selecting the Select documents based on Rich Text Content check box enables a Details button where you can specify further details.

You must specify one or more rich text items you would like to inspect, then specify the criteria you would like to use for filtering documents:

Content Pages– These are the primary types of pages created when users type content into the QuickPlace user interface. These pages can contain rich text bodies and multiple attachments.
Imported Pages– These are pages are created when users import Word files or HTML files. These pages typically contain the imported file itself, plus an HTML rendering of the file generated by QuickPlace or Quickr.
Link Pages– These pages are simple links to other pages (internal to the QuickPlace or Quickr).
Calendar entries– These pages contain fields for scheduling events and contain special fields for organizing attendees, repeating meetings.
Task entries– These pages contain fields for managing to-do items and contain special fields for organizing due dates and assignees.
Discussion pages– These pages implement a topic/response hierarchy used in threaded discussions.
Members– These pages contain information about the team members who typically use the QuickPlace.
Orphans– These are all the other pages that are not members of any specific view or folder in the QuickPlace or Quickr (except for the Index). In practice, these pages are often out-of-date or otherwise not useful (as evidenced by the fact that there is not direct navigation to them) and they can be omitted in many migration scenarios.

The Publishing section of this tab allows you to control which documents are selected for migration in terms of the QuickPlace/Quickr concepts of "published/unpublished" versions. The default is to migrate only published documents. You can choose to migrate only unpublished documents by selecting the “unpublished documents” radio button or both types of documents by selecting the “all documents” radio button.

For advanced jobs, you can also select documents by Folder, by Form used, or by using a dynamic Notes formula.

The Versioning section of this tab allows you to control which documents are selected for migration in terms of the Domino.Doc and Quickr concepts of “major/minor” versions. The default is to migrate only current versions. You can choose to migrate all the latest major versions by selecting the “latest major versions” radio button or all the versions by selecting the “all versions” radio button.

You can select documents by Binder, by Document Type, or by using a dynamic Notes formula.

To filter records based on their rich text content, use the Select documents based on Rich Text Content check box. Use this to implement one or more of the following policies for document libraries:

Selecting the Select documents based on Rich Text Content check box enables a Details button where you can specify further details.

Specify one or more rich text items you would like to inspect. Specify the criteria you would like to use for filtering documents:

This record selection option allows you to create multiple migration jobs for each document library, each one implementing one of the rules in the policy.

Data Fields tab

Previous Next


Data Fields tab

Table 55. Columns

Property

Description

Item

An item in a Notes document. You should specify the internal ItemName (which may be different than the name you are used to seeing displayed in forms and views).

View
Column

A pre-computed column in a Notes view or folder. You can only select this type if you specified a view or folder on the Record Selection tab. You can identify columns by ColumnName or ColumnNumber.

Formula

A dynamic value based on the Notes @Formula you specify. You should also specify the Formula property (for example "@Uppercase(Subject)") using the Notes formula editor where you can edit your formula with built-in or custom code fragments. A sample use case for this column type is if you do not want to migrate large attachments from Notes to SharePoint. To filter out the large attachments, use the following formula as your selection criteria:

@Attachments = 0 | @AttachmentLengths < 100000

Using this formula, any document with 0 attachments, or any document with attachment size less than 100,000 bytes will be migrated.

Parent
Item

An item in the current document's parent document. You should specify the internal ItemName (which may be different than the name you are used to seeing displayed in forms and views).

Parent
Formula

A dynamic value based on the Notes @Formula you specify. The formula will be evaluated in the context of the current document's parent document.

RichText

Extract a rich text item value as plain text, HTML, or MIME (MHT) formatted data.

Render

Render each document with the named form and return a Rich Text value. Rendering basically means taking a snapshot of the way a document is supposed to appear in the Notes client, and putting the entire thing into a single rich text field. This includes all the visual elements on the form, including form layout, field labels, graphics, and even “computed for display” fields. This can be a nice alternative to migrating all the individual data elements of a complex Notes application, especially in cases where you just want to archive the content from old applications and do not want to invest effort into migrating the application’s functionality.

In most cases, set the Option to HTML for mapping to SharePoint. Specifying the FormName to render with is optional. If you do not specify one, each document will be rendered with its default form (using the “FORM” Item in each individual document).

Images, objects, and attachments from the form may be included in your migration job by using the AttachmentScope property in those source data definition columns. To accomplish this, the AttachmentScope property includes the choice: “RenderWithForm”. If you choose this, you again can specify an optional FormName property. This should match the FormName you specified with the Render columns.

Attachment

Extract an attachment (or multiple attachments) from the named Rich Text item in each document and/or document level attachments. In the ItemName field, enter the rich text item you want to extract attachments from. If you leave the ItemName blank, then all attachments in each document will be extracted. For further details, see the AttachmentScope section.

The Compression option, Zip, gives you the ability to compress Notes file attachments while migrating them to SharePoint. There are a number of good reasons for wanting to do this:

To configure a set of global exceptions to this rule, use the Compression Exclusions option on the Notes tab of the tool's Options dialog. This option allows you to specify any file extensions that should never be zipped. This would typically include media files that are already well-compressed and would not benefit from zipping.

Attachment
Links

This generates a list of links to the designated set of attachments as a small rich text area. This gives you a way to navigate to attachments that you may not otherwise be able to get to. For example, you could append a links section to the bottom of migrated document so users could link to all the document level attachments that were not in the main rich text area.

Image

Extract an image (or multiple images) from the named Rich Text item in each document. Images stored as native Notes bitmaps will be converted to GIF or JPEG formats.

Ole
Object

Extract an embedded object (or multiple embedded objects) from the named Rich Text item in each document. Whenever possible, objects will be converted to files that can be subsequently opened by the applications that created them. (For example, an embedded PowerPoint 2003 slide will be converted to a .PPT file.) Refer to the Release Notes for details and limitations about this conversion process.

Document

Convert the contents of the selected Notes document into an XML document (such as an InfoPath® form).

Additional Properties

The subsequent properties you can specify will vary depending on the ColumnType you choose. In most cases, you can specify an Alias for the field and a ReturnType.

You can override the name of any data column by specifying the Alias property.

In some cases, additional options may be available:

Multi - Allows you to return multi-valued items as arrays.
Flat - Allows you to return multi-valued items as concatenated strings.
Html - Return Rich Text items as HTML formatted text.
Mime - Return Rich Text items, including images and attachments, as a complete multi-part MIME (MHT) document.
Xml - Return Rich Text items as XML (Lotus DXL format), including images and attachments.
XmlNoBinary - Return Rich Text items as XML (Lotus DXL format), excluding images and attachments.
AttachmentScope - This property is only available for source columns of type Image, OleObject, Attachment and AttachmentLinks. It can be set to RichTextItem, DocumentLevelOnly, All Attachments or RenderWithForm.

RichTextItem returns attachments from a rich text item. If the scope is a RichTextItem, there is also an ItemName property. In the ItemName field, enter the rich text item you want to extract attachments from.

DocumentLevelOnly returns the document level attachments that are not part of any rich text field.

AllAttachments returns all the attachments in the document, including attachments from multiple rich text fields and document level attachments.

RenderWithForm returns all the images, objects or attachments from the form that is being rendered. You can specify an optional FormName property. This should match the FormName you specified with the Render columns.

There are also two options for controlling the layout of the AttachmentLinks field for Notes source (this is not applicable for QuickPlace/Quickr):

Columns - This property controls the number of links that will be shown on one row. Set to 0 for a pure horizontal format or 1 for a vertical format.
Label - This property allows you to place a text label at the start of the links area. Note that of Columns = 0, than the label will be displayed in the same horizontal line, otherwise it will be placed on a separate line.

QuickPlace and Quickr do not use the same mechanism as Notes for displaying an Attachment Links area. Instead of creating a new source column for Notes, you need to use the predefined {AttachmentLinks} column.

The following is an example of a migration job that places multiple AttachmentLinks sections on a Wiki page. Below is the source document.

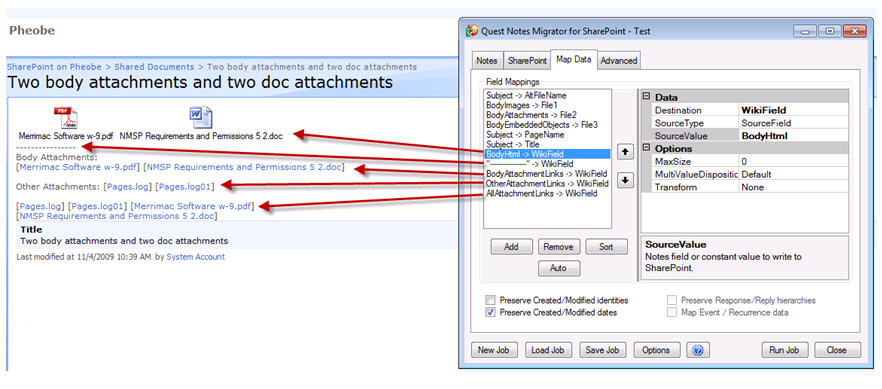
Figure 7. Migration job example

The following is the migration job and the resulting Wiki page.

Figure 8. Migration job with resulting WiKi page

Related Documents

The document was helpful.

Select Rating

I easily found the information I needed.

Select Rating