Using the Web Component Tutorial
Browser Interface Views
How to Use this Tutorial
Tutorial 1: Drag and Drop
Tutorial 2: Creating a Dashboard
Constructing the Tutorial Module
Configuring a Query
Configuring a Row-Oriented Table
Building the Dashboard
Summary
Tutorial 3: Adding a Drilldown Page
Preliminary Setup
Adding a Column of Aggregate Alarms to the Table
Adding a Dependent Page
Summary
Tutorial 4: Adding Views
Designing the Page
Preliminary Setup
Defining the Alarms Query
Configuring a Table of Alarms
Configuring a Chart Component
Configuring a Label with an Action
Configuring the Drilldown Page
Configuring a Drop-Down List
Flowing Monitored Hosts to Host Details T3
Adding a Customizer
Adding Nested Views
Summary
Tutorial 5: Using a Grid
Tutorial 6: Reports
Configuring a Query
Creating a Basic Report Page
Creating a More Elaborate Hosts Table
Adding a Header
Adding a Footer
Adding an Iterator for a Multi-Page Report
Summary
Tutorial 7: Creating a Form
About this Tutorial
Defining the Enumerated Types for Manager and Staff
Defining the Manager and Staff Types
Defining the Company Type
Defining the Functions for Adding and Removing a Manager
Defining the Labels
Defining the Bean Input Components
Defining the Grid Layout
Defining the Dialog
Defining the Table of Managers
Summary
Tutorial 8: Renderers
Tutorial 9: Adding Questions and Answers
Working with Associations and Question Viewers
Tutorial 10: Sending Messages to Other Users
About Domain Associations
About Question Associations
About Category Associations
About Question Viewers
Building Associations for Your Question Viewer
Populating the Question Viewer with Questions and Answers
Building a Mini-Viewer
Summary
Overview for creating the components
|
• |
Create the enumerated types Manager Title and Staff Title, with Common: Enumeration as their Super Type. For more information, see Defining the Enumerated Types for Manager and Staff. |
|
• |
Create the Manager and Staff types, each consisting of a First Name, Last Name, Title, and Employee ID. For more information, see Defining the Manager and Staff Types. |
|
• |
Create a Company type consisting of a Name, list of Managers and list of Staff Members. For more information, see Defining the Company Type. |
|
• |
|
• |
Create the Add Manager function. |
|
• |
Create the Remove Manager function. |
|
• |
Create the Grid Layout (Bean Data Fields for Manager) for the manager data fields. For more information, see Defining the Grid Layout. |
|
• |
Create the add manager Form Dialog (Form for adding a new company manager) to hold the Bean Data Fields for Manager grid. For more information, see Defining the Dialog. |
Here is where you set an additional context key (manager) using Writable Data Object to create a new instance of a Manager data object whose storage property is none. This transitory object holds the data fields set in the dialog. A new Manager object is created each time the dialog box appears. Because the storage type is none, the Manager object must be copied into the company structure to persist it, which is accomplished by calling company.save() in the Add Manager function.
The defined Action, whose flow type is Previous, calls the Add Manager function, which requires two parameters:
|
• |
|
• |
|
• |
Create The Company’s Management Team table to display the added managers. For more information, see Defining the Table of Managers. |
|
• |
|
• |
The Remove Manager row selection action is used to update the table after selecting a row and calling the Remove Manager function, which requires two parameters: context keys for the selected row and a reference to the company object. |
|
• |
Create a Company Personnel Grid Layout to hold the table. For more information, see Defining the Top-Level Dashboard. |
It is in the Additional Context of this component that you use a Writeable Data Object to create the company object which creates a null manager object. The storage type for the company object is user, which means each different logon name has a different company object that is kept until the server is restarted. See the Web Component Guide for information about the available storage mechanism choices.
Defining the Enumerated Types for Manager and Staff
|
1 |
The Add Type dialog box appears.
|
2 |
Create two types using the information provided below. Both types must have Common:Enumeration as their Super Type. |
The first figure displays the definition of the Manager Title type in edit mode and the second figure displays Staff Title after it is saved. We will not be using Staff Title in this tutorial—it is only there as a placeholder.
Figure 3. Manager Title type
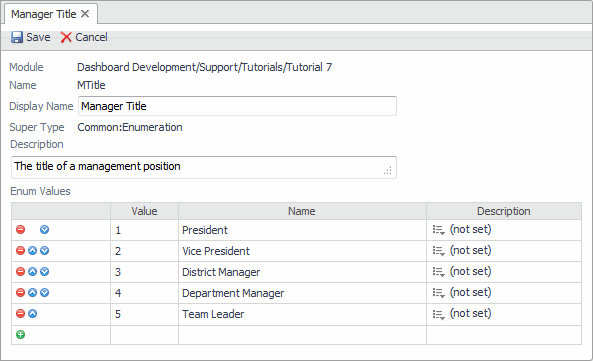
Figure 4. Staff Title type

Defining the Manager and Staff Types
|
• |
Still in the types editor, define two more types: Manager and Staff with the settings displayed below, and save them as usual. |
Figure 5. Manager type

Figure 6. Staff type

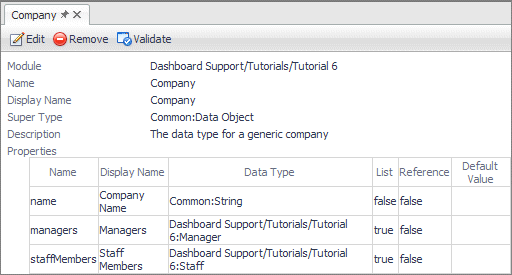
Defining the Company Type
|
• |
Still in the types editor, define the Company type with the settings displayed below, and save it. |
Figure 7. Company type