
Online-Only Topics
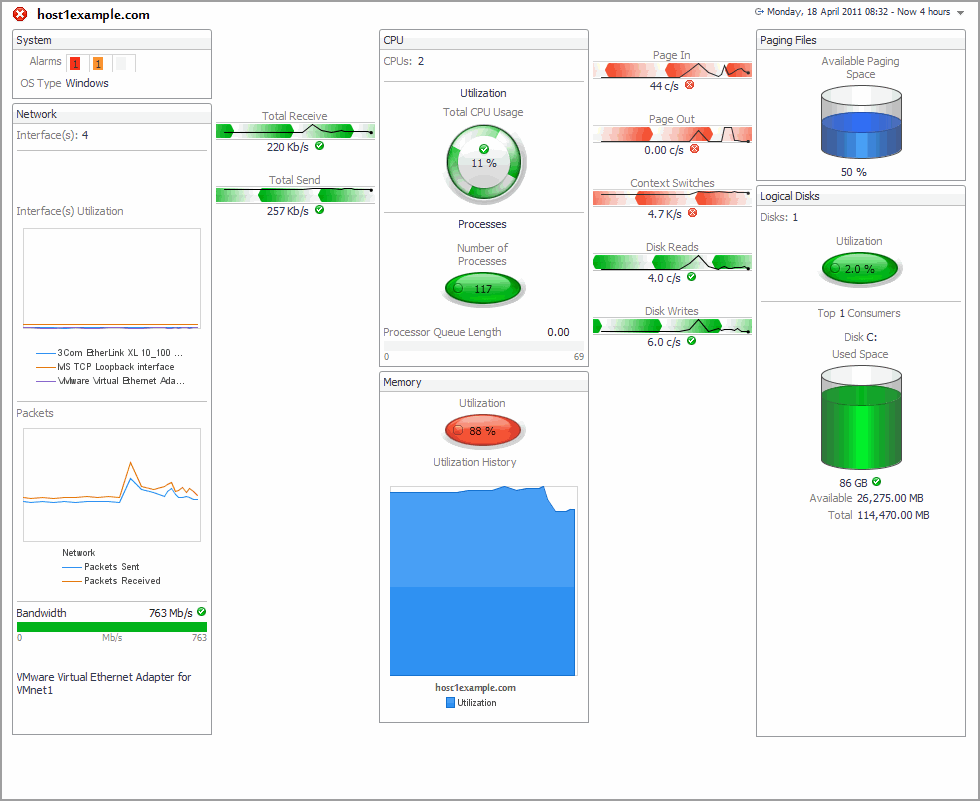
The Host Monitor dashboard displays detailed information about a monitored host. You access this dashboard from the navigation panel, under Dashboards > Hosts > Host Monitor.
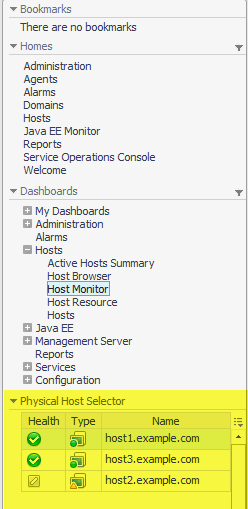
To view the property details for another host running in your environment, open the navigation panel, and select a host from the Physical Host Selector.
Online-Only Topics
You can use the Report feature to identify changes in rules, alarms and registry values in the current release compared to previous releases or a specific date. For more information, see Viewing reports on changes in Rules, Alarms and Registry values .
|
4 |
|
5 |
Click Run a Report. |
|
• |
Filter the list of templates by typing the first few letters of the template name or module in the Search field. You can also click the Search menu to perform an advanced or regular expression search. |
|
7 |
Click Next. |
|
8 |
|
9 |
Click Next. |
|
10 |
Type a unique name for the report in the Name field. |
|
11 |
Choose the Output Format: |
|
• |
PDF is the default option. |
|
• |
Excel creates a report that you can open in Microsoft Excel. |
|
• |
XML creates a report in the XML format. Select this format if you want to import the data into other applications. |
|
12 |
Optional—if you want Quest Foglight to send this report to specific individuals, type a comma-separated list of their email addresses. |
|
13 |
Optional — Specify any of the following scheduling options for your report. |
|
a |
Select the Schedule This Report check box to enable scheduling. The wizard will present scheduling options on the next page. |
|
b |
In the Retain field, type the number of instances of a scheduled report that you want Quest Foglight to keep. For example, if you type 3, Quest Foglight deletes the oldest instance of this report when it generates a fourth instance. |
|
c |
The Enable Scheduling check box is selected by default. When this option is selected, the scheduled report is automatically enabled when you click Next. |
|
d |
Click Next. |
|
e |
Select a schedule from the list or click the New Schedule icon |
|
NOTE: To delete a schedule, contact your Administrator. Schedules are deleted in the Administration > Schedules > Manage Schedules dashboard. For more information, see the Administration and Configuration Guide. |
|
f |
Click Next. |
|
14 |
Confirm that the report values are correct. If they are not correct, click Previous and make the appropriate changes. If they are correct, click Finish to generate the report. |
|
1 |
On the navigation panel, click Reports. |
|
2 |
Click Run a Report. |
Online-Only Topics
For more details, see Managing Scheduled Reports.
Online-Only Topics
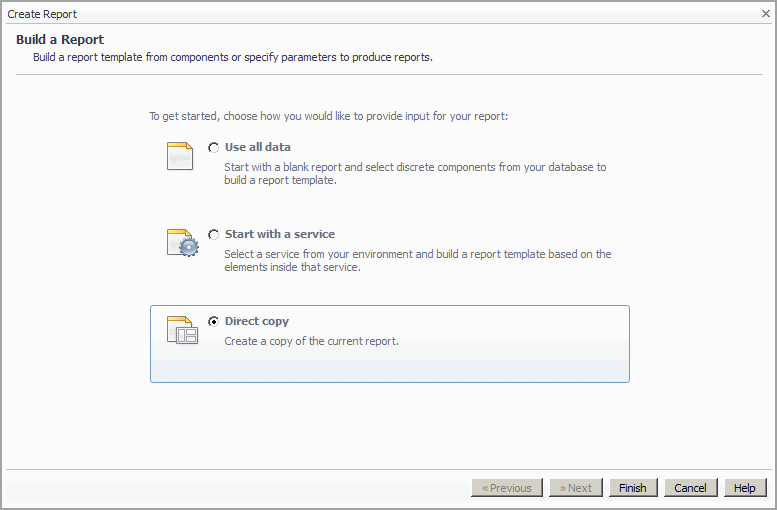
Choose to base your report template on one of the following options:
|
• |
Use all data: start with a blank report template and build a report by selecting discrete components from your database. See Creating a Report Based on All Data. |
|
• |
Start with a service: build a report template based on components of the service you select. See Creating a Report Based on a Service. |
|
• |
Create a report based on the current dashboard: use the data shown on the current dashboard to build a report template. You can also create a parameterized report template that can be populated with different data. See Creating a Report Based on the Current Dashboard. |
|
• |
Direct Copy: use the data shown on the current report to build a report template. See Copying a Report. |
|
7 |
In the Create Report wizard, select Use all data. |
|
8 |
Click Finish. |
|
• |
|
• |
|
• |
|
1 |
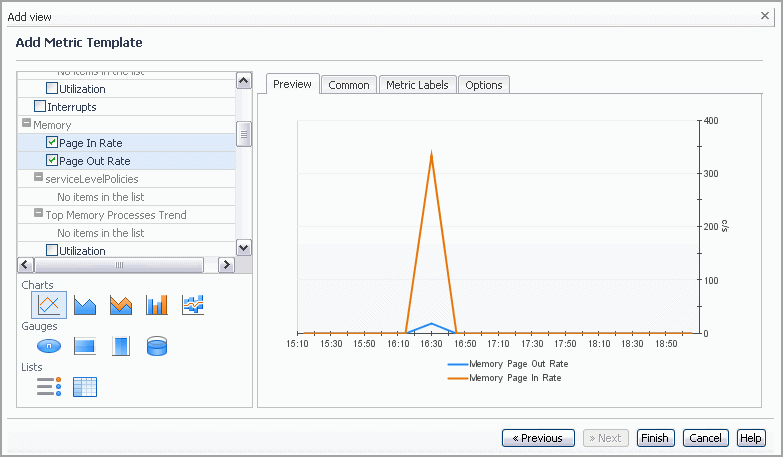
If you are creating a chart: select as many metrics as you want to include. |
|
• |
Plot: graphs metric data as a line. |
|
• |
Area: graphs metric data as connected data points, filled below the points. |
|
• |
Stacking Area: graphs metric data as connected data points, filled below the points and (in the case of multiple metrics) stacked. |
|
• |
Bar: draws each data point as a bar. |
|
• |
High/Low: draws the maximum and minimum values as a series of bars, with an additional line that shows the average. |
|
• |
Metric Indicator: displays a metric as an oval with a number at its center. |
|
• |
Horizontal Bar: displays the current value of a metric as a horizontal bar (linear gauge). |
|
• |
Vertical Bar: displays the current value of a metric as a vertical bar (linear gauge). |
|
• |
Cylinder: displays the current value of a metric as a cylinder. |
|
• |
Lists: metrics list or table |
|
a |
Preview tab: see the metric view based on your selections: |
|
b |
Common tab: specify a Title (name for the chart) and Height (select the Height check box to set the height for this chart). The default chart height is 300 pixels. |
|
c |
Metrics tab: choosing another label for a metric is helpful when you have many metrics and parents. The label appears in the legend when the chart contains metrics from more than one parent. The settings that you can change are: |
|
d |
Options tab: controls how metrics are displayed in charts. For more information, see Options tab. |
|
• |
Select a different view style or input data. See Adding a View for instructions. |
|
• |
Select different metrics. See Step 1 for instructions. |
|
• |
Select a different metric view type. See Step 2 for instructions. |
|
1 |
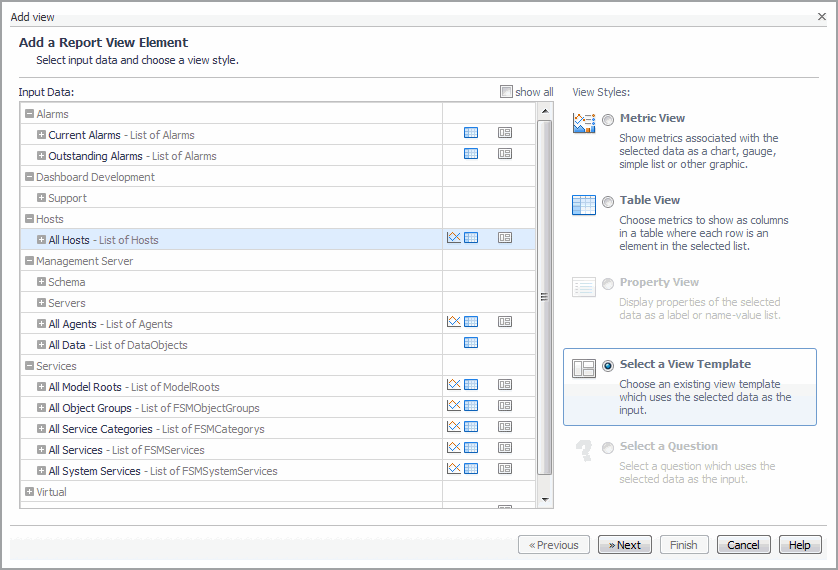
On the Add View wizard’s Select Add a Report View Element step, select the input data you want to use. |
|
2 |
|
4 |
Optional—select Show all to display all data objects. |
|
5 |
Click Next. |
You can configure your table column headers, text alignment, and the renderer.
|
1 |
Optional — Change the order of the columns using the arrows ( |
|
• |
Label: change the name of one or more of the columns. |
|
• |
Property: cannot be edited. |
|
• |
Alignment: choose to align the column to the left, center, or right. |
|
• |
Renderer: choose how Quest Foglight displays the value. For example, show metric values as a sparkline or configure an object name to appear in bold. |
|
2 |
Click Next. |
|
1 |
If you want to make changes to the table: click Previous. You can navigate back to: |
|
• |
Select a different view style or input data. See Adding a View for instructions. |
|
• |
Select different properties to appear in the table view. See Step 1 for instructions. |
|
• |
Re-configure the table columns. See Step 1 for instructions. |
|
2 |
If the view suits your needs as-is: click Finish to exit the wizard. See Working with Your Custom Report Template. |
|
1 |
On the Add View wizard’s Select Add a Report View Element step, select the input data you want to use. |
|
2 |
|
4 |
Optional — Select Show all to display all data objects. |
|
• |
Select Name-Value List if you want the properties you select to be listed as name-value pairs in a simple two-column table. You can customize how Quest Foglight displays both the name (for example, to display a host name in bold text) and the value (for example, to display a metric value as a sparkline). |
|
• |
Select Property Renderer if you want the values of the properties you select to be rendered together in a single label component. You can add text between components and customize how Quest Foglight displays values. |
|
6 |
Click Next. |
|
7 |
Optional — Provide a Title for the view. |
|
• |
Label: change the name of one or more of the properties. |
|
• |
Property: cannot be edited. |
|
• |
Renderer: choose how Quest Foglight displays the value. For example, show metric values as a sparkline or configure an object name to appear in bold. |
|
• |
Preceding Text: type the text that you want to appear before the first property. For example, if your first component is the CPU utilization on a host, you could type “CPU utilization is”, so that the property renderer displays CPU utilization is <value>%. |
|
• |
Preceding Text Style: choose how Quest Foglight displays the text you add. For example, configure the text so that it appears in bold. |
|
• |
Following Text: type the text that you want to appear after a property. For example (continuing from the example above), if your first property is the CPU utilization on a host and your second property is the host name, you could type “on” as the text following the first property so that the property renderer displays CPU utilization is <value>% on <host name>. |
|
• |
Text Renderer: choose how Quest Foglight displays the text you add. For example, configure the text so that it appears in bold. |
|
• |
Property: cannot be edited. |
|
• |
Renderer: choose how Quest Foglight displays the value. For example, show metric values as a sparkline or configure an object name to appear in bold. |
|
10 |
If you want to make changes to the view: click Previous. You can navigate back to: |
|
• |
Select a different view style or input data. See Adding a View for instructions. |
|
• |
Select different properties. See Step 1 for instructions. |
|
• |
Select a different property view style. See Step 5 for instructions. |
|
• |
Re-configure the view. See Step 9 for instructions. |
|
11 |
If the view suits your needs as-is: click Finish to exit the wizard. See Working with Your Custom Report Template. |
|
2 |
On the toolbar, click Properties. |
|
3 |
Type a unique name for the report in the Name field. |
|
5 |
Optional — Click the edit icon |
|
6 |
Optional — Enter a description of the report in the Context Help text box. This text appears in a tooltip when you hover over the report name in the navigation panel. |
|
7 |
Select the Allow this view to be included in other views check box if you want this view to have a reportlet purpose. |
|
8 |
Click OK. |
|
• |
Display the top n of anything (for example, the top 5 hosts by CPU utilization). |
|
• |
|
NOTE: If you create multiple rules, you must choose whether the filter matches all rules or any of the rules. All corresponds to the AND condition; Any corresponds to the OR condition. |
|
2 |
You can quickly add a view to your report or dashboard by using an existing view template.
|
a |
Preview tab: see how the view looks based on your selections. |
|
b |
|
3 |
You can use a number of defined questions to place data onto your report. Quest Foglight provides a list of default questions to start from. For example, “What are the hosts with the least stable memory utilization?” By selecting this question, Quest Foglight searches for the hosts in your environment which meet this criteria, and adds that data to your report. Once done, you can run or schedule the report.
|
1 |
On the navigation panel, under Dashboards, open a custom report. |
|
2 |
In the report toolbar, click Properties. |
|
3 |
|
4 |
|
5 |
|
6 |
From the toolbar, click Add view. |
|
8 |
Next you can run or schedule the report. See Running a Report. You can also create a scheduled version of a report that has been generated. For more information, see Managing Reports.
|
1 |
On the action panel, click Reports > Create a New Report. |
|
2 |
In the Create report wizard, click Start with a service. |
|
3 |
Click Next. |
|
4 |
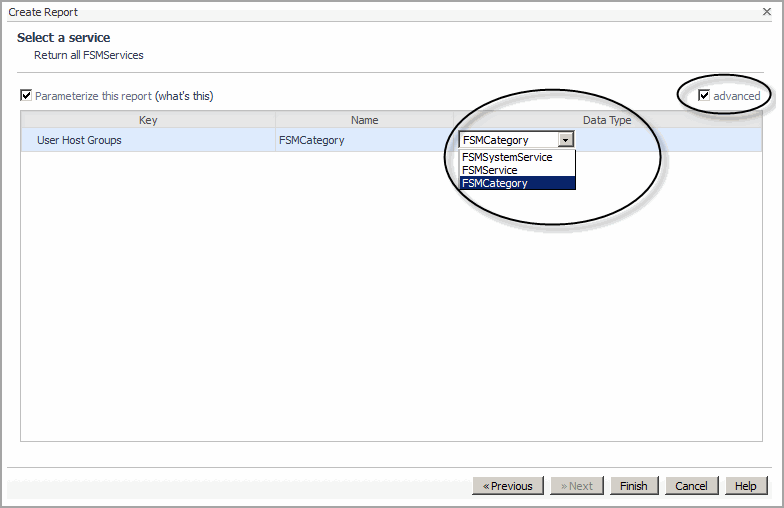
Optional — Select the Parameterize this report check box if you want to create a report that is designed to run with any service. |
|
5 |
Optional — After you select Parameterize this report, select the Advanced checkbox to choose a data type for any of the services listed. This enables you to reduce the scope of the report to a particular data type. |
Creating a report based on the current dashboard (Other Actions > Reports > Create a New Report from the action panel) allows you to use live data from the current dashboard as the report inputs.
|
2 |
On the Action panel, click Other Actions > Reports > Create a New Report. |
|
3 |
The Create Report wizard appears.In the Create report wizard, click Create a Report based on the current Dashboard. |
|
4 |
Click Next. |

|
5 |
Optional — Clear the Parameterize this report check box if you do not want to create a report designed to run with any object. |
|
6 |
Optional — Select the objects in the table you want to include in your report. |
|
7 |
Optional — When Parameterize this report is selected, click the Advanced checkbox to choose a data type for any of the services listed. This enables you to reduce the scope of the report to a particular data type. |
You can run a report on a selected dashboard at any time.
Once a user creates a report based on a dashboard (see Creating a Report Based on the Current Dashboard), this report is displayed in the Reports menu for all users who have the same user role.
|
2 |

You can build on an existing report by copying the report.
|
2 |
On the action panel, click Reports > Create a New Report. |
|
3 |
In the Create Report wizard, click Direct Copy. |
When you finish adding a view, it appears on the workspace for your custom report template.

Continue to add views by selecting Add view on the report workspace toolbar or by dragging and dropping data onto the workspace. See Adding a View and Adding a View Using the Drag and Drop Functionality for details. See Working with Views for information about options available for the views that you add.
From the report workspace, you can also add other elements (such as text, a header or footer, or a background image). See Adding Text, Customizing the Header or Footer, and Editing Properties for details.
Click Run () to generate the report immediately. Alternatively, click General > Actions > Run this report. See Online-Only Topics for details.
Click Show Tutorial () to view a learning video on how to use parameters to manage your report. See Using Parameterized Input Values for details.
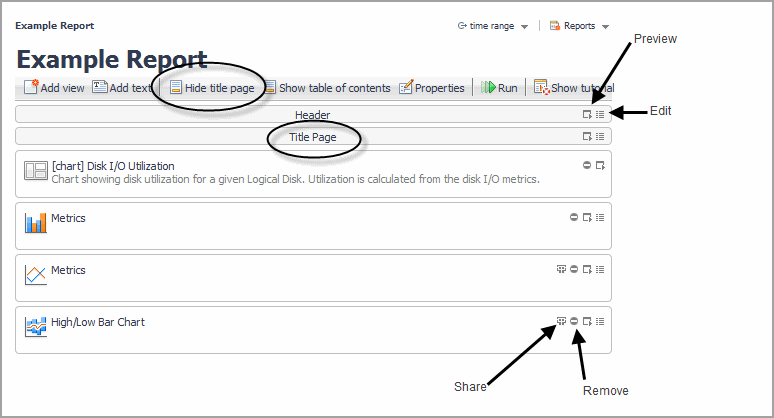
Click one of the Options icon to perform one of the actions listed below.
|
• |
Preview ( |
|
• |
|
• |
Remove ( |
|
• |
Share ( |
|
• |
The Name of the view. Provide the view with a distinctive name that describes its purpose or contents. |
|
• |
Additional Purposes: Select one or more of the following check boxes if you want to make this view available for use in another view or dashboard: |
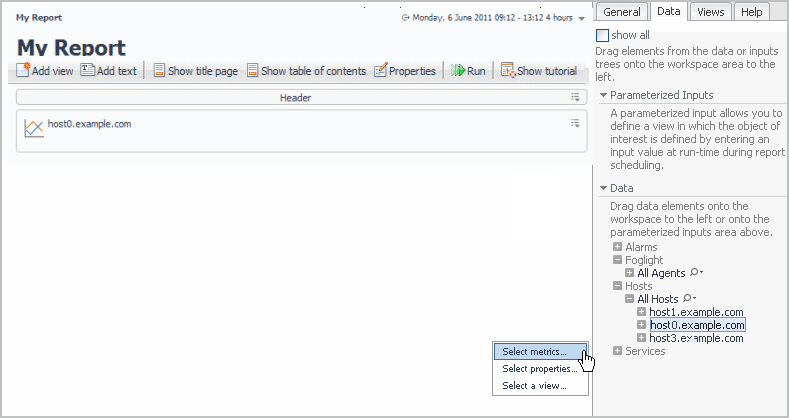
Add views to you custom report template or dashboard by dragging data objects onto the workspace from the list in the Data tab. If the data object you drag and drop supports two or more view types (for example, a host), a list appears from which you can select a create a metric view, a table view, a properties view, or select a view template. See Adding a Metric View, Adding a Table View, Adding a Property View, and Using an Existing Template for details.
You can also drag and drop views from the Views tab. This tab lists all of the default Quest Foglight views to which you have access. It also lists any non-parameterized custom views that you create and share. By default, views are organized by module (for example, Hosts, or the cartridge in which the view is included); if you select show by role, they are organized based on your roles. Drag and drop views to quickly add information to your report.
|
1 |
If you are customizing a report template: click Add text in the toolbar ( |
|
2 |
|
4 |
If you want to add a background image to the text, click the edit icon ( |
|
5 |
Click OK. |
You can add a title page to your report.
|
2 |
Click Show title page. |
|
5 |

|
7 |
If you want to add images to the report title page, click the add icon to the left of Add Image to open the Select an Image dialog box. |
|
a |
Enter the URL where the image can be found, navigate to the image in the Available Images tree (if you previously uploaded an image), or click Upload image to add an image to a directory for your user account. |
|
b |
Click OK. |
|
8 |
Click Apply to save the changes. |
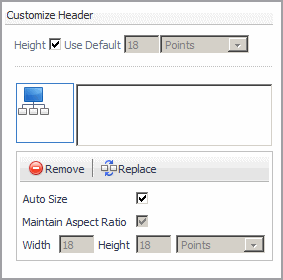
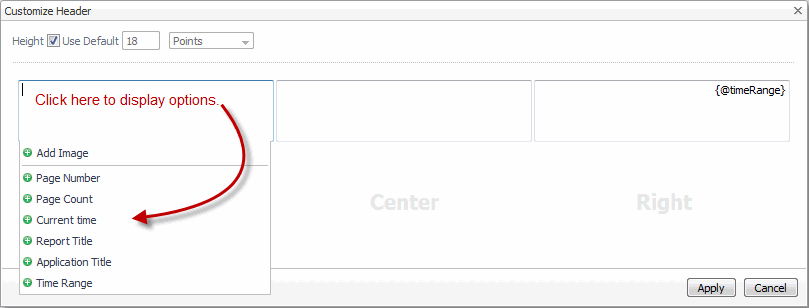
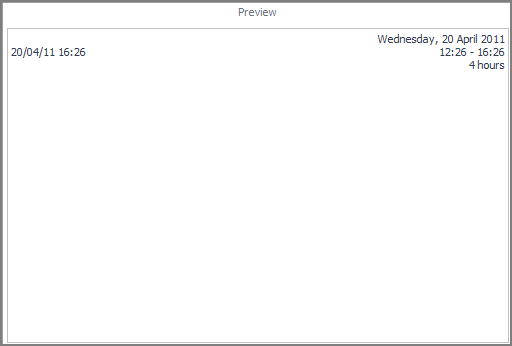
You can add a custom header or footer to your report.
|
3 |
The default height of a header is 18 points. To change the height, clear the Height check box, and set a new height value and unit. |
|
4 |
|
6 |
If you want to add images to the report, click the add icon to the left of Add Image to open the Select an Image dialog box. You can add an image either on the right or left side of the header. |
|
a |
Enter the URL where the image can be found, navigate to the image in the Available Images tree (if you previously uploaded an image), or click Upload image to add an image to a directory for your user account. |
|
b |
Click OK. |
|
7 |
Click Apply to save the changes. |
|
• |
Click the |
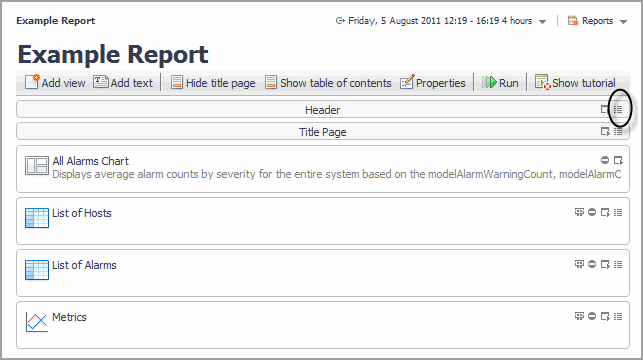
You can add a table of contents to your report.
|
1 |
On the navigation panel, under My Dashboards, open a report you have created. If you do not have an existing report already created, see Building a Custom Report. |
|
2 |
In the toolbar of the report, click Show Table of Contents. |
|
• |
Click Hide Table of Contents. |
|
1 |
|
2 |
Click Manage Reports. |


|
1 |
Click General > Actions > Properties > Edit basic properties in the action panel or (for report templates) click Properties in the toolbar ( |
|
2 |
Type a unique name for the report in the Name field. Since custom reports are listed under My Dashboards in the navigation panel, choose a name that indicates that this is a report. |
|
3 |
For dashboards: select an Auto Refresh Rate option to refresh the dashboard at regular intervals (or not at all). The default rate is 300 seconds. You can also specify a custom rate (in seconds) or choose for the dashboard to never refresh. |
|
6 |
If you want to add a background image to the report, click the edit icon ( |
|
7 |
For dashboards: if you want to configure the dashboard so that it can be included in other views, select the Allow this view to be included in another views check box. This causes the dashboard to be considered a portlet. See Working with Views for more information about portlets. |
|
8 |
|
9 |
Click OK to save your changes. |
You can quickly run a report at any time.

|
1 |
|
a |
Type a unique name for the report in the Name field. |
|
b |
Optional—set the roles for your report. By default, if you do not select any relevant or allowed roles, the dashboard or report template is available to all roles. |
|
c |
Optional—click the edit icon |
|
d |
You can enter a description of the report in the Context Help text box. This text appears in a tooltip when you hover over the report name in the navigation panel. |
|
e |
Select the Allow this view to be included in other views check box if you want this view to have a reportlet purpose. |
|
f |
|
g |
Click OK. |
|
4 |
Confirm if the report values are correct. If they are not, click Previous and make the appropriate changes. If they are correct, click Finish to generate your report. |
Select a video from the Video Tutorial menu to launch the video in a separate browser window.