
Replication Benchmark Test
The Replication benchmark test is a unique test developed by Benchmark Factory for testing replication in applications such as SharePlex.
This test allows you to create customized database objects, as well as a customized workload, in order to produce a repeatable database change rate and history (for example, Oracle redo logs) that can be used to test replication strategies. This test can also be used to create a model of your database and workload in order to help demonstrate replication performance.
While this benchmark was designed for testing and evaluating replication strategies and functionality in SharePlex, it can also be used to test other database replication products as well.
The following options can be customized in the Replication benchmark test:
- The number of tables in the test
- The number of columns per table and the column types (data types)
- The percentage of each column type (data type) in all tables, for example, 40% INT, 20% VARCHAR(255), etc.
- The percentage of each statement type (insert, update, delete), as well as the number of statements per commit (transaction)
To create a Replication benchmark test
- Select File | New to open the New Job Wizard.
- In the New Job Wizard, select a connection in the Database Under Test page. Then click Workload in the left pane.
- In the Workload page, select Industry Standard Benchmark Test from the test type drop-down list.
- Then select the Replication test from the Other Tests category.
- Click
to add the test to the workload. The Summary tab opens.
-
Summary tab. The Summary tab provides a summary of the job and the workload, as well as links to the commonly edited options for this test. Click each link to navigate to the applicable tab where you can edit that option. Options shown in red are required. Review the following for additional information:
Scale Click to change the scale factor for this test/step. In the Benchmark Scale field, specify a scale factor. See Benchmark Scale Factor for more information. Size Displays the total size of all objects in this Create Objects step. Click to open the Scale tab where you can modify the database size or the scale factor. See Benchmark Scale Factor for more information.
Number of Tables (Replication test only) Displays the number of tables to create. Click to modify the number of tables, the number of columns in a table, and the data types to create. See Replication Table Options Tab for more information. Transactions Displays the number of transactions. Click to modify the transaction mix for the transaction step. See Transactions Tab for more information. User Load Displays the user load—the number of virtual users per test iteration. Click to review or modify the user load. See Specify User Load for more information. Length Click to modify the timing for this test. See Timing Tab for more information. -
Create Objects - More Options. To specify more options for the Create Objects step, select the Create Object for Replication step in the left pane. Then select the Test Options tab. Review the following for more information:
Scale tab See Benchmark Scale Factor. Table Options tab Use the Table Options tab to specify options such as the number of tables, number of columns, column data types, and data type percentages. See Replication Table Options Tab. Options tab Use the Options tab to specify some general options for this step, such as specifying the number of agents to use to load data. See Options Tab (Create Objects Step).
Object/Data Retention Method - Special Considerations
- The Recreate objects and reload data every execution method will override the selected method in the following scenarios:
- If you modify the list or proportion of data types or the number of columns between runs
- If you select Refresh data using inserts and modify the number of tables between runs
- Tables are added or deleted if you select either Refresh data using backup sets or Create/Load objects if objects don't exist and modify the number of tables between runs.
- Rows are added or deleted if you select Refresh data using backup sets and modify the scale factor between runs.
- The Recreate objects and reload data every execution method will override the selected method in the following scenarios:
-
Replication Test - More Options. To specify more options for the Replication step, select the Replication Test step in the left pane. Then select the Test Options tab. Review the following for more information:
Transactions tab See Transactions Tab. User Load tab See Specify User Load. Timing tab See Timing Tab. Advanced tab See Advanced Tab. - To add another test to the workload, click Add Another Test/Step. This takes you back to the selection page of the Workload section.
- Job Setup. To configure job-level options, select the Job Setup tab. See Job Setup Tab to learn more about job-level options.
- Agent. To set up the agents for this job, click Agent in the left pane. Select the agents/computers to use for this test. See About Agents for more information.
-
After specifying the test-level and job-level options, you can save the job, run the job, or schedule the job. Review the following:
- To run the job immediately, click
.
- To schedule the job, click Workload (left pane) and select the Job Setup tab. Then select the Schedule tab. See Schedule a Job.
- To save the job without running it immediately, click
. Use this option after scheduling a job.
- To save the job to an existing job, select the Job Setup tab. In the Save Job section, select the name of an existing job. Click
- To run the job immediately, click
Notes:
- Each Insert statement is applied to only one row.
- Each Update or Delete statement is applied to only one row if the target row exists. If the target row does not exist, no rows are affected.
- In a Replication test, each incremental increase in the scale factor loads an additional 1000 rows of data into each table.
Capture and Replay a Workload
Capture/Replay tests allow you to capture and then replay a workload, or replay an existing capture from a trace file, database repository, text file, or output from another Quest Software tool.
Select one of the following topics for more information:
- Capture and Replay Oracle Workload
- Capture and Replay SQL Server Workload
- Replay Load from an Oracle Trace File
- Replay from SQL Server Trace Table
- Replay Load from an ODBC Trace File
- Import from a Delimited Text File
- Import from Oracle Dynamic Performance View
- Import from Quest Tools Export File
Capture and Replay Oracle Workload
Benchmark Factory allows you to capture Oracle workloads, then replay those workloads to view transactions and response times.
In Benchmark Factory, use one of the following workflows to capture an Oracle workload:
- New Job Wizard—Use the New Job Wizard (File | New) to guide you through the steps of setting up and capturing the workload. Then add the captured workload to your new job to run it immediately or at a later time.
- Capture Scenario Wizard—Select Tools | Capture Workload to open the Capture Scenario Wizard.
Note: This feature is not available in the freeware edition of Benchmark Factory.
See also, Considerations When Performing an Oracle Capture and Replay.
To capture an Oracle workload
- Select File | New to open the New Job Wizard.
- On the Database Under Test page, select the database to test.
- Then click
.
- On the Workload page, select Capture/Replay Test from the drop-down list.
- Then select the Capture and Replay Oracle Workload option.
- Click
.
-
On the Replay Workload page, click Perform New Capture. The Capture Scenario Wizard opens and the New Job Wizard closes.
Tip: You can also create a new capture using the same settings as an existing capture project. In the Captures tab of the Benchmark Factory console, right-click a capture and select Repeat Capture.
-
Capture Scenario Wizard. In the Capture Scenario Wizard, enter connection information for the database from which you want to capture a workload.
-
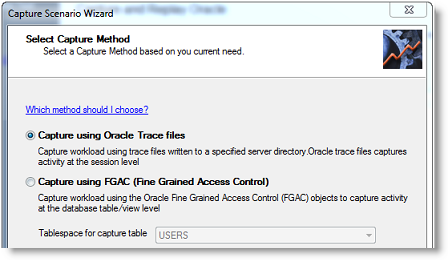
Select Capture Method. On the Select Capture Method page, select a capture method to use. Review the options below. Click Next when finished.
Capture using Oracle Trace files Captures workloads using trace files written to a specified server directory. These files are captured at the session level.
Note: The Trace file capture method is not available for Oracle connections that use Real Application Clusters (RAC).
Capture using FGAC (Fine-Grained Access Control) Captures workloads using the Oracle Fine-Grained Access objects that capture activities at the database table and view levels.
Tablespace for capture table—Allows you to select the required tablespace for Fine Grained Access captures.
Note: The FGAC capture method is enabled only if the feature is available in the target database.
-
Apply Privileges. If the user does not have the required privileges to do the capture, the Apply Privileges page opens. Enter the credentials of a DBA-type user account that can apply the necessary privileges. Click Next when finished.
Note: To view the missing privileges necessary for this user to perform the capture process, click the View/Save Script button and review the script.
-
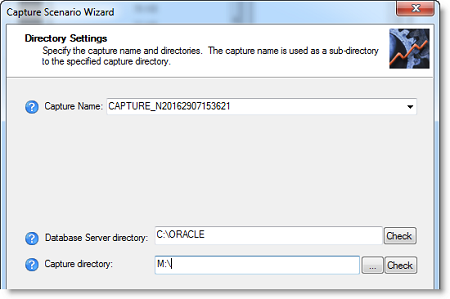
Directory Settings. On the Directory Settings page, specify an Oracle server-side directory in which to place the capture files. Also, specify the capture directory from which Benchmark Factory will replay the files. Review the following for additional information:
Click Next when finished.
Capture Name Enter a name for the capture, or use the default. This name is used for the sub-directory where the capture files are stored in the Capture Directory you specify.
Note: Only alpha and numeric characters and the underscore (_) are permitted. The name must begin with a letter.
Database Server Directory Specify an Oracle server-side directory where Benchmark Factory should place the capture files. Specify the path as the server sees it.
Note: You can specify a network directory here. Enter the full network path to the network directory. The database service must be able to access the network directory. In a Linux environment, a local directory must be mounted to the network location.
Capture Directory Specify a directory where Benchmark Factory will look for the capture files to replay. Do one of the following:
- Manual transfer: Specify a client-side directory and then manually transfer the capture files to this location.
-
Shared directory: Specify the same Oracle server-side (or network) directory you specified in the preceding field. However, enter the path as the client computer sees it.
To use this method, you must first map a drive on the client computer to the Database Server Directory (Oracle server-side or network directory). Then, browse to and select that mapped drive.
Selecting a shared directory: The shared capture directory can be on the database server as a local directory or on a network file server as a local directory. Either location must be accessible by the Benchmark Factory client computer (Windows network share, Samba, or NFS). A network file server is the preferred location for the following reasons:
- This minimizes total network I/O required for capture and replay.
- The shared directory can be placed on an I/O subsystem with sufficient I/O bandwidth to handle both the concurrent I/O writing and the cumulative size of the trace and export files.
-
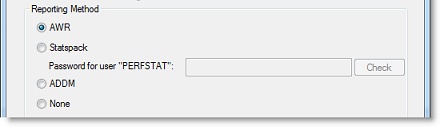
Reporting method. On the Reporting Settings page, select the performance reporting method to use. Review the options below. Click Next when finished.
Reporting Method Select a performance collection and reporting method.
-
AWR—If this option is selected, Benchmark Factory uses the optional Oracle Enterprise Manager (OEM) “Diagnostic Pack” Automatic Workload Repository (AWR) to collect database wide performance statistics, collect before and after workload capture, replay AWR snapshots of database-wide performance statistics, and generate a differences report between the capture and replay results.
Note: A valid licenses is required to use the optional OEM Diagnostics Pack.
-
Statspack—If this option is selected, Benchmark Factory calls the Oracle “Stats Pack” utility to create a performance data repository, collect before and after workload capture, replay Stats Pack snapshots of database-wide performance statistics, and generate a different report between the capture and replay results.
Note: "perfstat" is the default password.
- ADDM—Select to instruct Benchmark Factory to use performance analysis information from the Oracle Automatic Database Diagnostic Monitor (ADDM).
- None—If this option is selected, no reports are generated.
-
-
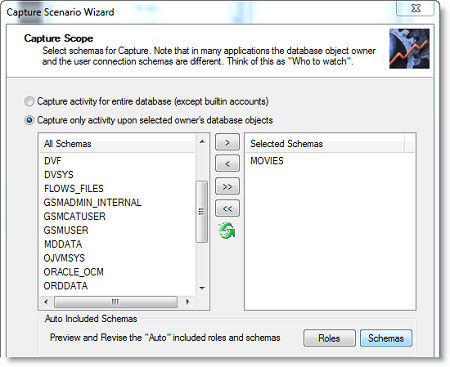
Capture Scope. The Capture Scope page allows you to select schemas for capture. You can select the entire database or use the list to select specific schemas. Review the options below. Click Next when finished.
Capture activity for entire database Captures activity for the entire database, but not for built-in accounts.
Capture only activity upon selected owner's database objects Captures only the data of the selected database objects. This option allows you to select individual schemas for capture.
- To select database objects, move the desired schemas to the right pane.
- To specify auto-included schemas, click one or both of the following buttons:
- Roles—Opens the Auto Included Roles dialog which displays the roles that can access the objects in the schemas in the Selected Schemas column. Select which roles to include or exclude.
- Schemas—Opens the Auto Included Schemas dialog which displays schemas that can access the objects in the Selected Schemas. Select which related schemas to include or exclude.
-
Export Scope. The Export Scope page allows you to specify whether or not to export the database objects and data required to replay the workload on the same data snapshot. Review the options below. Click Next when finished.
Perform export as part of capture process Select to instruct Benchmark Factory to export the objects selected on the previous page (Capture Scope). The export is performed during the capture procedure.
Note: If you selected to capture activity for the entire database, exporting the entire database can require significant time and space.
Include export of related schemas—Select to export the auto-included schemas selected on the Capture Scope page.
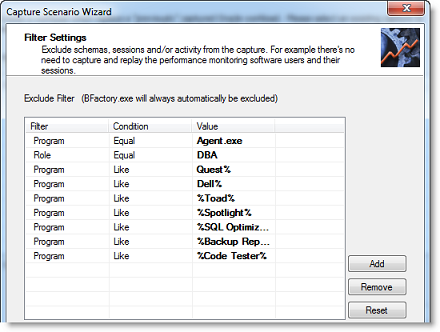
- Filter Settings. (Optional) The Filtered Settings page allows you to add filters to exclude activity from the capture.
-
To add a filter, click Add. Then specify parameters for the filter. Click Next when finished.
-
-
Capture Thresholds. Benchmark Factory allows you to specify limits for CPU usage and free space during a capture. If levels exceed the values you specify, the capture process is stopped.
Benchmark Factory displays the current values to help you determine the best thresholds to specify. Review the options below. Click Next when finished.
Stop capture if CPU percentage exceeds Enter a percentage. If CPU usage exceeds this value, Benchmark Factory stops the capture process. Stop capture if disk/tablespace free space falls below Enter a value for free space in MB. If the amount of free space falls below this level, Benchmark Factory stops the capture process. -
Capture Control. Use the Capture Control page to specify when to start the capture.
You can start the capture immediately after finishing the wizard, or you can schedule the capture. Review the options below. Click Next when finished.
Start Capture/Export Immediately—Select to start the capture process immediately.
Scheduled (via database schedule)—Select to schedule the capture process. Then specify a date and time based on the server time.
Capture Automatically
Stop After—Use the sliders to specify a duration for the capture process. The default is 30 minutes.
-
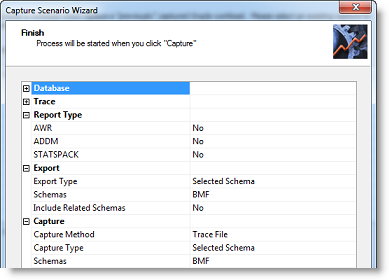
Start the capture. The Finish page provides capture specifications. To start the capture (or enable the schedule), click Capture.
-
Capture Status. The Capture Status window opens providing export or capture status and process details.
Immediate capture: If you selected to start the capture immediately, the Capture Status window displays information about the capture process, such as the status of the export process and the number of sessions captured.
- Click the Click here for details link to view more-detailed information during the export or capture. You can view which objects are exporting or which session/user is currently being captured and the total number of sessions captured.
- Click Settings to review the capture description.
Scheduled capture: If you scheduled the capture process, leave the capture wizard open to run the capture at the scheduled time.
- Transfer and process files. When the workload capture is finished, the Oracle capture files are processed.
- If you stopped the capture before it was finished, Benchmark Factory prompts you to process the files.
-
If you specified a client-side directory (instead of a shared directory) as the Capture Directory (directory from which the client replays the capture), BMF prompts you to transfer the capture files to your client-side directory now. Copy or move the trace/xml and export (DMP) files from the directory where they were generated (Database Server Directory) to the client-side Capture Directory. Place the files into the existing capture-named sub-directory. After transferring the files, click OK in the message box. BMF then processes the necessary files and updates the project file.
Optionally, if you want to transfer the files at a later time, click Cancel.
- Click the Click here for details links to review the export and capture processes. Close the Capture Status window when finished. You can open the Capture Status window again from the Captures tab in the Benchmark Factory console. In the Captures tab, right-click a capture and select View Status.
- You can now replay the workload.
To replay an Oracle workload
- Select File | New to open the New Job Wizard.
- On the Database Under Test page, select the database to test.
- Then click
- On the Workload page, select Capture/Replay Test from the drop-down list.
- Then select the Capture and Replay Oracle Workload option.
- Click
- Select a capture. On the Replay Workload page, select a capture from the Capture to Replay field using one of the following methods:
- Click the browse button and navigate to the directory where the capture files are located. Select the project (.mse) file for the capture you want to replay.
- Select one of your previously-replayed captures from the drop-down list.
Benchmark Factory loads the capture details into Capture Properties fields.
- Transfer and process files. If you did not transfer the trace or .xml capture files to the client-side directory at the time of the capture, or you transferred the files at a later time, Benchmark Factory warns you that the capture data must be processed.
- To process the files you transferred after the capture, click Yes in the warning message. Benchmark Factory closes the New Job Wizard and begins processing the capture data.
- To transfer the files now, first click Yes in the warning message. Benchmark Factory then prompts you to transfer the files. Transfer the files, and then click OK in the prompt.
When the process is finished, close the Capture Status window. Then open the New Job Wizard again and select the project (.mse) file again.
- Import Test. Click
. The test is added to the workload and the test Summary page displays.
- If you exported the database objects and data required to replay the workload, Benchmark Factory prompts you for the location of this file. Enter the path to the file location on the database server (or network).
- On the Summary page, you can click each of the links to go directly to an option to modify it.
-
To jump to the Test Options tab, click Test Options at the bottom of the Summary page. Review the following for more information:
Tab Description Transactions tab Modify the transactions and the transaction mix for the test.
For a custom test, add transactions.
Options tab Enable scaling for the user scenario. See Options Tab (Capture/Replay) for more information. Advanced tab Specify Repository options, error handling, and connect/disconnect options for the test. See Advanced Tab for more information.
-
After specifying options for this test, you can add another test to the job, configure job setup options, save and close the job, run the job, or schedule the job. For more information about each of these steps, see Quickstart: Create a New Job.
Considerations When Performing an Oracle Capture and Replay
| Consideration | Description |
|---|---|
| Trace file capture and replay times (AWR) might not match |
When using trace files as the capture method, you could find that the replay time as reported by the AWR does not match your specified capture time. Benchmark Factory trace method only captures sessions that are initiated after the capture starts. If there is a lag between when the capture starts and when the first session is captured, this lag is reflected by the mismatched times. |
| Oracle Enterprise Manager TPS results | If you choose to collect database wide performance statistics from the AWR, the TPS results from Benchmark Factory and Oracle Enterprise Manager may not match. This is because Benchmark Factory displays TPS for the workload, while OEM displays TPS for all the work the server is doing. |
Notes:
- Database objects created by Benchmark Factory for the capture process are automatically dropped after the capture is finished.
- You can manage your existing capture projects from the Captures tab in the Benchmark Factory console.
Capture and Replay SQL Server Workload
Benchmark Factory allows you to capture SQL Server workloads, then replay those workloads to view real-time transactions and response results.
In Benchmark Factory, use one of the following workflows to capture a SQL Server workload:
- New Job Wizard—Use the New Job Wizard (File | New) to guide you through the steps of setting up and capturing the workload. Then add the captured workload to your new job to run it immediately or at a later time.
- Capture Scenario Wizard—Select Tools | Capture Workload to open the Capture Scenario Wizard.
Note: This feature is not available in the freeware edition of Benchmark Factory.
To capture a SQL Server workload
- Select File | New to open the New Job Wizard.
- On the Database Under Test page, select the database to test.
- Then click
- On the Workload page, select Capture/Replay Test from the drop-down list.
- Then select the Capture and Replay SQL Server Workload option.
- Click
-
On the Replay Workload page, click Perform New Capture. The Capture Scenario Wizard opens and the New Job Wizard closes.
Tip: You can also create a new capture using the same settings as an existing capture project. In the Captures tab of the Benchmark Factory console, right-click a capture and select Repeat Capture.
- Capture Scenario Wizard. In the Capture Scenario Wizard, enter connection information for the database from which you want to capture a workload. See Create SQL Server Connection for more information. Click Next when finished.
-
Directory Settings. On the Directory Settings page, specify a SQL Server server-side directory in which to place the capture files. Also, specify the capture directory from which Benchmark Factory will replay the files. Review the following for additional information:
Click Next when finished.
Capture Name Enter a name for the capture, or use the default. This name is used for the sub-directory where the capture files are stored in the Capture Directory you specify.
Note: Only alpha and numeric characters and the underscore (_) are permitted. The name must begin with a letter.
Database Server Directory Specify a server-side directory where Benchmark Factory should place the capture files. Specify the path as the server sees it.
Note: You can specify a network directory here. Enter the full network path to the network directory. The database service must be able to access the network directory.
Capture Directory Specify a directory where Benchmark Factory will look for the capture files to replay. Do one of the following:
- Manual transfer: Specify a client-side directory and then manually transfer the capture files to this location.
-
Shared directory: Specify the same server-side (or network) directory you specified in the preceding field. However, enter the path as the client computer sees it.
To use this method, you must first map a drive on the client computer to the Database Server Directory (server-side or network directory). Then, browse to and select that mapped drive.
Selecting a shared directory: The shared capture directory can be on the database server as a local directory or on a network file server as a local directory. Either location must be accessible by the Benchmark Factory client computer (Windows network share, Samba, or NFS). A network file server is the preferred location for the following reasons:
- This minimizes total network I/O required for capture and replay.
- The shared directory can be placed on an I/O subsystem with sufficient I/O bandwidth to handle both the concurrent I/O writing and the cumulative size of the trace and export files.
-
Capture Scope. In the Capture Scope page, select one or more databases from which to capture activity. Review the options below. Click Next when finished.
Capture activity for entire database Select to capture all activity for the entire database. Capture only activity for selected databases Select to capture activity only for the selected databases. Then select the databases from which to capture activity.
-
Backup Scope. Benchmark Factory can export/backup the database objects and data required to replay the workload on the same data snapshot. Review the description below. Click Next when finished.
Perform backup as part of the Capture Process Select this option to instruct Benchmark Factory to export/backup the databases selected on the previous page (Capture Scope). The backup is performed during the capture procedure.
Note: If you selected to capture activity for the entire database, exporting the entire database can require significant time and space.
-
Filter Settings. (Optional) The Filtered Settings page allows you to add filters to exclude activity from the capture.
- To add a filter, click Add. Then specify parameters for the filter. Click Next when finished.
-
Capture Thresholds. Benchmark Factory allows you to specify limits for CPU usage and free space during a capture. If levels exceed the values you specify, the capture process is stopped.
Benchmark Factory displays the current values to help you determine the best thresholds to specify. Review the options below. Click Next when finished.
Stop capture if ... Description host CPU percentage of database server exceeds Enter a percentage. If CPU usage exceeds this value, Benchmark Factory stops the capture process. trace file disk free space falls below Enter a value for free space in GB. If the amount of free space falls below this level, Benchmark Factory stops the capture process. Note: The Capture Thresholds feature is not available for SQL Server running in a Linux environment.
-
Schedule Job. You can schedule a capture or start it immediately. Review the options below. Click Next when finished.
Start Capture/Export Immediately—Select to start the capture process immediately.
Later—Select to schedule the capture process. Then specify a date and time based on the server time.
Capture Automatically
Stop After—Use the sliders to specify a duration for the capture process. The default is 30 minutes.
-
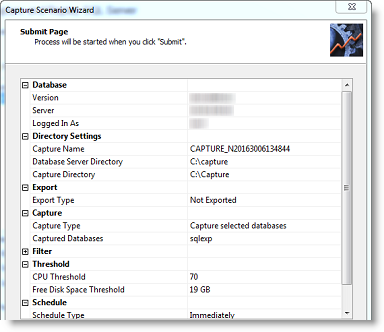
Start the capture. The Submit page provides capture specifications. To start the capture (or enable the schedule), click Submit.
-
Capture Status. The Capture Status window opens providing export and/or capture status and details of the process.
Immediate capture: If you selected to start the capture immediately, the Capture Status window displays information about the capture process, such as the status of the export process and the number of sessions captured.
- Click the Click for capture details link to view more-detailed information during the export or capture. You can view which objects are exporting or which session/user is currently being captured and the total number of sessions captured.
- Click Properties to review the capture description.
- Click the Click for capture details links to review the export and capture processes. Close the Capture Status window when finished. You can open the Capture Status window again from the Captures tab in the Benchmark Factory console. In the Captures tab, right-click a capture and select View Status.
To replay a SQL Server workload
- Select File | New to open the New Job Wizard.
- On the Database Under Test page, select the database to test.
- Then click
- On the Workload page, select Capture/Replay Test from the drop-down list.
- Then select the Capture and Replay SQL Server Workload option.
- Click
-
Select a capture. On the Replay Workload page, select a capture from the Capture to Replay field using one of the following methods:
- Click the browse button and navigate to the directory where the capture files are located. Select the project (.cpj) file for the capture you want to replay.
- Select one of your previously-replayed captures from the drop-down list.
Benchmark Factory loads the capture details into Capture Properties fields.
-
Import Test. Click
- On the Summary page, you can click each of the links to go directly to an option to modify it.
-
To jump to the Test Options tab, click Test Options at the bottom of the Summary page. Review the following for more information:
Tab Description Transactions tab Modify the transactions and the transaction mix for the test.
For a custom test, add transactions.
Options tab Enable scaling for the user scenario. See Options Tab (Capture/Replay) for more information. Advanced tab Specify Repository options, error handling, and connect/disconnect options for the test. See Advanced Tab for more information.
-
After specifying options for this test, you can add another test to the job, configure job setup options, save and close the job, run the job, or schedule the job. For more information about each of these steps, see Quickstart: Create a New Job.
Notes:
- Database objects created by Benchmark Factory for the capture process are automatically dropped after the capture is finished.
- You can manage your existing capture projects from the Captures tab in the Benchmark Factory console.