
Run Capture Scenario Wizard
You can run the Capture Scenario Wizard as a standalone application to capture an Oracle or SQL Server workload. Then replay the workload in Benchmark Factory. This utility provides an easy way for you to capture your database workloads without requiring the installation of Benchmark Factory.
After a workload is captured, the capture files can be distributed to others to replay and test in Benchmark Factory.
This utility is the same Capture Scenario Wizard that opens from the New Job Wizard in Benchmark Factory and it produces the same type of capture and export files.
Prerequisites
Oracle or SQL Server Capture. The following is required to run the Capture Scenario Wizard to capture any workload:
- Microsoft MSXML must be installed to run the Capture Scenario Wizard.
Oracle Capture. The following is required to run the Capture Scenario Wizard to capture an Oracle workload:
- An Oracle Client (version 9 or later) must be installed to create an Oracle connection and capture the workload.
- The 32-bit version of the Capture Wizard requires the 32-bit Oracle Client.
- The 64-bit version of the Capture Wizard requires the 64-bit Oracle Client.
Run the Capture Scenario Wizard
To run the Capture Scenario Wizard standalone application
-
Navigate to the Benchmark Factory application directory where Benchmark Factory is installed and open the bin directory.
For example, C:\Program Files (x86)\Quest Software\Benchmark Factory 7.5.0\bin
- In the bin directory, double-click BFCapture.exe to start the application.
- Select the capture type (Oracle or SQL Server).
- To capture an Oracle workload, see Capture and Replay Oracle Workload and skip ahead to the Capture Scenario Wizard step.
- To capture a SQL Server workload, see Capture and Replay SQL Server Workload and skip ahead to the Capture Scenario Wizard step.
To start the Capture Scenario Wizard from the command line, see Run the Capture Wizard from the Command Line.
Run Capture Wizard from Cmd Line
You can use the command line to start and run the Capture Scenario Wizard.
When running the Capture Scenario Wizard from the command line, you can specify the following parameters:
| Parameter | Description |
|---|---|
| -? | Displays Help |
| -O | -S |
Specifies the database type for the capture. -O performs an Oracle capture.
-S performs a Microsoft SQL Server capture.
These parameters are ignored when used with another parameter. If you do not specify a capture database type (Oracle or SQL Server), the Capture Scenario Wizard prompts you to select one. |
| -V |
View the status of the capture for the capture project file specified (*.mse or *.cpj).
|
| -D |
Deletes a capture. Specify the capture project file to delete (*.mse or *.cpj). Deletes the project file and the capture files. You cannot delete a running capture.
|
| -C |
Starts a new capture using the values in the specified capture project file (*.mse or *.cpj). Does not overwrite the specified capture.
|
Note: The parameters -V, -D, and -C cannot be used at the same time and must have a capture project file location specified.
Replay Load from an Oracle Trace File
Benchmark Factory allows you to import the SQL contained within an Oracle trace file. The resulting workload contains a user scenario consisting of the timed event sequence of captured SQL transactions.
Importing an Oracle Trace file allows you to replay your database activity with the same timing as was originally captured on an existing in-house Oracle database application.
Note: To create an Oracle trace file which includes bind parameters, a level number of 4 must be used. For example, to start an Oracle trace for a user session, use the following command:
ALTER SESSION SET EVENTS '10046 trace name context forever, level 4'
To import an Oracle trace file
- In the New Job or Edit Job Wizard, click Workload in the left pane.
- On the workload page, select Capture / Replay Test from the drop-down list.
- Select Capture load from an Oracle trace file.
- Click the Select Test button. The Oracle Trace Input dialog opens.
- Click Add Trace and browse to and select the trace file (or files).
- To add additional files, click Add Trace.
- To remove a file from the list, select the file and click Remove Trace.
-
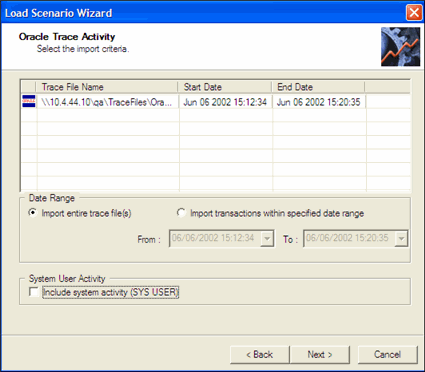
When you finish inputting files, click Next. The Oracle Trace Activity dialog opens.
- Select import criteria.
- Import entire trace file—Imports all activity in the trace file or files.
- Import transactions within specified date range—Select this option and enter a date range to import only the activity within the date range.
-
Include system activity—Select to include system activity (SYS USER).
Note: It is not recommended to include system activity (SYS USER). This imports Oracle SQL statements routinely run by Oracle for maintenance reasons and is not required for the load testing process.
- Click Finish.
-
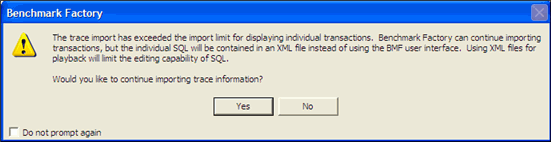
If the trace import file exceeds the Benchmark Factory limit for displaying individual transaction, the following dialog displays:
If you click Yes, the trace file import continues. Individual SQL is converted to .xml files. You can then edited the .xml files in the Benchmark Factory Session Editor.
- The test is added to the workload and the test Summary page displays.
- On the Summary page, you can click each of the links to go directly to an option to modify it.
-
To jump to the Test Options tab, click Test Options at the bottom of the Summary page. Review the following for more information:
Tab Description Transactions tab Modify the transactions and the transaction mix for the test.
For a custom test, add transactions.
Options tab Enable scaling for the user scenario. See Options Tab (Capture/Replay) for more information. Advanced tab Specify Repository options, error handling, and connect/disconnect options for the test. See Advanced Tab for more information.
-
After specifying options for this test, you can add another test to the job, configure job setup options, save and close the job, run the job, or schedule the job. For more information about each of these steps, see Quickstart: Create a New Job.
Replay Load from SQL Server Trace Table
Benchmark Factory allows you to import SQL from a SQL Server trace table. This allows you to replay your database activity with the same timing as was originally captured on an existing in-house SQL Server database application.
The resulting workload contains a user scenario consisting of the sequence of captured SQL transactions.
Before importing SQL from a SQL Server trace table, use SQL Profiler to save the SQL trace as a trace table. See the following topics for more information:
- Create a SQL 2000 Trace Table Using the SQL Server Profiler
- Create a SQL 2005 Trace Table Using the SQL Server Profiler
- Creating a SQL 2008/2008 R2 Trace Table Using the SQL Server Profiler
To import a workload from a SQL Server trace table
- In the New Job or Edit Job Wizard, click Workload in the left pane.
- On the workload page, select Capture / Replay Test from the drop-down list.
- Select Replay load from SQL Server trace table.
- Click the Import Test button.
- In the SQL Server Authentication dialog, enter the connection information for the database containing the trace table to import.
- Click Next. The SQL Server Trace Table dialog opens.
- Select a database from the Select a Database drop-down list.
- Select a table from the Select a Table drop-down list.
- Click Next. The SQL Server Trace Processing dialog displays.
- Click Finish. The test is added to the workload and the test Summary page displays.
- On the Summary page, click each link to go directly to that option to modify it.
-
To jump to the Test Options tab, click Test Options at the bottom of the Summary page. Review the following for more information:
Tab Description Transactions tab Modify the transactions and the transaction mix for the test.
For a custom test, add transactions.
Options tab Enable scaling for the user scenario. See Options Tab (Capture/Replay) for more information. Advanced tab Specify Repository options, error handling, and connect/disconnect options for the test. See Advanced Tab for more information.
- After specifying options for this test, you can add another test to the job, configure job setup options, save and close the job, run the job, or schedule the job. For more information about each of these steps, see Quickstart: Create a New Job.