
Migrating to SharePoint publishing pages


For designing a migration job, you need to extract the page to a local file so you can get an example of the ASPX layout. Select View All Site Content from the Site Actions menu and then go to the “Pages” document library.
In the Pages library, locate the test page you just created and pick Send To –> Download a Copy from the drop down menu for that page. y
If you open the target data definition in the migration job, you will notice that there is a target field of type ‘PageName’ and that the PageType property of this field is set to “Template”. This PageType allows you to specify your own custom ASPX code in the PageTemplate field.
The ASPX code is what needs to be put into the PageTemplate field. Not all of it though, just the bits that describe the page structure. The content parts can be left out and, as you will see shortly, we will specify the content in a different way (mapping the data dynamically from Notes). Your ASPX page may look different, but generally you want the ASPX tags at the top (which start with “<%@”) and the <html> tag.
Notice that the target data definition also specifies several fields that allow data to be mapped as content in the generated pages. Some of these you may recognize as the properties that were specified in the XML data island (the green part). We included PublishingPageContent for mapping the Notes rich text and PublishingPageLayout for specifying the page layout. Other page types may require additional properties but you will find that many of them can be omitted as the defaults are acceptable for migrations. Title and ApprovalCode allow setting of metadata on the page. ExternalImages and ExternalAttachments allow mapping of additional files to the appropriate SharePoint libraries.
Press OK to save the target data definition. Next, go to the Mapping tab to review how various fields are set from the dynamic Notes data. Most of these mappings will make sense to an experienced Migrator for Notes to SharePoint user, but two deserve special attention.
The PublishingPageLayout is set to a constant value, which is the URL of the appropriate layout page. It is critical that you replace this value with the address of a layout page on your SharePoint server. Recall that in the newly created test page in the example, the page layout “Article page with body only” was selected. In the resulting ASPX file, this translated to the PublishingPageLayout property in the XML data island (the green bit) set to “http://quest-e52a78ada/sites/publishing/_catalogs/masterpage/PageFromDocLayout.aspx”. This is the URL that you need to use here. If you do not get this part right, your pages will not open.
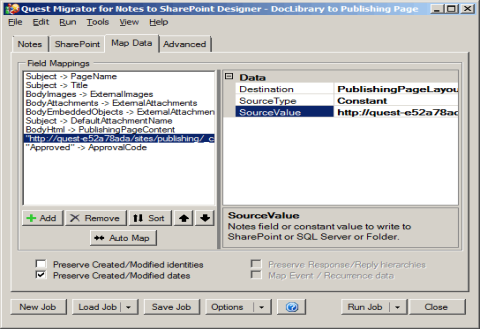
The jobs are also designed to set any migrated content to the “Approved” state. This is accomplished by mapping a constant value to the ApprovalCode field. Of course you can change this to a different constant value or even make it dynamic depending on the state of your Notes document.
Depending on the page layout you selected, you may need to map other properties as well. When you are ready, press the Run Job button to start the migration.
Migration jobs
Running migration jobs
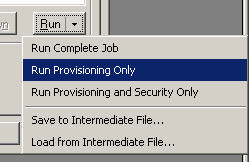
When you are ready to run your migration job, select Run. You can do this by selecting the Run toolbar menu or by clicking the Run button at the bottom of the Designer or the Migration Jobs tab of the Console’s Database Properties dialog box. This button is a split function button. If you click the left side of the button, the entire migration job will run. The right side of the button is a drop down menu that allows you to run portions of the job like provisioning.
|
3 |
Click the Save Job button to save the Job Definition. |
|
4 |
Click the Run button’s drop down menu and select Save to Intermediate File to save the results to an intermediate XML file. |
|
2 |
Click the Load Job button to save the Job Definition you saved in step #3. |
|
4 |
Click the Run button’s drop down menu and select and Load from Intermediate File to load from the intermediate XML file you saved in step #4. |
If you choose to use an intermediate data transfer file, you should also save the matching Job Definition. See Managing migration jobs for more details.
From the Console, you can select multiple databases, right-click, and select Migrate to SharePoint.
To view detail information regarding the jobs before you run them, click the Details link.
If you choose Save to Intermediate File, a dialog comes up that gives you an option to have the attachments saved to a separate folder rather than the default of the intermediate data file.
There are a couple of benefits to saving the attachments in a separate folder:
You should see your progress displayed in a task process dialog box. If you are using the Console and chose to run the job in the background, you can find the task process dialog box in the Task history node of the tree.
To cancel the migration, click Cancel Task or close the dialog box.
When your job is complete, you will have the opportunity to view your log file or go directly to the SharePoint list or library by clicking Go to List. To migrate the failed items for a job that completed with error, click Migrate Failed Items. For more information, see Migrating failed items.
Migrating failed items
|
1 |
In the data source (Notes/QuickPlace/Quickr/Domino.Doc) tab of Migrator for Notes to SharePoint Designer, select Load Failed Items from Log in the drop down menu list of the Load Job button. |
|
2 |
|
3 |
Click OK to confirm the number of the loaded failed items. To see the UNIDs of those items, click Edit in the Source Data Definition section, select the Record Selection tab, and click Details for the Select records based on UNID check box. |
|
4 |
Click Run Job. |