
Migration jobs
Running migration jobs
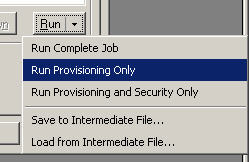
When you are ready to run your migration job, select Run. You can do this by selecting the Run toolbar menu or by clicking the Run button at the bottom of the Designer or the Migration Jobs tab of the Console’s Database Properties dialog box. This button is a split function button. If you click the left side of the button, the entire migration job will run. The right side of the button is a drop down menu that allows you to run portions of the job like provisioning.
|
3 |
Click the Save Job button to save the Job Definition. |
|
4 |
Click the Run button’s drop down menu and select Save to Intermediate File to save the results to an intermediate XML file. |
|
2 |
Click the Load Job button to save the Job Definition you saved in step #3. |
|
4 |
Click the Run button’s drop down menu and select and Load from Intermediate File to load from the intermediate XML file you saved in step #4. |
If you choose to use an intermediate data transfer file, you should also save the matching Job Definition. See Managing migration jobs for more details.
From the Console, you can select multiple databases, right-click, and select Migrate to SharePoint.
To view detail information regarding the jobs before you run them, click the Details link.
If you choose Save to Intermediate File, a dialog comes up that gives you an option to have the attachments saved to a separate folder rather than the default of the intermediate data file.
There are a couple of benefits to saving the attachments in a separate folder:
You should see your progress displayed in a task process dialog box. If you are using the Console and chose to run the job in the background, you can find the task process dialog box in the Task history node of the tree.
To cancel the migration, click Cancel Task or close the dialog box.
When your job is complete, you will have the opportunity to view your log file or go directly to the SharePoint list or library by clicking Go to List. To migrate the failed items for a job that completed with error, click Migrate Failed Items. For more information, see Migrating failed items.
Migrating failed items
|
1 |
In the data source (Notes/QuickPlace/Quickr/Domino.Doc) tab of Migrator for Notes to SharePoint Designer, select Load Failed Items from Log in the drop down menu list of the Load Job button. |
|
2 |
|
3 |
Click OK to confirm the number of the loaded failed items. To see the UNIDs of those items, click Edit in the Source Data Definition section, select the Record Selection tab, and click Details for the Select records based on UNID check box. |
|
4 |
Click Run Job. |
Migration job logging
Your migration job log contains more or less detail, depending on the logging options you have set. If you are running Migrator for Notes to SharePoint Designer, you can also change the file folder that log files are saved to. See Customizing global options for more details. If you are running your migrations through the Console, your log is written to the repository and can be viewed and exported from the Task history node or the Migration History tab of the Database Properties sheet.
The General tab of the Event Log dialog box displays basic migration job information. To display more information, click the arrows on the upper right side of the tab. Click the arrows again to close this detail.
To export the log to an XML file, click Export Log.
To open the target SharePoint list, click Go to List.
The Log Summary tab of the Event Log dialog box displays the processed records of the migration job. While the migration job is running, this information is automatically updated every 3 seconds.
To view the details of a processed record, select it in the table and click View Details.This opens the Log Entry Details dialog box.
To navigate to a previous entry, click <Prev and to navigate to the next entry, click Next>.
For a processed record of error type, you can click Search for solution to search the Context and Message texts of the record from the product Knowledge Base, and display the results in a new window, where you can preview the titles of those relevant articles. To show a snippet of a knowledge article immediately, hover your mouse over the title, or click the title to read the complete knowledge article in your browser.
To copy the entire entry to the clipboard, select Copy to Clipboard. You can then paste the contents into an editor of your choice.
To open the document for the given log entry in the source Notes database, select Open in Notes.
Select Close to close the Log Entry Details dialog box.
To view the log details for a migrated document, select the document in the Log Summary tab and click the Show in Log button on the right side of the tab. This will take you to the line item in the Log Details tab that represents the migration of the selected document.
The Log Details tab contains the detail line items of the log file. While the migration job is running, this information is updated by clicking the Refresh link in the upper left side of the tab. This link is only visible while the job is processing.
The data can be sorted by clicking on the column heading you want to sort by.
You can open the Log Entry Details dialog box by double clicking a row in the table.
See Importing tasks for details.
To open log files from prior jobs, you can select Open Log File from the File Menu. And if any items failed to migrate according to the log, click Migrate Failed Items to migrate them again. For more information, see Migrating failed items.
Latest Log File will open the log from the last time a job was run and Recent Log Files allows you to choose from a list of logs of the most recent run jobs.