Data connectivity functionality allows Toad Data Point users to publish data objects (views, snapshots, and datasets) to Intelligence Central. Data objects are published to Intelligence Central as a way to store and share data from remote data sources.
|
|
Note: A Toad Intelligence Central Data Connectivity license is required to enable data connectivity functionality in Intelligence Central. |
Users of Toad Intelligence Central can log in to the Web Console (Web Server) to view and download Data Connectivity objects that have been shared with them.
 to download the object. The location of the object on download will be as per your Web browser settings.
 For more information about working with objects published from Toad Data Point, see Work with Toad Data Point Objects.
| Object type | Download, view | ||||||||||||||||
|---|---|---|---|---|---|---|---|---|---|---|---|---|---|---|---|---|---|
|
Table
|
Tables are tables of data mapped from data source mappable objects.
| ||||||||||||||||
|
View
|
Views are saved SQL statements.
| ||||||||||||||||
|
Snapshot
|
Snapshots are the result set from an executed SQL statement (View) or table. Snapshots capture data at a specific point in time and can be scheduled to execute once or repeatedly. Snapshot data is stored in Intelligence Central so it is fast to load and does not require data source authentication to view. Snapshots are published with a shared key.
| ||||||||||||||||
|
Mappable Objects
|
Mappable objects are objects from the data source that can be potentially mapped to tables. Mappable objects are not available for download and not visible from a web browser. | ||||||||||||||||
|
Datasets
|
Datasets are tables of data published to Toad Intelligence Central. From a web browser, click Home. Locate the dataset.
|
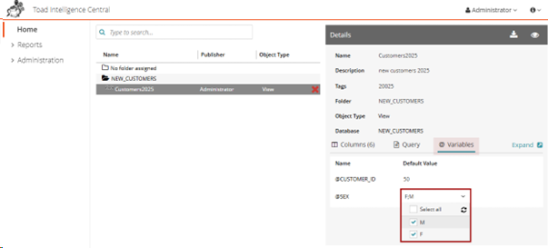
This feature allows you to define a list of specific values for bind variables, providing you with predefined options to choose from when generating reports. It ensures data integrity by making sure that valid and relevant variable values are selected, reducing errors in reports.
Predefined variable values:
You can define a list of possible values for bind variables when publishing objects (e.g., workbooks, views, automation scripts) from Toad Data Point or Toad Workbook. For details, see the User Guide of the Toad Data Point 6.4.1
The predefined list of values is included as part of the published object in Toad Intelligence Central and after publishing users can use these values or refresh the list to access the latest updates.
Using Predefined Variables
Variables are displayed in the Details section under the Variables tab, so users can set default values by typing them in, selecting them from the predefined list or loading values from .txt or .csv files
When running a published object, simply choose values from the list of predefined options or load variable values from a file
Multiple Value Selection and Restrictions
Allow Multiple Value Selection - you can select multiple values from the predefined list. Use a semicolon (;) as a separator when entering multiple values manually
Restrict Values to the Predefined List - this option ensures user can only select values from the predefined list. Manual typing is disabled for better control
Importing Values from Files
Load values directly from a .txt or .csv file - each value in the .txt or .csv file needs to be placed in a new line and no other delimiter should be specified

User Permissions:
If You’re a Manager of Published Objects, you can:
Edit default variable values
Allow Multi-Select to enable multiple value selection
Set Restrict to Predefined List to limit variable values
If You’re Not a Manager, you can:
View variable defaults and settings but cannot edit them
While running published objects, you can select values based on permissions set by the manager
NOTE:
In Toad Intelligence Central 6.4.1, objects published from earlier versions of Toad Data Point retain their existing settings after upgrade.
Objects published to Intelligence Central are organized into folders. The object's publisher selects an existing folder or creates a new folder during the publishing process in Toad Data Point. Intelligence Central users can also create folders through the Web Console.
Intelligence Central can contain several different types of folders. These folders can differ by purpose, origin, contents, and characteristics. Review the following descriptions for different folder types in Intelligence Central.
The following folders are created by Intelligence Central and have specific functionality.
No folder assigned
The No folder assigned folder is a special folder.
Common_Transformation_Repository
Toad Data Point users can publish Transform and Cleanse Rules to Intelligence Central to share with other users. These Transform and Cleanse Rules are stored in the Common_Transformation_Repository folder. See the Toad Data Point Help for more information about this feature.
Aside from the special folders listed above, Toad Intelligence Central provides two types of folders for storing objects: secured folders and non-secured folders. Secured folders have visibility (sharing) and manage privileges assigned to them. Non-secured folders do not. See About Secured Folders for additional information.
An Intelligence Central server can provide one or both types of folders. A user with the Administrator role can configure which types of folders can be created and which user role/roles are allowed to create secured folders.
| Icon | Description |
|---|---|
 |
Non-secured folder—Visible to all users. |
 |
Secured folder—Secured folders are visible only to users with visibility (sharing) privileges and can be managed only by users with manage privileges. |
You can create a new folder using the Web Console (Web Server). A folder can also be created through Toad Data Point when an object is published. Only alpha, numeric, and the underscore (_) characters are allowed in folder names. A name cannot begin with the underscore character.
Restrictions
For more information, see About Secured Folders.
To create a new folder
 in the Folder Details pane.
Click the button corresponding to the type of folder you want to create.
|
|
Note: If a button is disable, creation of that folder type is not allowed, either at the server level or in the selected parent folder. See the Restrictions listed above. |
|
|
Note: A folder can be created by an object's publisher during the publishing process in Toad Data Point. See the Toad Data Point Help for more information. |
On the Home page, you can drag-and-drop a folder to move it. To move a folder, a user must have the Administrator role or manage privileges to all objects in the folder. A folder cannot be moved if an object in the folder is locked by another user.
Restrictions:
See About Secured Folders for more information about secured folders.
You can delete a folder if you have the Administrator role or have manage privileges to all objects in the folder (unless an object is locked by another user).
To delete a folder
 in the Folder Details pane.
 You cannot delete the No folder assigned folder.
You can view information about a folder in Intelligence Central through the Folder Details pane. This is useful, especially for secured folders, which have sharing (visibility) and manage privileges assigned to them.
You can view the secured folders that have been shared with you. You can also view the parent folder of a secured folder that has been shared with you.
To view folder details
In the Home page of the Web Console, select a folder to display the Folder Details pane. Review the following for additional information.
| Detail | Description |
|---|---|
|
Name |
Folder name. For a secured folder, managers of the folder can rename the folder. |
|
Creator |
Folder creator. This is the name of the user who initially created the folder. |
|
Visibility |
(Secured folders) Displays the visibility (sharing) privileges for the selected folder. Managers can modify the visibility privileges. Click Visibility to open the Alter Folder Visibility dialog where you can modify visibility and manage privileges for the folder. See Specify Visibility, Manage and Publish Privileges for Folders for more information. |
|
Managers |
(Secured folders) Displays the list of users and groups with manage privileges for the selected folder. Managers can modify the visibility and manage privileges for the object. Click Managers to open the Alter Folder Visibility dialog where you can modify the manage privileges for the folder. See Specify Visibility, Manage and Publish Privileges for Folders for more information. |
|
Publishers |
(Secured folders) Displays the list of users and groups allowed to publish objects to the selected folder. Users with manage privileges can modify publish privileges for the folder through the Alter Folder Visibility dialog. See Specify Visibility, Manage and Publish Privileges for Folders for more information. |
For additional information about manage privileges for secured folders, see Manager Privileges.