
Step 11: Provision AD with mail-enabled users
Users must be provisioned as security principals in the target Active Directory before any user data can be migrated. Your choices for provisioning methods, and the implications of those choices, are explained in the Migrator for Notes to Exchange Pre-Migration Planning Guide (see Provisioning the Target Active Directory in chapter 2).
Migrator for Notes to Exchange tools can provision AD from the Notes source, as described below. For our purposes, this provisioning step also includes object merging (if necessary) and mail-enabling of the provisioned objects. By the end of this step, AD should contain a single mail-enabled object corresponding to each user you intend to migrate in the Domino source directory.
|
NOTE: This process does not create users’ Exchange mailboxes until just prior to their migration (per user collection, in the Batch migration process), due to the Exchange free/busy limitation (explained in chapter 1, see the Important note under Migration to proprietary Exchange). If you will not configure free/ busy coexistence, you could create Exchange mailboxes earlier in the process, in these Pre-Migration Preparations, as long as you also set Exchange-to-Notes mail forwarding for not-yet-migrated Notes users. |
|
1 |
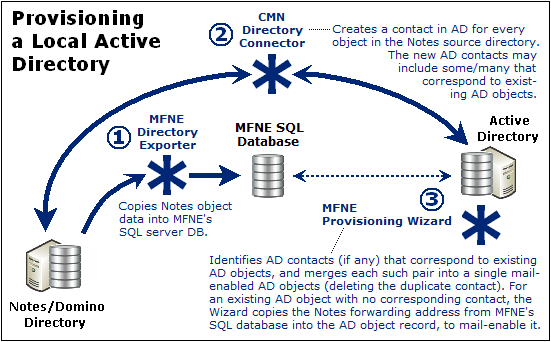
Synchronize the Notes/Domino directory with AD. Use the CMN Directory Connector (or some other method) to perform a bidirectional update between the two directories. Other tools and methods are also possible, but CMN was designed to complement the Migrator for Notes to Exchange tools. This synchronization reads user data from the Notes source to create corresponding mail-enabled contacts in AD, and vice-versa, to update both directories with routing objects corresponding to the users in the other system (to establish complete directories). |
|
NOTE: Migrator for Notes to Exchange also includes a feature that can provision users in AD and Exchange (with mailboxes) directly from contact objects. This can be valuable in environments where security principals do not already exist in AD, and CMN is used to create routing contacts in AD. This approach also is useful for provisioning resource objects in some scenarios. This behavior is controlled by the MBoxFromContact parameter setting, described in greater detail in the Migrator for Notes to Exchange Program Parameters Reference. |
|
2 |
Run Migrator for Notes to Exchange’s Provisioning Wizard (for all user collections) to consolidate any duplicate entities in AD and mail-enable objects that were already in AD. The Provisioning Wizard merges each contact’s information into the original corresponding AD object record, and then deletes the contact, leaving a single mail-enabled object in AD for each Notes user. Future directory updates will then see the merged AD object’s address attribute, so will not re-copy the corresponding Notes object. |
|
3 |
Verify Notes forwarding addresses. Your mail-routing method will let migrated users communicate with not-yet-migrated Notes users, relying on existing mail-enabled AD objects to do so. The routing addresses must therefore be verified and tested to ensure proper delivery. |
Step 12: Assess per-user migration volume
Run the Notes Data Locator Wizard now to find the source data and review per-user data volumes for all user collections, and to verify ownership of archives and PABs prior to migration. Then View Summaries | User and Resource Detail to review the per-user data volumes, and refine your collection members (if necessary) to accommodate any unexpected or atypical data volumes. The Notes Data Locator Wizard is documented in a chapter of the Migrator for Notes to Exchange Administration Guide. The View Summaries features are part of Notes Migration Manager, documented in chapter 1 of the Administration Guide.
Step 13 (or when appropriate):Redirect inbound external mail to Exchange
Modify the MX record to direct incoming external (Internet) mail to the Exchange server. Actually the DNS modification can occur at any time after the users’ AD accounts have been mail-enabled—before, during or after the actual migration. Some admins prefer to minimize change before and during the migration process, so they opt to update the MX record after the migration is complete (as described in the Post-migration activities at the end of this chapter).
Step 14 (if necessary):Replicate or copy local data to a central location
|
|
Conditional Step: Applies only if you want to use Migrator for Notes to Exchange’s Data Migration Wizard to batch-migrate data that resides on end users’ workstations. |
Migrator for Notes to Exchange includes several options for migrating data that resides on end users’ workstations. One approach uses Migrator for Notes to Exchange’s Self-Service Desktop Migrator (SSDM), which offers an optional Silent Mode to minimize user interaction and impact. This approach is discussed in more detail in chapter 4 (SSDM (per-desktop) migration) of this Guide.
Some scenarios, however, require centralized batch migration of local Notes PABs and archives. Migrator for Notes to Exchange’s Data Migration Wizard (in the Batch migration process, as described in the next section of this chapter) can migrate content to Exchange mailboxes, personal archives, or PST files. In that case, the program must have access to the source data. Migrator for Notes to Exchange includes a PAB Replicator feature to automate the process of replicating end users’ PAB data to server-based NSFs or the mail file of each user. Alternatively, users’ local data could be copied to a central location by some other means.