
Step 12: Provision Office 365 from the local AD
|
|
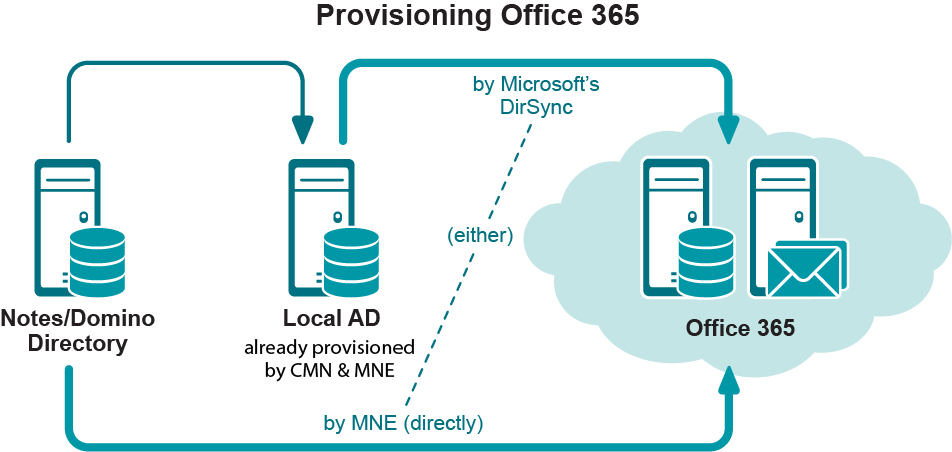
Conditional Step: Applies only if you are using Microsoft’s AD Sync tool to provision Office 365 from a local Active Directory. If you are provisioning by Migrator for Notes to Exchange or some other method, you will not provision Office 365 until the Batch migration process later in this chapter. For now, skip ahead to step 13. |
|
1 |
Run Migrator for Notes to Exchange’s Data Migration Wizard to Prepare local Active Directory accounts for MS AD Sync. This is a necessary administrative step that must precede your running the AD Sync tool. |
|
2 |
Run Microsoft’s AD Sync tool to provision all users in all collections into Office 365 as mail-enabled objects, without mailboxes. (Mailboxes will be created just prior to each user collection’s migration, in the Batch migration process described later in this chapter.) |
Step 13: Assess per-user migration volume
Run the Notes Data Locator Wizard now to find the source data and review per-user data volumes for all user collections, and to verify ownership of archives and PABs prior to migration. Then View Summaries | User and Resource Detail to review the per-user data volumes, and modify your collections (if necessary) to accommodate any unexpected or atypical data volumes. See the Notes Data Locator Wizard chapter in the Migrator for Notes to Exchange Administration Guide. The View Summaries features are part of Notes Migration Manager, described in chapter 1 of the Administration Guide.
Step 14 (if necessary):Copy end users' local data to a central location
|
|
Conditional Step: Applies only if you want to use Migrator for Notes to Exchange’s Data Migration Wizard to batch-migrate data that resides on end users’ workstations. |
Migrator for Notes to Exchange includes several options for migrating data that resides on end users’ workstations. One approach uses Migrator for Notes to Exchange’s Self-Service Desktop Migrator (SSDM), which offers an optional Silent Mode to minimize user interaction and impact. This approach is discussed in mroe detail in chapter 4 (SSDM (per-desktop) migration) of this Guide.
Some scenarios, however, require central migration of local Notes PABs and archives. Migrator for Notes to Exchange’s Data Migration Wizard (in the Batch migration process, as described later in this chapter) can then migrate content to Exchange mailboxes, personal archives, or PST files. In that case, the program must have access to the source data. Migrator for Notes to Exchange includes a PAB Replicator feature to automate the process of replicating end users’ PAB data to server-based NSFs or into the mail file of each user. Alternatively, users’ local data could be copied to a central location by some other means.
See chapter 9 of the Migrator for Notes to Exchange Administration Guide for full information about how to use Migrator for Notes to Exchange’s PAB Replicator.
Step 15 (if using smart hosts for mail routing): Configure smart hosts
|
|
Conditional Step: Applies only if you will use smart hosts for SMTP mail routing. |
The details of configuring smart-host SMTP mail routing are beyond the scope of this Guide, but see your Domino and Exchange documentation and online resources for more information about configuring smart hosts for those servers. In particular, see the Microsoft article Outbound Smart Host Scenario.
To configure smart-host SMTP routing with Quest's CMN, both smart hosts are configured to point to the CMN server. Within CMN, one set of SMTP IN and SMTP OUT queues is configured to accept mail from Domino and deliver it to the receiving Office 365 server, while another set is configured to accept mail from Exchange and deliver it to Domino. Multiple CMN servers can be deployed for load balancing and redundancy. The CMN User Guide (chapter 3) explains these configurations in much greater detail.
Remember to verify your smart host configurations by testing mail flow.