|
• |
Tasks—from the Tasks view you can: |
|
• |
Create New Report—provides a wizard that allows you to configure a report and select a host group (a group of computers) for a particular business unit. The reports are generated in PDF, Excel, and XML. (For more information, see Creating New Reports.) |
|
• |
Add Measure Resource Utilization Templates—allows you to create new measured resource utilization templates. |
|
• |
Set Currency—allows the changing of the default currency for Chargeback. |
|
• |
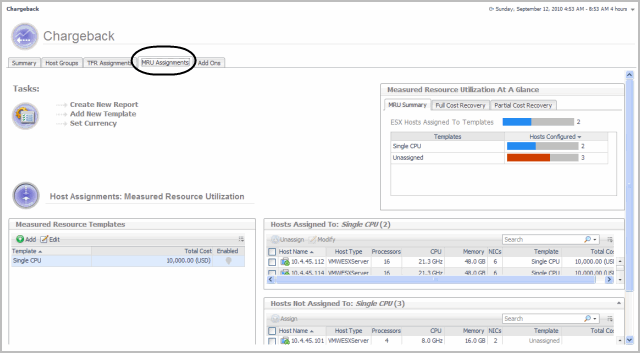
Measured Resource Utilization At A Glance—this view provides a quick visual summary of the hosts that have been assigned to the measured resource utilization model, as well as a visual breakdown of the host assignments within that model. This view contains a summary tab and tabs for both partial cost recovery and full cost recovery. All templates and their assigned hosts are listed under the tabs. |

|
• |
Host Assignments: Measured Resource Utilization—the three tables in this area allow for bulk assignment and unassignment of hosts to a given MRU template. The two tables to the right of this table display the hosts that have been assigned or are not yet assigned to the selected template. |
|
• |
Measured Resource Templates—this table shows all the measured resource utilization templates currently stored in the system. Selecting a template from this table enables the display of the assigned hosts for this template. From this view you can: |
|
• |
Hosts Assigned To—this table shows all hosts that are assigned to the template that has been selected in the templates listing table. Hosts can be searched for, selected, and removed from the assigned table. To remove a host from this table, select it from the list and click Unassign on the toolbar. This moves the selected host into the unassigned table, and disassociates it from the selected measured resource utilization template. Each column in the table can be sorted based on individual preferences. |
|
• |
Hosts Not Assigned To—this table shows all the hosts that are not assigned to the selected MRU template. To add a host to a selected template, choose the host you wish to add and click Assign on the toolbar. This moves the host into the Assigned To table view, and associates the host with the template that was selected. Each column in the table can be sorted based on individual preferences. |
|
1 |
Click Add New Template. |
|
• |
Host Template Name—name assigned to the template. This name is not editable once assigned. |
|
• |
Description—description of the template. For example, single CPU, 64 GB memory, 40 GB disk. |
|
• |
Total Host Cost—the total host cost for the life cycle set. |
|
• |
Lifecycle (Months)—the number of months the server will be used. |
|
• |
Enabled—enables the template to gather data. |
|
• |
CPU Weight—percentage of CPU weight used in the chargeback calculation. |
|
• |
Memory Weight—percentage of memory weight used in the chargeback calculation. |
|
• |
Network Weight—percentage of network weight used in the chargeback calculation. |
|
• |
Disk IO Weight—percentage of disk IO weight used in the chargeback calculation. |
|
3 |
Click Save. |
|
3 |
Click Assign. |
|
2 |
Click Edit. |

|
3 |
Click Description box and make the required edits. |
|
4 |
|
5 |
In the Lifecycle (Time Period) box, and make the required edits. |
|
6 |
If not enabled, click the Enabled checkbox to enable the selected template. Click again to disable the check box. You disable a template if you do not plan to use it any more because it is no longer valid. |

|
8 |
Click Save. |

|
• |
Tasks—from the Tasks view you can: |
|
• |
Create New Report—provides a wizard that allows you to configure a report and select a host group (a group of computers) for a particular business unit. The reports are generated in PDF, Excel, and XML. For more information, see Creating New Reports. |
|
• |
Add Add Ons—allows you to create new add on assignments. |
|
• |
Set Currency—allows the changing of the default currency for Chargeback. |
|
• |
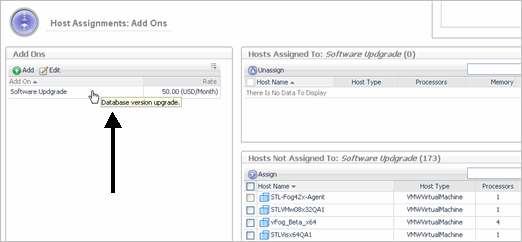
Add Ons At A Glance—this view provides a quick visual summary of the hosts that have been assigned to Add Ons as well as a visual breakdown of the host assignments within that model. |
|
• |
Host Assignments: Ad Ons—the three tables in this area allow for bulk assignment and unassignment of hosts to a given Add On. The Add On Definition table lists all available Add Ons and their details. The two tables to the right of this table display the hosts that have been assigned or are not yet assigned to the selected Add On. |
|
• |
Add Ons Definitions—this table lists all the Add Ons currently stored in the system. Selecting an Add On from this table enables the display of the assigned hosts for this Add On in the Hosts Assigned To table. From this view you can: |
|
• |
Hosts Assigned To—this table lists all hosts that are assigned to the Add On selected in the Add On Definitions list. Hosts can be searched for, selected, and removed from the assigned table. To remove a host from this table, select it from the list and click the Unassign button on the toolbar. This moves the selected host into the Unassigned table, and disassociates it from the selected Add On. Each column in the table can be sorted based on individual preferences. |
|
• |
Hosts Not Assigned To—this table lists all the hosts that are not assigned to the selected add on. To add a host to a selected add on, choose the host you want to add and click the Assign button on the toolbar. This moves the host into the Assigned To Table, and associates the host with the Add On that was selected. Each column in the table can be sorted based on individual preferences. |
|
1 |
Click Add New Add On. |
|
3 |
Click Save. |
|
1 |
|
3 |
Click Assign. |
|
2 |
Click Edit. |
|
IMPORTANT: The Add On Name cannot be edited. |
|
4 |
Click Save. |
