Ports Used by Recovery Manager for Active Directory Forest Edition (Disaster Recovery Edition)
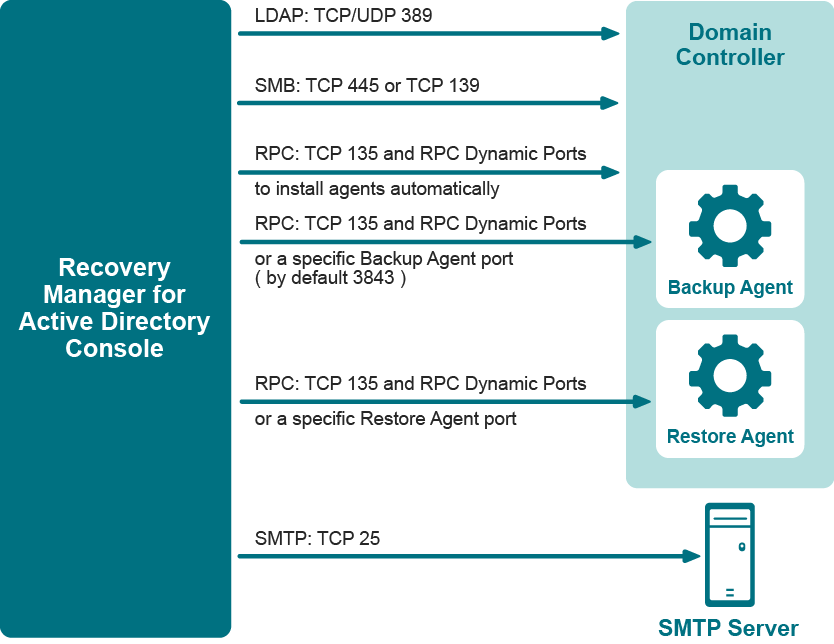
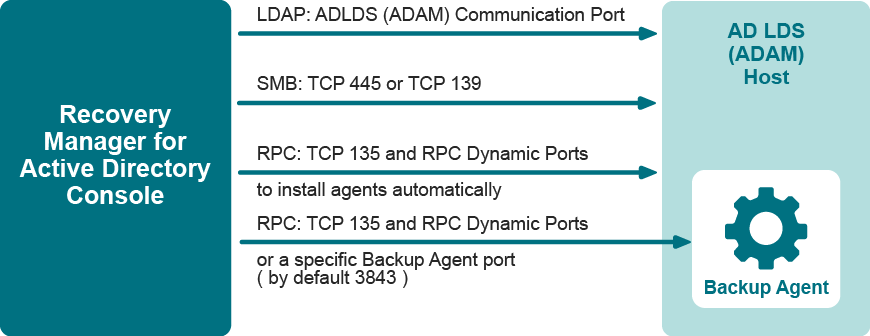
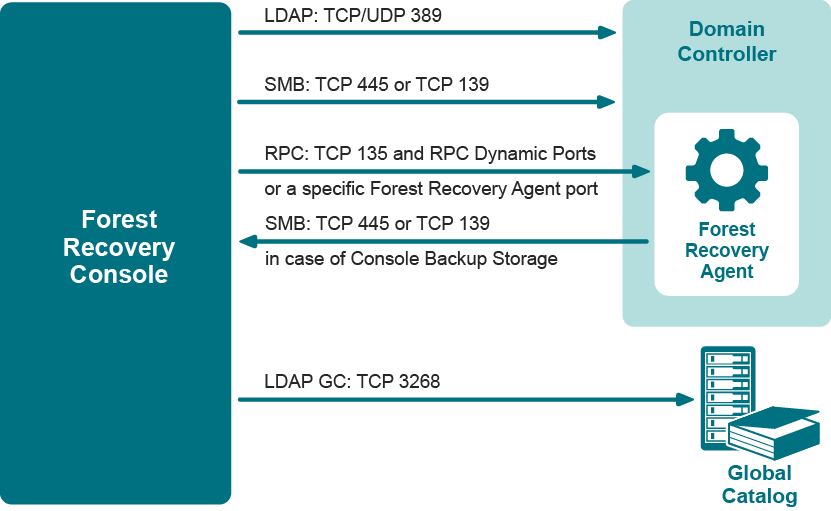
This section provides information about the communication ports required to work with Recovery Manager for Active Directory.
Backup Wizard
The Backup Wizard helps you create backups of domain controllers' Active Directory® components, including Active Directory® and Group Policy data. With this wizard you can select domain controllers whose Active Directory® is to be backed up, specify where to store backups, run backup immediately or schedule it for later, view and modify backup options.
The wizard has the following steps:
What to Back Up
Use this page to select computers whose Active Directory® components you want the wizard to back up. You can back up selected computers or computers that reside in a specific container.
-
Selected objects. The Selected objects list includes the names and descriptions of computers and containers the wizard will process. You can modify the list using the Add and Remove buttons.
-
Add. When you click Add, the wizard presents you with these commands:
-
Domain Controller. Selects and adds domain controllers by name.
-
Container. Selects and adds a container. The wizard will back up all computers that are in that container.
-
AD LDS (ADAM) Host. Selects and adds AD LDS (ADAM) hosts by name.
-
Import Computers. Use a text file, one computer name per line, to add computers to the list.
-
-
Remove. Removes the selected entries from the Selected objects list.
To add a computer by name
-
Click Add and then click Add Computer.
-
In the Select Computers dialog box, supply the name of the computer you want to add to the list.
With the Select Computers dialog box, you can select multiple computers. The Select Computers dialog box only allows you to add computers by computer account name. If you want to add computers by IP address, DNS name, or NetBIOS name, use an import file.
To add computers using an import file
-
Create a text file that contains computer names, one name per line.
-
Click Add and then click Import Computers.
-
Use the Open dialog box to locate and open the text file.
To add a container
-
Click Add and then click Add Container.
-
In the Domain box, select or type the DNS name of a domain. If you typed the DNS name, click Connect to refresh the tree in the Containers box.
-
In the Containers box, select the container to add.
If you select computers or containers before starting the Backup Wizard, the Selected objects list includes the objects you have selected.
Where to Store Backups
Use this page to specify the path and name format for backup files.
-
Backup file path and name format. Provides a space for you to specify format for paths and names of .bkf files where you want the wizard to store backups. You can use UNC names to store backups in a shared network folder. The path format may include optional expressions that enable the automatic creation of subfolders. The file name format may also include expressions. For example, you might specify C:\DIRNAME\%COMPUTERNAME%\%DATETIME%.
As a result, backups for different computers will be saved in separate subfolders named by a computer name. In addition, the file name of each backup will be composed of the date and time of the backup creation.
-
Expression. Click this button to specify optional path and file name notations in Backup file path and name format. You can choose the following expressions:
-
Default backup storage (%BACKUPS%). Path to the default backup storage folder. Unless modified during the installation of RMAD, it points to the folder %AllUsersProfile%\Quest\Recovery Manager for Active Directory\Backups.
-
Domain (%DOMAIN%). Name of the home domain of the computer being backed up.
-
Computer name (%COMPUTERNAME%). Name of the computer being backed up.
-
Date and Time (%DATETIME%). Date and time of the backup creation.
-
-
Browse. Click this button to locate the folder where backups are to be stored.
-
Sample path and file name matching the specified format. This box displays an example of the path and file name that matches the format string supplied in Backup file path and name format.


