4.10 Offline Domain Join (ODJ) Requirements
4.1 Migrator Pro for Active Directory Basic Installation Requirements
The Migrator Pro for Active Directory suite consists of Binary Tree Migrator Pro for Active Directory, which includes both the console and the Web service, and Directory Sync Pro for Active Directory software packages. Both packages will require access to Microsoft SQL Server. In most environments, all of these components will be installed on the same server.
Single Server Installation Requirements
|
Supported Operating Systems |
|
|
SQL Server Requirements |
|
|
Minimum Hardware Requirements |
|
|
Additional Components |
|
If you are planning to have a long-term co-existence (1 year+), we recommend using the following formula to determine if you should use a full edition of SQL Server with our products. This formula assumes High / Verbose logging turned on for all profiles = worst case scenario.
Formula: (Expected months of co-existence x Users) x Profiles = N
If calculated N >= 12000 then we recommend full edition of SQL Server.
-
Low example: 3 months x 300 users x 1 profile = 900
-
Medium example: 6 months x 1000 users x 2 profiles = 12000
-
High example: 12 months x 3000 users x 5 profiles = 180,000
-
Extreme example: 14 months x 6000 users x 7 profiles = 588,000
Multi-Server Installation Requirements
Migrator Pro for Active Directory is scalable and supports segregating components and can be installed in a multi-server configuration to support larger or complex environments.
If required in larger installations, remote SQL Servers may be used for the primary database and the logging database. Additionally, the primary database and the logging database can be segregated onto separate SQL Server instances.
Each of the following roles/functions may be separated onto different servers as required in advanced configurations:
-
Directory Sync Pro for Active Directory/Migrator Pro for Active Directory Administrative Web Interface
-
Migrator Pro for Active Directory Web Service
-
Directory Sync Pro for Active Directory Databases
When installed independently, the components require the following resources:
|
Supported Operating Systems |
|
|
Migrator Pro for Active Directory Split Role Minimum Hardware Requirements |
|
|
Directory Sync Pro for Active Directory Hardware Requirements |
|
|
SQL Server |
|
|
Additional Components |
|
Report Server Requirements
|
SQL Server Requirements |
|
4.2 Workstation and Member Server System Requirements
|
Supported Operating Systems |
|
|
PowerShell Requirements |
|
|
.NET Framework Requirements |
|
4.3 Admin Agent Device Requirements
|
Operating System Requirements |
|
|
Supported Operating Systems |
|
|
Additional Requirements |
|
4.4 Networking Requirements
Domain Controller Access
For most scenarios, Migrator Pro for Active Directory requires access to at least one read/write domain controller running Windows 2003 SP2 or newer in each source and target Active Directory domain. For fault tolerance, at least two domain controllers in each source and target domain is recommended.
If SID History will be synchronized, any domain controller listed in the Target DCs tab within a Directory Sync Pro for Active Directory profile will require access to the domain controller holding the PDC Emulator Active Directory FSMO role in the source. Keep in mind that even if the domain controller holding the PDC Emulator Active Directory FSMO role is not listed in the Source DCs tab, any SID History migration attempts will require a DC in the target to communicate with the PDC Emulator domain controller. For this reason, it is a best practice to ensure that all domain controllers specified on the Target DCs screen within a Directory Sync Pro for Active Directory profile have the appropriate networks access to communicate with the source domain controller holding the PDC Emulator Active Directory FSMO role before a SID History migration is attempted.
In limited scenarios, it is possible that Migrator Pro for Active Directory will not be responsible for creating or updating any accounts in the source or the target domains. In this scenario, Migrator Pro for Active Directory can be configured to communicate with Read Only Domain Controllers (RODCs).
Network/Firewall Requirements
Migrator Pro for Active Directory requires the following network ports to enable full functionality:
|
Source |
Target |
Port/Protocol |
|
Workstations and Member Servers |
Migrator Pro for Active Directory Server |
443 (TCP) or 80 (TCP) |
|
Migrator Pro for Active Directory Server |
Source and Target Domain Controllers running Windows Server 2003 |
135, 137, 389, 445, 1024-5000 (TCP) 389 (UDP) |
|
Migrator Pro for Active Directory Server |
Source and Target Domain Controllers running Windows Server 2008 or newer |
135, 137, 389, 445, 49152-65535 (TCP) 389 (UDP) |
|
Target domain controllers listed in the Target DCs tab |
Domain controller in the source environment holding the PDC Emulator Active Directory FSMO role |
135, 137, 139, 389, 445, 3268 and 49152-65535 (TCP) 389 (UDP) |
The following ports need to be opened between workstations/servers and writable domain controllers for a successful domain join operation:
|
Type of Traffic |
Protocol and Port |
|
DNS |
TCP/UDP 53 |
|
Kerberos |
TCP/UDP 88 |
|
EPM |
TCP 135 |
|
NetLogon, NetBIOS Name Resolution |
UDP 137 |
|
DFSN, NetLogon, NetBIOS Datagram Service |
UDP 138 |
|
DFSN, NetBIOS Session Service, NetLogon |
TCP 139 |
|
C-LDAP |
TCP/UDP 389 |
|
DFS, LsaRpc, NbtSS, NetLogonR, SamR, SMB, SrvSvc |
TCP/UDP 445 |
|
LDAP SSL |
TCP 636 |
|
Random RPC |
TCP 1024-5000 |
|
GC |
TCP 3268 |
|
GC |
TCP 3269 |
|
DFS-R |
TCP 5722 |
|
Random RPC |
TCP 49152-65535 |
4.5 SSL Certificate Requirements
Migrator Pro for Active Directory does not require HTTPS (HTTP with SSL), and can operate using HTTP. However, it is strongly recommended to implement Migrator Pro for Active Directory using HTTPS to secure communications between the devices to be migrated and the Migrator Pro for Active Directory Server. In order to activate HTTPS on the IIS component in Windows, the Migrator Pro for Active Directory system will require that a SSL certificate is present.
An SSL Certificate is not provided as part of the installation. For the most secure installation, purchasing an SSL Certificate from a Windows supported 3rd party provider is recommended.
In scenarios where this is not possible, self-signed SSL Certificate can be generated in Windows following these directions: https://technet.microsoft.com/en-us/library/cc753127(v=ws.10).aspx
If using a self-signed certificate, it should be noted that Migrator Pro for Active Directory’s agent component would utilize the operating system’s certificate trust list. Due to the security nature of Active Directory migrations, there is no method of implementing an override and forcing the agent to use an untrusted certificate. If a self-signed certificate is used, that certificate will need to be added to the trusted root certificate list for all computer objects to be migrated. This can be accomplished via group policy: https://technet.microsoft.com/en-us/library/cc738131(v=ws.10).aspx
4.6 Service Account Requirements
Migrator Pro for Active Directory requires the following user account permissions and privileges to support Active Directory migrations:
-
One service account with read/write access to all organizational units (OUs) containing user, group, and computer objects in the source Active Directory to be migrated to the target environment.
-
One service account with administrative rights on the target domain(s)
-
If administrative rights cannot be granted, the service account requires the following rights:
-
The ability to create and modify user objects in the desired OUs in the target Active Directory environment.
-
Read Permissions to the configuration container in Active Directory
-
User credentials with the delegated migrateSIDHistory extended right.
-
-
-
A service account in each source and target domain with the ability to modify computer objects and add computers to the domain.
4.7 SQL Server Reporting Services (SSRS) Account Requirements
Migrator Pro for Active Directory's Reporting feature requires credentials in the following places:
-
Content credential: Credential for accessing the report server content.
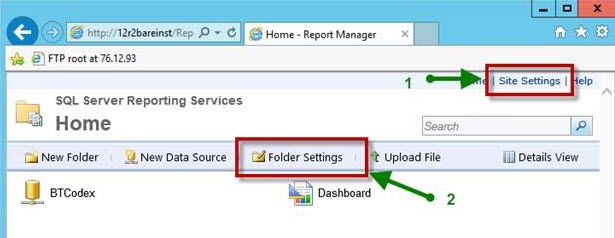
You must set the securities in two different places in the SSRS ‘Report Manager’ web interface (http://<servername>/Reports) to connect to the report server and upload reports from the installation program.
In the Site Settings, you MUST enable the ‘System Administrator’ role during installation. After installation is complete, you may change this user’s role to ‘System User’ if desired.
In the Folder Settings, you must add the same user with (at least) ‘Browser’ permission.
-
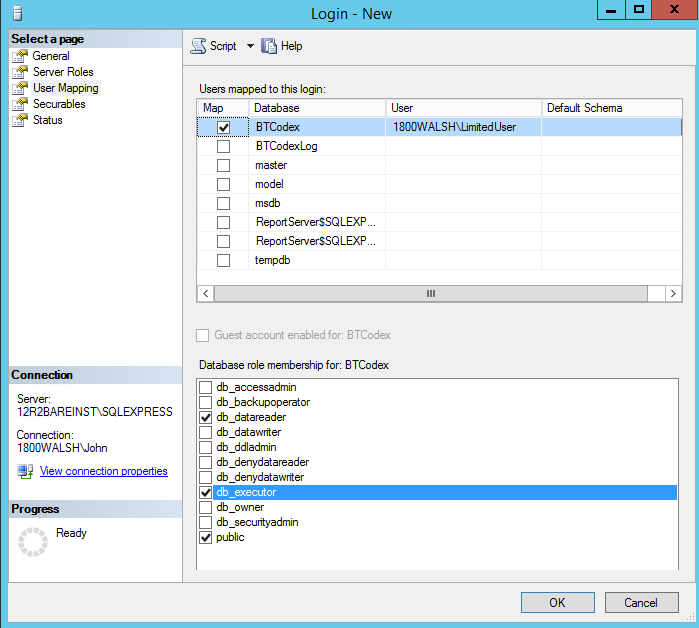
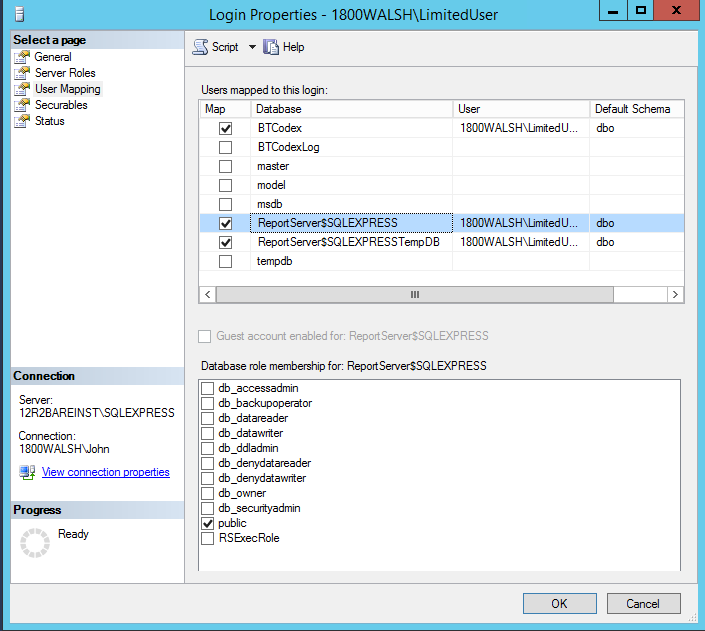
Data Source Credential: The Data Source is used to access queries in the ADM database. These credentials and roles are set in the SQL server with SSMS
The user must have public, db_reader, and db_executor roles on the ADM database.
The user must have the public role on the report server and report server temp databases.
4.8 DNS SRV Record Requirement
In each source domain, a SRV DNS record must be created to enable autodiscover for Migrator Pro for Active Directory agents.
-
To enable autodiscover when HTTPS is desired
-
Record Name: _btadm._https.SourceDomainName.Local
-
Weight and Priority: 0
-
Port Number: 443
-
-
To enable autodiscover when HTTP is desired
-
Record Name: _btadm._http.SourceDomainName.Local
-
Weight and Priority: 0
-
Port Number: 80
-
4.9 Directory Sync Pro for Active Directory Requirement for Synchronizing Passwords
If you are planning to use the Password Copy functionality of Migrator Pro for Active Directory, PsExec must be installed in the Directory Sync Pro for Active Directory program directory (C:\Program Files\Binary Tree\DirSync). Ignore the PSExec Installation Guide concerning the proper installation location. PsExec is available at: https://technet.microsoft.com/en-us/sysinternals/bb897553
4.10 Offline Domain Join (ODJ) Requirements
In order to successfully facilitate the new Cached Credentials job (which supports the Offline Domain Join feature) a one-way external trust must be configured from the source domain to the target domain.
The devices that the ODJ process is being run on must have network connectivity to BOTH the source and target environments at the same time in order to have the Cached Credentials function work properly.
Offline domain join files must be created prior to running the Offline Domain Join process. A full explanation of Microsoft’s Djoin.exe utility and how to create these files can be found here:
https://technet.microsoft.com/en-us/library/offline-domain-join-djoin-step-by-step%28v=ws.10%29.aspx
Section 5. Requirements for Both Directory Sync Pro for Active Directory and Migrator Pro for Active Directory
5.1 Browser Requirements
Directory Sync Pro for Active Directory uses a browser-based user interface. We recommend using Chrome or Firefox for the best browser experience.
The browser Download settings should be configured to ask you where to save files before downloading.
5.2 SID History and Password Synchronization Requirements
SID History Synchronization Requirements
Microsoft requires an administrative account in the source domain.
In order to support synchronization of SID History from the source to the target domains, Windows requires that a specific domain local group exists and that account auditing is enabled.
The source and target domains must not have the same NETBIOS name to allow the required trust between the two environments.
Communication between a Source PDC and the configured Target GC is required for SID History Migration to successfully complete. Please note, there are additional ports that must be open between the Source PDC and the configured Target GC as defined in Section 3. Directory Sync Pro for Active Directory Advanced Network Requirement’s (Directory Sync Pro for Active Directory Profile with SID History Synchronization selected) of this document.
Preparing the Source and Target Domains
To prepare each source and target domain for SID History Synchronization, the following configuration steps must be completed:
-
In the source domain, create a local group called SourceDomain$$$, where SourceDomain is the NetBIOS name of your source domain. For example, if your domain's NetBIOS name is ADM, you must create a domain local group named ADM$$$.
|
|
SID History synchronization will fail if members are added to this local group. |
-
Enable TCP/IP client support on the source domain PDC emulator:
-
On the domain controller in the source domain that holds the PDC emulator operations master (also known as flexible single master operations or FSMO) role, click Start, and then click Run.
-
In Open, type regedit, and then click OK.
-
In Registry Editor, navigate to the following registry subkey:
HKEY_LOCAL_MACHINE\SYSTEM\CurrentControlSet\Control\LSA
-
Modify the registry entry TcpipClientSupport, of data type REG_DWORD, by setting the value to 1.
-
Close Registry Editor, and then restart the computer.
-
-
Enable auditing in the target domain:
-
Log on as an administrator to any domain controller in the target domain.
-
Click Start, point to All Programs, point to Administrative Tools, and then click Group Policy Management.
-
Navigate to the following node: Forest | Domains | Domain Name | Domain Controllers | Default Domain Controllers Policy
-
Right-click Default Domain Controllers Policy and click Edit.
-
In Group Policy Management Editor, in the console tree, navigate to the following node: Computer Configuration | Policies | Windows Settings | Security Settings | Local Policies | Audit Policy
-
In the details pane, right-click Audit account management, and then click Properties.
-
Click Define these policy settings, and then click Success and Failure.
-
Click Apply, and then click OK.
-
In the details pane, right-click Audit directory service access and then click Properties.
-
Click Define these policy settings and then click Success.
-
Click Apply, and then click OK.
-
If the changes need to be immediately reflected on the domain controller, open an elevated command prompt and type gpupdate /force.
-
Repeat the above steps in the source domain.
-
|
|
It may also be necessary to reboot the domain controller to have auditing take effect. Even with group policy applied on the default domain controller for the domain audit, the server audit setting on the primary domain controller (PDC) may not be enabled. Please confirm this setting is enabled for the local security policy on the PDC server. If not enabled, use the local security policy to enable this setting. |
Validate Cross-Domain Verification
In order to receive the maximum benefit a trust should be in place. When a trust is present, it is necessary to ensure that the trust is properly configured to permit cross-domain verification. To do so, first identify if the trust between the source and target domain is an external trust or a forest trust. Next, following commands must be run from an administrative command prompt:
If the trust between the source and target is an external trust:
-
From the source domain:
-
Netdom trust SourceDomain /domain: TargetDomain /quarantine:No /user: domainadministratorAcct /password: domainadminpwd
-
-
From the target domain:
-
Netdom trust TargetDomain /domain: SourceDomain /quarantine:No /user: domainadministratorAcct /password: domainadminpwd
-
If the trust between the source and target is a forest trust:
-
From the source domain:
-
Netdom trust SourceDomain /domain: TargetDomain /enablesIDHistory:Yes /user: domainadministratorAcct /password: domainadminpwd
-
-
From the target domain:
-
Netdom trust TargetDomain /domain: SourceDomain /enablesIDHistory:Yes /user: domainadministratorAcct /password: domainadminpwd
-
Domain Controller Access
If SID History will be synchronized, any Domain Controller listed in the Target DCs tab within a Directory Sync Pro for Active Directory profile will require access to the Domain Controller holding the PDC Emulator Active Directory FSMO role in the source. Keep in mind that even if the Domain Controller holding the PDC Emulator Active Directory FSMO role is not listed in the Source DCs tab, any SID History migration attempts will require a DC in the target to communicate with the PDC Emulator domain controller. For this reason, it is a best practice to ensure that all Domain Controllers specified in the Target DCs tab within a Directory Sync Pro for Active Directory profile has the appropriate networks access to communicate with the source Domain Controller holding the PDC Emulator Active Directory FSMO role before a SID History migration is attempted.
Password Synchronization Requirements
The domain controller with the PDC Emulator FSMO role must not be configured to run LSASS as a protected service or the password sync will fail with an access denied error.
5.3 Password Requirements
Directory Sync Pro for Active Directory and Migrator Pro for Active Directory do not validate the password policies present within your domains. Verify that the password entered as the Default Password complies with the password policy of your target environment. Objects will fail to be created if the password violates that policy.
5.4 Internet Requirement for Online Help and Video Tutorials
An internet connection is required to access the online help system and video tutorials.
-
Within the Directory Sync Pro for Active Directory/Migrator Pro for Active Directory interface, the online help system can be accessed by clicking “HELP” in the pull-down menu
and the video tutorials can be accessed by clicking the
icons found throughout the application. Relevant topics in the online help system can be found using the Search bar at top of the page or navigated to while viewing topics by clicking on a topic in the list on the left side of the page. Individual topics can be printed by using the browser’s Print function.
-
Windows Server operating systems will need to have the Desktop Experience feature (or a video codec) installed to view the video tutorials.
Section 6. Installing Directory Sync Pro for Active Directory and Migrator Pro for Active Directory
The Binary Tree Directory Sync Pro for Active Directory and Migrator Pro for Active Directory installer can be used to install both Directory Sync Pro for Active Directory and Migrator Pro for Active Directory at the same time or individually. Migrator Pro for Active Directory should only be installed at the same time as Directory Sync Pro for Active Directory or if it has previously been installed on the same server.
This guide includes the steps for installing Directory Sync Pro for Active Directory and Migrator Pro for Active Directory at the same time. Installing Directory Sync Pro for Active Directory first and running the installer again to install the Migrator Pro for Active Directory components is another option.
The installer creates a local group on the Directory Sync Pro for Active Directory server named BTDirSyncPro and will add the currently logged in user to the group. Other users or a Domain group can be added to provide access to other users.
|
|
It is recommended to select “SQL Server Authentication” during the Directory Sync Pro for Active Directory/Migrator Pro for Active Directory server console installation if multiple people will be accessing the Directory Sync Pro for Active Directory/Migrator Pro for Active Directory web user interfaces. Otherwise, if “Windows Authentication” is chosen during installation, create a security group in AD and assign DB Owner rights to the Directory Sync Pro for Active Directory SQL databases and add all the users that need access to the console as members. |
6.1 Installing Directory Sync Pro for Active Directory and Migrator Pro for Active Directory on a Windows Server
-
Download the installer executable file from the FTP site and save it on the Binary Tree Windows Server.
-
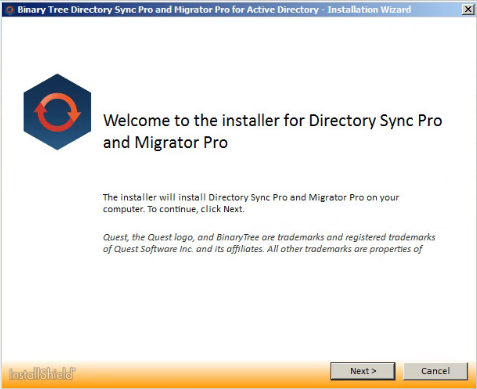
Double-click the executable to begin installing Migrator Pro for Active Directory. The Welcome screen appears. Click Next to continue.
-
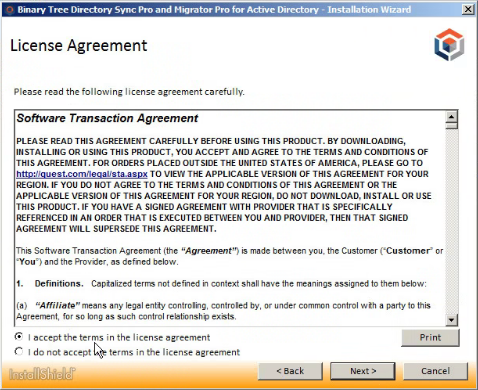
The License Agreement screen appears. To accept the terms of the license agreement and continue with the install, select “I accept the terms in the license agreement” and click Next.
-
The Setup Type screen appears.
-
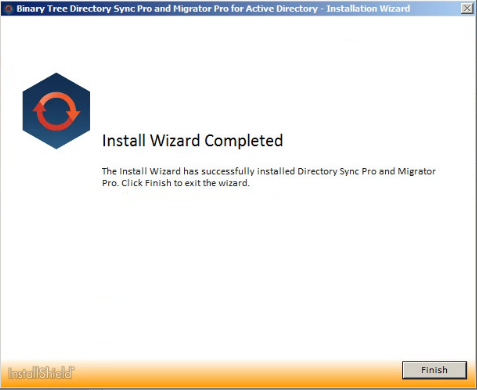
Select Default Installation to install Directory Sync Pro for Active Directory and/or Migrator Pro for Active Directory with the default configuration options. A series of screens will appear while installing the needed databases and features. The Install Wizard Completed screen will appear when done.
-
Select the Advanced Installation option to review and set the configuration options for the installation. The Install Wizard will continue to the next step.
-
The SQL Option screen appears. Select to use an existing SQL server or to install SQL Express and then click Next. If you choose to install SQL Express, a series of installation screens will appear while SQL Express is being installed.
-
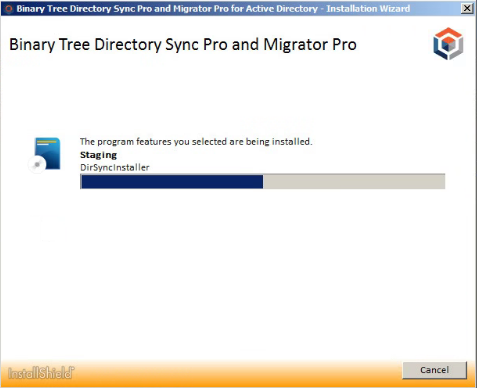
The Installation screen appears and will remain open. The Recommended Components screen will appear in a separate window. You will be prompted if there are applications using files that need to be updated by the installer.
-
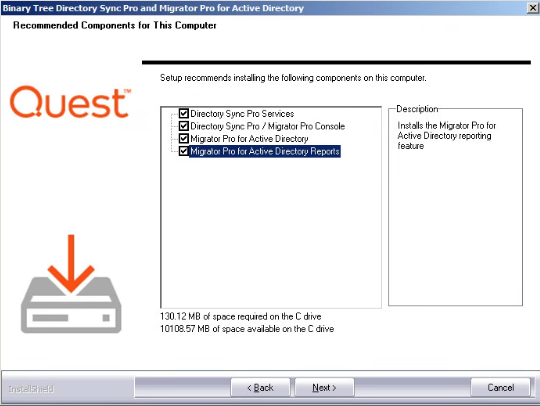
The Recommended Components for This Computer screen appears. By default, only the Directory Sync Pro for Active Directory components are selected. To install Migrator Pro for Active Directory, select the Directory Sync Pro / Migrator Pro Console, Migrator Pro for Active Directory, and (optionally) Migrator Pro for Active Directory Reports components and click Next to continue.
-
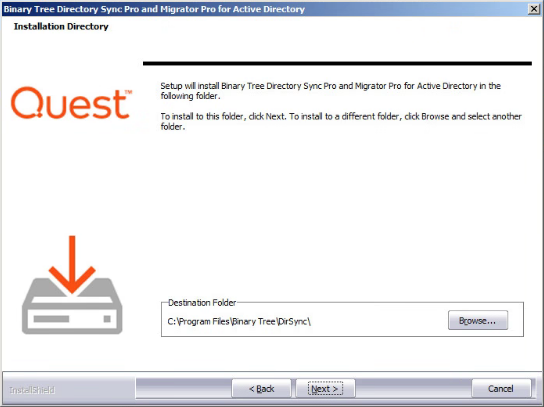
The Installation Directory screen appears. Both Directory Sync Pro for Active Directory and Migrator Pro for Active Directory are installed in the same directory. Click Browse to choose a different install location. Click Next to continue.
-
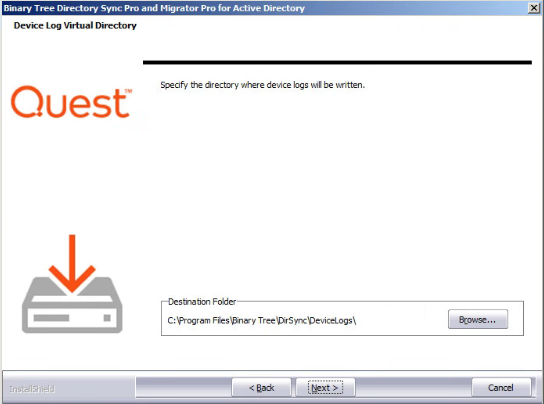
The Device Log Virtual Directory screen appears. Click Browse to choose a different location where device logs will be written. Click Next to continue.
-
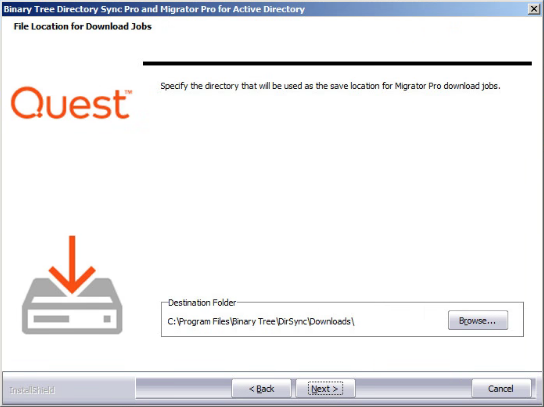
The File Location for Download Jobs screen appears. Click Browse to choose a different location where download jobs will be saved. Click Next to continue.
-
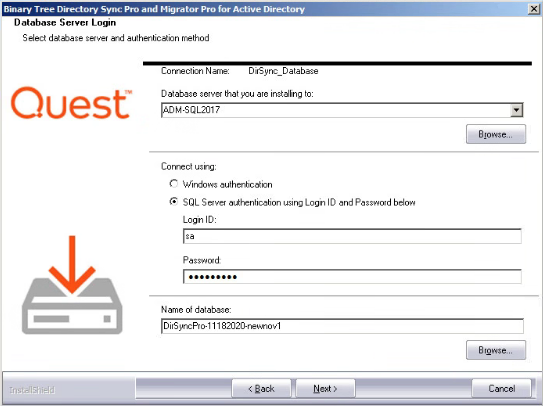
The Database Server Login screen appears. Enter the SQL Database Server location, credential information, and database name. Click Next to continue. If you chose to install SQL Server Express, the installer sets the “sa” account with the default password “Password1”.
-
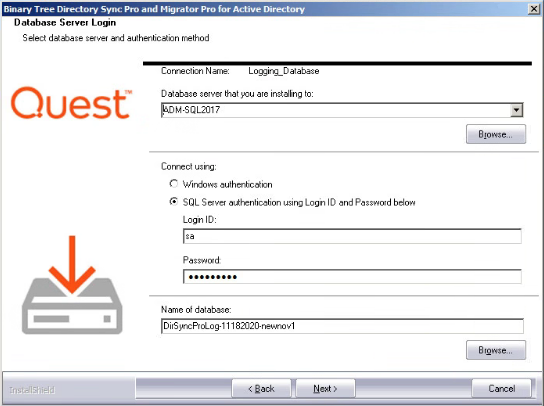
The Database Server Login screen appears again, this time for the logging database. Enter the SQL Database Server location for the logging database, credential information, and database name. Click Next to continue.
-
If you selected to connect using Windows Authentication on the previous screen, a screen to enter domain username and password appears. Enter the domain user in DOMAIN\username format and the password. Click Next to continue.
-
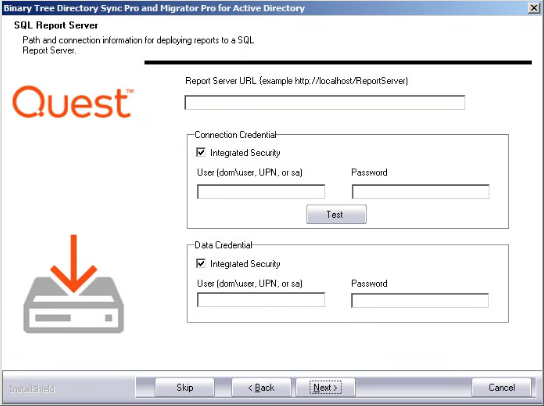
If you selected to install the optional Reporting feature, the SQL Report Server screen appears. Enter the Report Server URL and select the appropriate Connection Credential and Data Credential options. Clicking the Test button to verify the SSRS connection credential is a best practice. See the Appendix of this document for information on verifying the Report Server URL. Click Next to continue. If SQL Server Reporting Services (SSRS) is not set up, click Skip and OK on the confirmation window.
|
|
The Connection Credential requires an account that has the Content Manager role and the System Administrator role defined on the SQL Server Reporting Server. The Data Credential requires an account that has permission on the SQL Server Reporting Services database. These permissions are typically the database-level roles db_datareader and db_datawriter but should be verified by the SQL Server Reporting Services database administrator. Reports will not appear in the Migrator Pro for Active Directory Console UI if the installation of the Reporting feature is skipped. To install the Reporting feature at a later time, select to Modify the installation from the Programs and Features page in the Control Panel. When an AD credential is used as the Data Credential on the SQL Report Server screen in the Migrator Pro for Active Directory installer, the Windows Credential check box is not checked. This will need to be changed manually in the DataSource in the Report Server after installation is completed. |
-
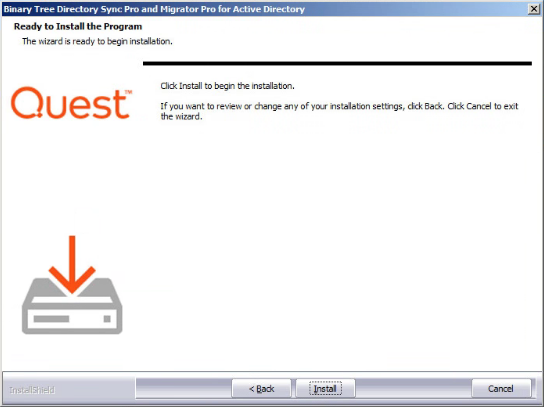
The Ready to Install screen appears. Click Install to begin the installation.
-
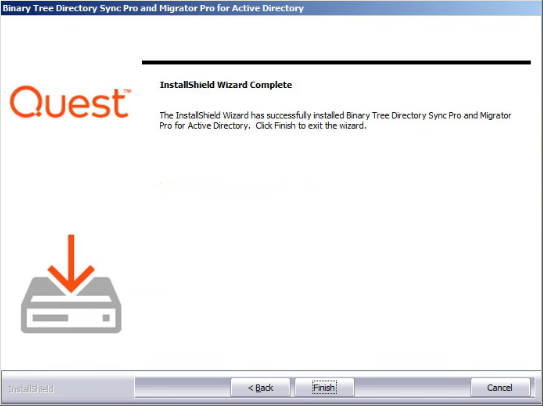
When the installation completes, the InstallShield Wizard Complete message appears. Click Finish.
Also, click Finish on the Installation window.
|
|
If upgrading from a previous version of Directory Sync Pro for Active Directory, you must delete the C:\Windows\BTPass folder from all domain controllers being used in the Directory Sync Pro for Active Directory profiles. A new version of BTPass will be pushed to the domain controllers on the next sync. |
-
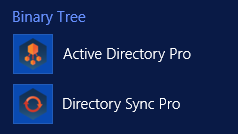
The Apps screen or Start Menu is updated and the Migrator Pro for Active Directory and Directory Sync Pro for Active Directory icons are added to the desktop.
Apps screen:
Desktop icons:
If planning to use the Password Copy functionality of Active Directory Pro Synchronization, PsExec must be installed in the Directory Sync Pro for Active Directory program directory (C:\Program Files\Binary Tree\DirSync). Ignore the PSTools Installation Guide concerning the proper installation location. PsExec is available at: https://technet.microsoft.com/en-us/sysinternals/bb897553
The Upload Logs functionality requires the following actions to work:
-
Enable BITS on the Migrator Pro for Active Directory server.
-
Update the c:\windows\system32\inetsrv\applicationhost.config file to include a physical path (C:\Program Files\Binary Tree\DirSync\DeviceLogs\) for the application path="/adm/DeviceLogs" under the Default Web Site. Then, reset IIS.
Section 5. Requirements for Both Directory Sync Pro for Active Directory and Migrator Pro for Active Directory
4.1 Migrator Pro for Active Directory Basic Installation Requirements
The Migrator Pro for Active Directory suite consists of Binary Tree Migrator Pro for Active Directory, which includes both the console and the Web service, and Directory Sync Pro for Active Directory software packages. Both packages will require access to Microsoft SQL Server. In most environments, all of these components will be installed on the same server.
Single Server Installation Requirements
|
Supported Operating Systems |
|
|
SQL Server Requirements |
|
|
Minimum Hardware Requirements |
|
|
Additional Components |
|
If you are planning to have a long-term co-existence (1 year+), we recommend using the following formula to determine if you should use a full edition of SQL Server with our products. This formula assumes High / Verbose logging turned on for all profiles = worst case scenario.
Formula: (Expected months of co-existence x Users) x Profiles = N
If calculated N >= 12000 then we recommend full edition of SQL Server.
-
Low example: 3 months x 300 users x 1 profile = 900
-
Medium example: 6 months x 1000 users x 2 profiles = 12000
-
High example: 12 months x 3000 users x 5 profiles = 180,000
-
Extreme example: 14 months x 6000 users x 7 profiles = 588,000
Multi-Server Installation Requirements
Migrator Pro for Active Directory is scalable and supports segregating components and can be installed in a multi-server configuration to support larger or complex environments.
If required in larger installations, remote SQL Servers may be used for the primary database and the logging database. Additionally, the primary database and the logging database can be segregated onto separate SQL Server instances.
Each of the following roles/functions may be separated onto different servers as required in advanced configurations:
-
Directory Sync Pro for Active Directory/Migrator Pro for Active Directory Administrative Web Interface
-
Migrator Pro for Active Directory Web Service
-
Directory Sync Pro for Active Directory Databases
When installed independently, the components require the following resources:
|
Supported Operating Systems |
|
|
Migrator Pro for Active Directory Split Role Minimum Hardware Requirements |
|
|
Directory Sync Pro for Active Directory Hardware Requirements |
|
|
SQL Server |
|
|
Additional Components |
|
Report Server Requirements
|
SQL Server Requirements |
|
4.2 Workstation and Member Server System Requirements
|
Supported Operating Systems |
|
|
PowerShell Requirements |
|
|
.NET Framework Requirements |
|
4.3 Admin Agent Device Requirements
|
Operating System Requirements |
|
|
Supported Operating Systems |
|
|
Additional Requirements |
|
4.4 Networking Requirements
Domain Controller Access
For most scenarios, Migrator Pro for Active Directory requires access to at least one read/write domain controller running Windows 2003 SP2 or newer in each source and target Active Directory domain. For fault tolerance, at least two domain controllers in each source and target domain is recommended.
If SID History will be synchronized, any domain controller listed in the Target DCs tab within a Directory Sync Pro for Active Directory profile will require access to the domain controller holding the PDC Emulator Active Directory FSMO role in the source. Keep in mind that even if the domain controller holding the PDC Emulator Active Directory FSMO role is not listed in the Source DCs tab, any SID History migration attempts will require a DC in the target to communicate with the PDC Emulator domain controller. For this reason, it is a best practice to ensure that all domain controllers specified on the Target DCs screen within a Directory Sync Pro for Active Directory profile have the appropriate networks access to communicate with the source domain controller holding the PDC Emulator Active Directory FSMO role before a SID History migration is attempted.
In limited scenarios, it is possible that Migrator Pro for Active Directory will not be responsible for creating or updating any accounts in the source or the target domains. In this scenario, Migrator Pro for Active Directory can be configured to communicate with Read Only Domain Controllers (RODCs).
Network/Firewall Requirements
Migrator Pro for Active Directory requires the following network ports to enable full functionality:
|
Source |
Target |
Port/Protocol |
|
Workstations and Member Servers |
Migrator Pro for Active Directory Server |
443 (TCP) or 80 (TCP) |
|
Migrator Pro for Active Directory Server |
Source and Target Domain Controllers running Windows Server 2003 |
135, 137, 389, 445, 1024-5000 (TCP) 389 (UDP) |
|
Migrator Pro for Active Directory Server |
Source and Target Domain Controllers running Windows Server 2008 or newer |
135, 137, 389, 445, 49152-65535 (TCP) 389 (UDP) |
|
Target domain controllers listed in the Target DCs tab |
Domain controller in the source environment holding the PDC Emulator Active Directory FSMO role |
135, 137, 139, 389, 445, 3268 and 49152-65535 (TCP) 389 (UDP) |
The following ports need to be opened between workstations/servers and writable domain controllers for a successful domain join operation:
|
Type of Traffic |
Protocol and Port |
|
DNS |
TCP/UDP 53 |
|
Kerberos |
TCP/UDP 88 |
|
EPM |
TCP 135 |
|
NetLogon, NetBIOS Name Resolution |
UDP 137 |
|
DFSN, NetLogon, NetBIOS Datagram Service |
UDP 138 |
|
DFSN, NetBIOS Session Service, NetLogon |
TCP 139 |
|
C-LDAP |
TCP/UDP 389 |
|
DFS, LsaRpc, NbtSS, NetLogonR, SamR, SMB, SrvSvc |
TCP/UDP 445 |
|
LDAP SSL |
TCP 636 |
|
Random RPC |
TCP 1024-5000 |
|
GC |
TCP 3268 |
|
GC |
TCP 3269 |
|
DFS-R |
TCP 5722 |
|
Random RPC |
TCP 49152-65535 |
4.5 SSL Certificate Requirements
Migrator Pro for Active Directory does not require HTTPS (HTTP with SSL), and can operate using HTTP. However, it is strongly recommended to implement Migrator Pro for Active Directory using HTTPS to secure communications between the devices to be migrated and the Migrator Pro for Active Directory Server. In order to activate HTTPS on the IIS component in Windows, the Migrator Pro for Active Directory system will require that a SSL certificate is present.
An SSL Certificate is not provided as part of the installation. For the most secure installation, purchasing an SSL Certificate from a Windows supported 3rd party provider is recommended.
In scenarios where this is not possible, self-signed SSL Certificate can be generated in Windows following these directions: https://technet.microsoft.com/en-us/library/cc753127(v=ws.10).aspx
If using a self-signed certificate, it should be noted that Migrator Pro for Active Directory’s agent component would utilize the operating system’s certificate trust list. Due to the security nature of Active Directory migrations, there is no method of implementing an override and forcing the agent to use an untrusted certificate. If a self-signed certificate is used, that certificate will need to be added to the trusted root certificate list for all computer objects to be migrated. This can be accomplished via group policy: https://technet.microsoft.com/en-us/library/cc738131(v=ws.10).aspx
4.6 Service Account Requirements
Migrator Pro for Active Directory requires the following user account permissions and privileges to support Active Directory migrations:
-
One service account with read/write access to all organizational units (OUs) containing user, group, and computer objects in the source Active Directory to be migrated to the target environment.
-
One service account with administrative rights on the target domain(s)
-
If administrative rights cannot be granted, the service account requires the following rights:
-
The ability to create and modify user objects in the desired OUs in the target Active Directory environment.
-
Read Permissions to the configuration container in Active Directory
-
User credentials with the delegated migrateSIDHistory extended right.
-
-
-
A service account in each source and target domain with the ability to modify computer objects and add computers to the domain.
4.7 SQL Server Reporting Services (SSRS) Account Requirements
Migrator Pro for Active Directory's Reporting feature requires credentials in the following places:
-
Content credential: Credential for accessing the report server content.
You must set the securities in two different places in the SSRS ‘Report Manager’ web interface (http://<servername>/Reports) to connect to the report server and upload reports from the installation program.
In the Site Settings, you MUST enable the ‘System Administrator’ role during installation. After installation is complete, you may change this user’s role to ‘System User’ if desired.
In the Folder Settings, you must add the same user with (at least) ‘Browser’ permission.
-
Data Source Credential: The Data Source is used to access queries in the ADM database. These credentials and roles are set in the SQL server with SSMS
The user must have public, db_reader, and db_executor roles on the ADM database.
The user must have the public role on the report server and report server temp databases.
4.8 DNS SRV Record Requirement
In each source domain, a SRV DNS record must be created to enable autodiscover for Migrator Pro for Active Directory agents.
-
To enable autodiscover when HTTPS is desired
-
Record Name: _btadm._https.SourceDomainName.Local
-
Weight and Priority: 0
-
Port Number: 443
-
-
To enable autodiscover when HTTP is desired
-
Record Name: _btadm._http.SourceDomainName.Local
-
Weight and Priority: 0
-
Port Number: 80
-
4.9 Directory Sync Pro for Active Directory Requirement for Synchronizing Passwords
If you are planning to use the Password Copy functionality of Migrator Pro for Active Directory, PsExec must be installed in the Directory Sync Pro for Active Directory program directory (C:\Program Files\Binary Tree\DirSync). Ignore the PSExec Installation Guide concerning the proper installation location. PsExec is available at: https://technet.microsoft.com/en-us/sysinternals/bb897553
4.10 Offline Domain Join (ODJ) Requirements
In order to successfully facilitate the new Cached Credentials job (which supports the Offline Domain Join feature) a one-way external trust must be configured from the source domain to the target domain.
The devices that the ODJ process is being run on must have network connectivity to BOTH the source and target environments at the same time in order to have the Cached Credentials function work properly.
Offline domain join files must be created prior to running the Offline Domain Join process. A full explanation of Microsoft’s Djoin.exe utility and how to create these files can be found here:
https://technet.microsoft.com/en-us/library/offline-domain-join-djoin-step-by-step%28v=ws.10%29.aspx
Section 5. Requirements for Both Directory Sync Pro for Active Directory and Migrator Pro for Active Directory
5.1 Browser Requirements
Directory Sync Pro for Active Directory uses a browser-based user interface. We recommend using Chrome or Firefox for the best browser experience.
The browser Download settings should be configured to ask you where to save files before downloading.
5.2 SID History and Password Synchronization Requirements
SID History Synchronization Requirements
Microsoft requires an administrative account in the source domain.
In order to support synchronization of SID History from the source to the target domains, Windows requires that a specific domain local group exists and that account auditing is enabled.
The source and target domains must not have the same NETBIOS name to allow the required trust between the two environments.
Communication between a Source PDC and the configured Target GC is required for SID History Migration to successfully complete. Please note, there are additional ports that must be open between the Source PDC and the configured Target GC as defined in Section 3. Directory Sync Pro for Active Directory Advanced Network Requirement’s (Directory Sync Pro for Active Directory Profile with SID History Synchronization selected) of this document.
Preparing the Source and Target Domains
To prepare each source and target domain for SID History Synchronization, the following configuration steps must be completed:
-
In the source domain, create a local group called SourceDomain$$$, where SourceDomain is the NetBIOS name of your source domain. For example, if your domain's NetBIOS name is ADM, you must create a domain local group named ADM$$$.
|
|
SID History synchronization will fail if members are added to this local group. |
-
Enable TCP/IP client support on the source domain PDC emulator:
-
On the domain controller in the source domain that holds the PDC emulator operations master (also known as flexible single master operations or FSMO) role, click Start, and then click Run.
-
In Open, type regedit, and then click OK.
-
In Registry Editor, navigate to the following registry subkey:
HKEY_LOCAL_MACHINE\SYSTEM\CurrentControlSet\Control\LSA
-
Modify the registry entry TcpipClientSupport, of data type REG_DWORD, by setting the value to 1.
-
Close Registry Editor, and then restart the computer.
-
-
Enable auditing in the target domain:
-
Log on as an administrator to any domain controller in the target domain.
-
Click Start, point to All Programs, point to Administrative Tools, and then click Group Policy Management.
-
Navigate to the following node: Forest | Domains | Domain Name | Domain Controllers | Default Domain Controllers Policy
-
Right-click Default Domain Controllers Policy and click Edit.
-
In Group Policy Management Editor, in the console tree, navigate to the following node: Computer Configuration | Policies | Windows Settings | Security Settings | Local Policies | Audit Policy
-
In the details pane, right-click Audit account management, and then click Properties.
-
Click Define these policy settings, and then click Success and Failure.
-
Click Apply, and then click OK.
-
In the details pane, right-click Audit directory service access and then click Properties.
-
Click Define these policy settings and then click Success.
-
Click Apply, and then click OK.
-
If the changes need to be immediately reflected on the domain controller, open an elevated command prompt and type gpupdate /force.
-
Repeat the above steps in the source domain.
-
|
|
It may also be necessary to reboot the domain controller to have auditing take effect. Even with group policy applied on the default domain controller for the domain audit, the server audit setting on the primary domain controller (PDC) may not be enabled. Please confirm this setting is enabled for the local security policy on the PDC server. If not enabled, use the local security policy to enable this setting. |
Validate Cross-Domain Verification
In order to receive the maximum benefit a trust should be in place. When a trust is present, it is necessary to ensure that the trust is properly configured to permit cross-domain verification. To do so, first identify if the trust between the source and target domain is an external trust or a forest trust. Next, following commands must be run from an administrative command prompt:
If the trust between the source and target is an external trust:
-
From the source domain:
-
Netdom trust SourceDomain /domain: TargetDomain /quarantine:No /user: domainadministratorAcct /password: domainadminpwd
-
-
From the target domain:
-
Netdom trust TargetDomain /domain: SourceDomain /quarantine:No /user: domainadministratorAcct /password: domainadminpwd
-
If the trust between the source and target is a forest trust:
-
From the source domain:
-
Netdom trust SourceDomain /domain: TargetDomain /enablesIDHistory:Yes /user: domainadministratorAcct /password: domainadminpwd
-
-
From the target domain:
-
Netdom trust TargetDomain /domain: SourceDomain /enablesIDHistory:Yes /user: domainadministratorAcct /password: domainadminpwd
-
Domain Controller Access
If SID History will be synchronized, any Domain Controller listed in the Target DCs tab within a Directory Sync Pro for Active Directory profile will require access to the Domain Controller holding the PDC Emulator Active Directory FSMO role in the source. Keep in mind that even if the Domain Controller holding the PDC Emulator Active Directory FSMO role is not listed in the Source DCs tab, any SID History migration attempts will require a DC in the target to communicate with the PDC Emulator domain controller. For this reason, it is a best practice to ensure that all Domain Controllers specified in the Target DCs tab within a Directory Sync Pro for Active Directory profile has the appropriate networks access to communicate with the source Domain Controller holding the PDC Emulator Active Directory FSMO role before a SID History migration is attempted.
Password Synchronization Requirements
The domain controller with the PDC Emulator FSMO role must not be configured to run LSASS as a protected service or the password sync will fail with an access denied error.
5.3 Password Requirements
Directory Sync Pro for Active Directory and Migrator Pro for Active Directory do not validate the password policies present within your domains. Verify that the password entered as the Default Password complies with the password policy of your target environment. Objects will fail to be created if the password violates that policy.
5.4 Internet Requirement for Online Help and Video Tutorials
An internet connection is required to access the online help system and video tutorials.
-
Within the Directory Sync Pro for Active Directory/Migrator Pro for Active Directory interface, the online help system can be accessed by clicking “HELP” in the pull-down menu
and the video tutorials can be accessed by clicking the
icons found throughout the application. Relevant topics in the online help system can be found using the Search bar at top of the page or navigated to while viewing topics by clicking on a topic in the list on the left side of the page. Individual topics can be printed by using the browser’s Print function.
-
Windows Server operating systems will need to have the Desktop Experience feature (or a video codec) installed to view the video tutorials.
Section 6. Installing Directory Sync Pro for Active Directory and Migrator Pro for Active Directory
The Binary Tree Directory Sync Pro for Active Directory and Migrator Pro for Active Directory installer can be used to install both Directory Sync Pro for Active Directory and Migrator Pro for Active Directory at the same time or individually. Migrator Pro for Active Directory should only be installed at the same time as Directory Sync Pro for Active Directory or if it has previously been installed on the same server.
This guide includes the steps for installing Directory Sync Pro for Active Directory and Migrator Pro for Active Directory at the same time. Installing Directory Sync Pro for Active Directory first and running the installer again to install the Migrator Pro for Active Directory components is another option.
The installer creates a local group on the Directory Sync Pro for Active Directory server named BTDirSyncPro and will add the currently logged in user to the group. Other users or a Domain group can be added to provide access to other users.
|
|
It is recommended to select “SQL Server Authentication” during the Directory Sync Pro for Active Directory/Migrator Pro for Active Directory server console installation if multiple people will be accessing the Directory Sync Pro for Active Directory/Migrator Pro for Active Directory web user interfaces. Otherwise, if “Windows Authentication” is chosen during installation, create a security group in AD and assign DB Owner rights to the Directory Sync Pro for Active Directory SQL databases and add all the users that need access to the console as members. |
6.1 Installing Directory Sync Pro for Active Directory and Migrator Pro for Active Directory on a Windows Server
-
Download the installer executable file from the FTP site and save it on the Binary Tree Windows Server.
-
Double-click the executable to begin installing Migrator Pro for Active Directory. The Welcome screen appears. Click Next to continue.
-
The License Agreement screen appears. To accept the terms of the license agreement and continue with the install, select “I accept the terms in the license agreement” and click Next.
-
The Setup Type screen appears.
-
Select Default Installation to install Directory Sync Pro for Active Directory and/or Migrator Pro for Active Directory with the default configuration options. A series of screens will appear while installing the needed databases and features. The Install Wizard Completed screen will appear when done.
-
Select the Advanced Installation option to review and set the configuration options for the installation. The Install Wizard will continue to the next step.
-
The SQL Option screen appears. Select to use an existing SQL server or to install SQL Express and then click Next. If you choose to install SQL Express, a series of installation screens will appear while SQL Express is being installed.
-
The Installation screen appears and will remain open. The Recommended Components screen will appear in a separate window. You will be prompted if there are applications using files that need to be updated by the installer.
-
The Recommended Components for This Computer screen appears. By default, only the Directory Sync Pro for Active Directory components are selected. To install Migrator Pro for Active Directory, select the Directory Sync Pro / Migrator Pro Console, Migrator Pro for Active Directory, and (optionally) Migrator Pro for Active Directory Reports components and click Next to continue.
-
The Installation Directory screen appears. Both Directory Sync Pro for Active Directory and Migrator Pro for Active Directory are installed in the same directory. Click Browse to choose a different install location. Click Next to continue.
-
The Device Log Virtual Directory screen appears. Click Browse to choose a different location where device logs will be written. Click Next to continue.
-
The File Location for Download Jobs screen appears. Click Browse to choose a different location where download jobs will be saved. Click Next to continue.
-
The Database Server Login screen appears. Enter the SQL Database Server location, credential information, and database name. Click Next to continue. If you chose to install SQL Server Express, the installer sets the “sa” account with the default password “Password1”.
-
The Database Server Login screen appears again, this time for the logging database. Enter the SQL Database Server location for the logging database, credential information, and database name. Click Next to continue.
-
If you selected to connect using Windows Authentication on the previous screen, a screen to enter domain username and password appears. Enter the domain user in DOMAIN\username format and the password. Click Next to continue.
-
If you selected to install the optional Reporting feature, the SQL Report Server screen appears. Enter the Report Server URL and select the appropriate Connection Credential and Data Credential options. Clicking the Test button to verify the SSRS connection credential is a best practice. See the Appendix of this document for information on verifying the Report Server URL. Click Next to continue. If SQL Server Reporting Services (SSRS) is not set up, click Skip and OK on the confirmation window.
|
|
The Connection Credential requires an account that has the Content Manager role and the System Administrator role defined on the SQL Server Reporting Server. The Data Credential requires an account that has permission on the SQL Server Reporting Services database. These permissions are typically the database-level roles db_datareader and db_datawriter but should be verified by the SQL Server Reporting Services database administrator. Reports will not appear in the Migrator Pro for Active Directory Console UI if the installation of the Reporting feature is skipped. To install the Reporting feature at a later time, select to Modify the installation from the Programs and Features page in the Control Panel. When an AD credential is used as the Data Credential on the SQL Report Server screen in the Migrator Pro for Active Directory installer, the Windows Credential check box is not checked. This will need to be changed manually in the DataSource in the Report Server after installation is completed. |
-
The Ready to Install screen appears. Click Install to begin the installation.
-
When the installation completes, the InstallShield Wizard Complete message appears. Click Finish.
Also, click Finish on the Installation window.
|
|
If upgrading from a previous version of Directory Sync Pro for Active Directory, you must delete the C:\Windows\BTPass folder from all domain controllers being used in the Directory Sync Pro for Active Directory profiles. A new version of BTPass will be pushed to the domain controllers on the next sync. |
-
The Apps screen or Start Menu is updated and the Migrator Pro for Active Directory and Directory Sync Pro for Active Directory icons are added to the desktop.
Apps screen:
Desktop icons:
If planning to use the Password Copy functionality of Active Directory Pro Synchronization, PsExec must be installed in the Directory Sync Pro for Active Directory program directory (C:\Program Files\Binary Tree\DirSync). Ignore the PSTools Installation Guide concerning the proper installation location. PsExec is available at: https://technet.microsoft.com/en-us/sysinternals/bb897553
The Upload Logs functionality requires the following actions to work:
-
Enable BITS on the Migrator Pro for Active Directory server.
-
Update the c:\windows\system32\inetsrv\applicationhost.config file to include a physical path (C:\Program Files\Binary Tree\DirSync\DeviceLogs\) for the application path="/adm/DeviceLogs" under the Default Web Site. Then, reset IIS.
5.1 Browser Requirements
4.1 Migrator Pro for Active Directory Basic Installation Requirements
The Migrator Pro for Active Directory suite consists of Binary Tree Migrator Pro for Active Directory, which includes both the console and the Web service, and Directory Sync Pro for Active Directory software packages. Both packages will require access to Microsoft SQL Server. In most environments, all of these components will be installed on the same server.
Single Server Installation Requirements
|
Supported Operating Systems |
|
|
SQL Server Requirements |
|
|
Minimum Hardware Requirements |
|
|
Additional Components |
|
If you are planning to have a long-term co-existence (1 year+), we recommend using the following formula to determine if you should use a full edition of SQL Server with our products. This formula assumes High / Verbose logging turned on for all profiles = worst case scenario.
Formula: (Expected months of co-existence x Users) x Profiles = N
If calculated N >= 12000 then we recommend full edition of SQL Server.
-
Low example: 3 months x 300 users x 1 profile = 900
-
Medium example: 6 months x 1000 users x 2 profiles = 12000
-
High example: 12 months x 3000 users x 5 profiles = 180,000
-
Extreme example: 14 months x 6000 users x 7 profiles = 588,000
Multi-Server Installation Requirements
Migrator Pro for Active Directory is scalable and supports segregating components and can be installed in a multi-server configuration to support larger or complex environments.
If required in larger installations, remote SQL Servers may be used for the primary database and the logging database. Additionally, the primary database and the logging database can be segregated onto separate SQL Server instances.
Each of the following roles/functions may be separated onto different servers as required in advanced configurations:
-
Directory Sync Pro for Active Directory/Migrator Pro for Active Directory Administrative Web Interface
-
Migrator Pro for Active Directory Web Service
-
Directory Sync Pro for Active Directory Databases
When installed independently, the components require the following resources:
|
Supported Operating Systems |
|
|
Migrator Pro for Active Directory Split Role Minimum Hardware Requirements |
|
|
Directory Sync Pro for Active Directory Hardware Requirements |
|
|
SQL Server |
|
|
Additional Components |
|
Report Server Requirements
|
SQL Server Requirements |
|
4.2 Workstation and Member Server System Requirements
|
Supported Operating Systems |
|
|
PowerShell Requirements |
|
|
.NET Framework Requirements |
|
4.3 Admin Agent Device Requirements
|
Operating System Requirements |
|
|
Supported Operating Systems |
|
|
Additional Requirements |
|
4.4 Networking Requirements
Domain Controller Access
For most scenarios, Migrator Pro for Active Directory requires access to at least one read/write domain controller running Windows 2003 SP2 or newer in each source and target Active Directory domain. For fault tolerance, at least two domain controllers in each source and target domain is recommended.
If SID History will be synchronized, any domain controller listed in the Target DCs tab within a Directory Sync Pro for Active Directory profile will require access to the domain controller holding the PDC Emulator Active Directory FSMO role in the source. Keep in mind that even if the domain controller holding the PDC Emulator Active Directory FSMO role is not listed in the Source DCs tab, any SID History migration attempts will require a DC in the target to communicate with the PDC Emulator domain controller. For this reason, it is a best practice to ensure that all domain controllers specified on the Target DCs screen within a Directory Sync Pro for Active Directory profile have the appropriate networks access to communicate with the source domain controller holding the PDC Emulator Active Directory FSMO role before a SID History migration is attempted.
In limited scenarios, it is possible that Migrator Pro for Active Directory will not be responsible for creating or updating any accounts in the source or the target domains. In this scenario, Migrator Pro for Active Directory can be configured to communicate with Read Only Domain Controllers (RODCs).
Network/Firewall Requirements
Migrator Pro for Active Directory requires the following network ports to enable full functionality:
|
Source |
Target |
Port/Protocol |
|
Workstations and Member Servers |
Migrator Pro for Active Directory Server |
443 (TCP) or 80 (TCP) |
|
Migrator Pro for Active Directory Server |
Source and Target Domain Controllers running Windows Server 2003 |
135, 137, 389, 445, 1024-5000 (TCP) 389 (UDP) |
|
Migrator Pro for Active Directory Server |
Source and Target Domain Controllers running Windows Server 2008 or newer |
135, 137, 389, 445, 49152-65535 (TCP) 389 (UDP) |
|
Target domain controllers listed in the Target DCs tab |
Domain controller in the source environment holding the PDC Emulator Active Directory FSMO role |
135, 137, 139, 389, 445, 3268 and 49152-65535 (TCP) 389 (UDP) |
The following ports need to be opened between workstations/servers and writable domain controllers for a successful domain join operation:
|
Type of Traffic |
Protocol and Port |
|
DNS |
TCP/UDP 53 |
|
Kerberos |
TCP/UDP 88 |
|
EPM |
TCP 135 |
|
NetLogon, NetBIOS Name Resolution |
UDP 137 |
|
DFSN, NetLogon, NetBIOS Datagram Service |
UDP 138 |
|
DFSN, NetBIOS Session Service, NetLogon |
TCP 139 |
|
C-LDAP |
TCP/UDP 389 |
|
DFS, LsaRpc, NbtSS, NetLogonR, SamR, SMB, SrvSvc |
TCP/UDP 445 |
|
LDAP SSL |
TCP 636 |
|
Random RPC |
TCP 1024-5000 |
|
GC |
TCP 3268 |
|
GC |
TCP 3269 |
|
DFS-R |
TCP 5722 |
|
Random RPC |
TCP 49152-65535 |
4.5 SSL Certificate Requirements
Migrator Pro for Active Directory does not require HTTPS (HTTP with SSL), and can operate using HTTP. However, it is strongly recommended to implement Migrator Pro for Active Directory using HTTPS to secure communications between the devices to be migrated and the Migrator Pro for Active Directory Server. In order to activate HTTPS on the IIS component in Windows, the Migrator Pro for Active Directory system will require that a SSL certificate is present.
An SSL Certificate is not provided as part of the installation. For the most secure installation, purchasing an SSL Certificate from a Windows supported 3rd party provider is recommended.
In scenarios where this is not possible, self-signed SSL Certificate can be generated in Windows following these directions: https://technet.microsoft.com/en-us/library/cc753127(v=ws.10).aspx
If using a self-signed certificate, it should be noted that Migrator Pro for Active Directory’s agent component would utilize the operating system’s certificate trust list. Due to the security nature of Active Directory migrations, there is no method of implementing an override and forcing the agent to use an untrusted certificate. If a self-signed certificate is used, that certificate will need to be added to the trusted root certificate list for all computer objects to be migrated. This can be accomplished via group policy: https://technet.microsoft.com/en-us/library/cc738131(v=ws.10).aspx
4.6 Service Account Requirements
Migrator Pro for Active Directory requires the following user account permissions and privileges to support Active Directory migrations:
-
One service account with read/write access to all organizational units (OUs) containing user, group, and computer objects in the source Active Directory to be migrated to the target environment.
-
One service account with administrative rights on the target domain(s)
-
If administrative rights cannot be granted, the service account requires the following rights:
-
The ability to create and modify user objects in the desired OUs in the target Active Directory environment.
-
Read Permissions to the configuration container in Active Directory
-
User credentials with the delegated migrateSIDHistory extended right.
-
-
-
A service account in each source and target domain with the ability to modify computer objects and add computers to the domain.
4.7 SQL Server Reporting Services (SSRS) Account Requirements
Migrator Pro for Active Directory's Reporting feature requires credentials in the following places:
-
Content credential: Credential for accessing the report server content.
You must set the securities in two different places in the SSRS ‘Report Manager’ web interface (http://<servername>/Reports) to connect to the report server and upload reports from the installation program.
In the Site Settings, you MUST enable the ‘System Administrator’ role during installation. After installation is complete, you may change this user’s role to ‘System User’ if desired.
In the Folder Settings, you must add the same user with (at least) ‘Browser’ permission.
-
Data Source Credential: The Data Source is used to access queries in the ADM database. These credentials and roles are set in the SQL server with SSMS
The user must have public, db_reader, and db_executor roles on the ADM database.
The user must have the public role on the report server and report server temp databases.
4.8 DNS SRV Record Requirement
In each source domain, a SRV DNS record must be created to enable autodiscover for Migrator Pro for Active Directory agents.
-
To enable autodiscover when HTTPS is desired
-
Record Name: _btadm._https.SourceDomainName.Local
-
Weight and Priority: 0
-
Port Number: 443
-
-
To enable autodiscover when HTTP is desired
-
Record Name: _btadm._http.SourceDomainName.Local
-
Weight and Priority: 0
-
Port Number: 80
-
4.9 Directory Sync Pro for Active Directory Requirement for Synchronizing Passwords
If you are planning to use the Password Copy functionality of Migrator Pro for Active Directory, PsExec must be installed in the Directory Sync Pro for Active Directory program directory (C:\Program Files\Binary Tree\DirSync). Ignore the PSExec Installation Guide concerning the proper installation location. PsExec is available at: https://technet.microsoft.com/en-us/sysinternals/bb897553
4.10 Offline Domain Join (ODJ) Requirements
In order to successfully facilitate the new Cached Credentials job (which supports the Offline Domain Join feature) a one-way external trust must be configured from the source domain to the target domain.
The devices that the ODJ process is being run on must have network connectivity to BOTH the source and target environments at the same time in order to have the Cached Credentials function work properly.
Offline domain join files must be created prior to running the Offline Domain Join process. A full explanation of Microsoft’s Djoin.exe utility and how to create these files can be found here:
https://technet.microsoft.com/en-us/library/offline-domain-join-djoin-step-by-step%28v=ws.10%29.aspx
Section 5. Requirements for Both Directory Sync Pro for Active Directory and Migrator Pro for Active Directory
Directory Sync Pro for Active Directory uses a browser-based user interface. We recommend using Chrome or Firefox for the best browser experience.
The browser Download settings should be configured to ask you where to save files before downloading.
5.2 SID History and Password Synchronization Requirements
SID History Synchronization Requirements
Microsoft requires an administrative account in the source domain.
In order to support synchronization of SID History from the source to the target domains, Windows requires that a specific domain local group exists and that account auditing is enabled.
The source and target domains must not have the same NETBIOS name to allow the required trust between the two environments.
Communication between a Source PDC and the configured Target GC is required for SID History Migration to successfully complete. Please note, there are additional ports that must be open between the Source PDC and the configured Target GC as defined in Section 3. Directory Sync Pro for Active Directory Advanced Network Requirement’s (Directory Sync Pro for Active Directory Profile with SID History Synchronization selected) of this document.
Preparing the Source and Target Domains
To prepare each source and target domain for SID History Synchronization, the following configuration steps must be completed:
-
In the source domain, create a local group called SourceDomain$$$, where SourceDomain is the NetBIOS name of your source domain. For example, if your domain's NetBIOS name is ADM, you must create a domain local group named ADM$$$.
|
|
SID History synchronization will fail if members are added to this local group. |
-
Enable TCP/IP client support on the source domain PDC emulator:
-
On the domain controller in the source domain that holds the PDC emulator operations master (also known as flexible single master operations or FSMO) role, click Start, and then click Run.
-
In Open, type regedit, and then click OK.
-
In Registry Editor, navigate to the following registry subkey:
HKEY_LOCAL_MACHINE\SYSTEM\CurrentControlSet\Control\LSA
-
Modify the registry entry TcpipClientSupport, of data type REG_DWORD, by setting the value to 1.
-
Close Registry Editor, and then restart the computer.
-
-
Enable auditing in the target domain:
-
Log on as an administrator to any domain controller in the target domain.
-
Click Start, point to All Programs, point to Administrative Tools, and then click Group Policy Management.
-
Navigate to the following node: Forest | Domains | Domain Name | Domain Controllers | Default Domain Controllers Policy
-
Right-click Default Domain Controllers Policy and click Edit.
-
In Group Policy Management Editor, in the console tree, navigate to the following node: Computer Configuration | Policies | Windows Settings | Security Settings | Local Policies | Audit Policy
-
In the details pane, right-click Audit account management, and then click Properties.
-
Click Define these policy settings, and then click Success and Failure.
-
Click Apply, and then click OK.
-
In the details pane, right-click Audit directory service access and then click Properties.
-
Click Define these policy settings and then click Success.
-
Click Apply, and then click OK.
-
If the changes need to be immediately reflected on the domain controller, open an elevated command prompt and type gpupdate /force.
-
Repeat the above steps in the source domain.
-
|
|
It may also be necessary to reboot the domain controller to have auditing take effect. Even with group policy applied on the default domain controller for the domain audit, the server audit setting on the primary domain controller (PDC) may not be enabled. Please confirm this setting is enabled for the local security policy on the PDC server. If not enabled, use the local security policy to enable this setting. |
Validate Cross-Domain Verification
In order to receive the maximum benefit a trust should be in place. When a trust is present, it is necessary to ensure that the trust is properly configured to permit cross-domain verification. To do so, first identify if the trust between the source and target domain is an external trust or a forest trust. Next, following commands must be run from an administrative command prompt:
If the trust between the source and target is an external trust:
-
From the source domain:
-
Netdom trust SourceDomain /domain: TargetDomain /quarantine:No /user: domainadministratorAcct /password: domainadminpwd
-
-
From the target domain:
-
Netdom trust TargetDomain /domain: SourceDomain /quarantine:No /user: domainadministratorAcct /password: domainadminpwd
-
If the trust between the source and target is a forest trust:
-
From the source domain:
-
Netdom trust SourceDomain /domain: TargetDomain /enablesIDHistory:Yes /user: domainadministratorAcct /password: domainadminpwd
-
-
From the target domain:
-
Netdom trust TargetDomain /domain: SourceDomain /enablesIDHistory:Yes /user: domainadministratorAcct /password: domainadminpwd
-
Domain Controller Access
If SID History will be synchronized, any Domain Controller listed in the Target DCs tab within a Directory Sync Pro for Active Directory profile will require access to the Domain Controller holding the PDC Emulator Active Directory FSMO role in the source. Keep in mind that even if the Domain Controller holding the PDC Emulator Active Directory FSMO role is not listed in the Source DCs tab, any SID History migration attempts will require a DC in the target to communicate with the PDC Emulator domain controller. For this reason, it is a best practice to ensure that all Domain Controllers specified in the Target DCs tab within a Directory Sync Pro for Active Directory profile has the appropriate networks access to communicate with the source Domain Controller holding the PDC Emulator Active Directory FSMO role before a SID History migration is attempted.
Password Synchronization Requirements
The domain controller with the PDC Emulator FSMO role must not be configured to run LSASS as a protected service or the password sync will fail with an access denied error.
5.3 Password Requirements
Directory Sync Pro for Active Directory and Migrator Pro for Active Directory do not validate the password policies present within your domains. Verify that the password entered as the Default Password complies with the password policy of your target environment. Objects will fail to be created if the password violates that policy.
5.4 Internet Requirement for Online Help and Video Tutorials
An internet connection is required to access the online help system and video tutorials.
-
Within the Directory Sync Pro for Active Directory/Migrator Pro for Active Directory interface, the online help system can be accessed by clicking “HELP” in the pull-down menu
and the video tutorials can be accessed by clicking the
icons found throughout the application. Relevant topics in the online help system can be found using the Search bar at top of the page or navigated to while viewing topics by clicking on a topic in the list on the left side of the page. Individual topics can be printed by using the browser’s Print function.
-
Windows Server operating systems will need to have the Desktop Experience feature (or a video codec) installed to view the video tutorials.
Section 6. Installing Directory Sync Pro for Active Directory and Migrator Pro for Active Directory
The Binary Tree Directory Sync Pro for Active Directory and Migrator Pro for Active Directory installer can be used to install both Directory Sync Pro for Active Directory and Migrator Pro for Active Directory at the same time or individually. Migrator Pro for Active Directory should only be installed at the same time as Directory Sync Pro for Active Directory or if it has previously been installed on the same server.
This guide includes the steps for installing Directory Sync Pro for Active Directory and Migrator Pro for Active Directory at the same time. Installing Directory Sync Pro for Active Directory first and running the installer again to install the Migrator Pro for Active Directory components is another option.
The installer creates a local group on the Directory Sync Pro for Active Directory server named BTDirSyncPro and will add the currently logged in user to the group. Other users or a Domain group can be added to provide access to other users.
|
|
It is recommended to select “SQL Server Authentication” during the Directory Sync Pro for Active Directory/Migrator Pro for Active Directory server console installation if multiple people will be accessing the Directory Sync Pro for Active Directory/Migrator Pro for Active Directory web user interfaces. Otherwise, if “Windows Authentication” is chosen during installation, create a security group in AD and assign DB Owner rights to the Directory Sync Pro for Active Directory SQL databases and add all the users that need access to the console as members. |
6.1 Installing Directory Sync Pro for Active Directory and Migrator Pro for Active Directory on a Windows Server
-
Download the installer executable file from the FTP site and save it on the Binary Tree Windows Server.
-
Double-click the executable to begin installing Migrator Pro for Active Directory. The Welcome screen appears. Click Next to continue.
-
The License Agreement screen appears. To accept the terms of the license agreement and continue with the install, select “I accept the terms in the license agreement” and click Next.
-
The Setup Type screen appears.
-
Select Default Installation to install Directory Sync Pro for Active Directory and/or Migrator Pro for Active Directory with the default configuration options. A series of screens will appear while installing the needed databases and features. The Install Wizard Completed screen will appear when done.
-
Select the Advanced Installation option to review and set the configuration options for the installation. The Install Wizard will continue to the next step.
-
The SQL Option screen appears. Select to use an existing SQL server or to install SQL Express and then click Next. If you choose to install SQL Express, a series of installation screens will appear while SQL Express is being installed.
-
The Installation screen appears and will remain open. The Recommended Components screen will appear in a separate window. You will be prompted if there are applications using files that need to be updated by the installer.
-
The Recommended Components for This Computer screen appears. By default, only the Directory Sync Pro for Active Directory components are selected. To install Migrator Pro for Active Directory, select the Directory Sync Pro / Migrator Pro Console, Migrator Pro for Active Directory, and (optionally) Migrator Pro for Active Directory Reports components and click Next to continue.
-
The Installation Directory screen appears. Both Directory Sync Pro for Active Directory and Migrator Pro for Active Directory are installed in the same directory. Click Browse to choose a different install location. Click Next to continue.
-
The Device Log Virtual Directory screen appears. Click Browse to choose a different location where device logs will be written. Click Next to continue.
-
The File Location for Download Jobs screen appears. Click Browse to choose a different location where download jobs will be saved. Click Next to continue.
-
The Database Server Login screen appears. Enter the SQL Database Server location, credential information, and database name. Click Next to continue. If you chose to install SQL Server Express, the installer sets the “sa” account with the default password “Password1”.
-
The Database Server Login screen appears again, this time for the logging database. Enter the SQL Database Server location for the logging database, credential information, and database name. Click Next to continue.
-
If you selected to connect using Windows Authentication on the previous screen, a screen to enter domain username and password appears. Enter the domain user in DOMAIN\username format and the password. Click Next to continue.
-
If you selected to install the optional Reporting feature, the SQL Report Server screen appears. Enter the Report Server URL and select the appropriate Connection Credential and Data Credential options. Clicking the Test button to verify the SSRS connection credential is a best practice. See the Appendix of this document for information on verifying the Report Server URL. Click Next to continue. If SQL Server Reporting Services (SSRS) is not set up, click Skip and OK on the confirmation window.
|
|
The Connection Credential requires an account that has the Content Manager role and the System Administrator role defined on the SQL Server Reporting Server. The Data Credential requires an account that has permission on the SQL Server Reporting Services database. These permissions are typically the database-level roles db_datareader and db_datawriter but should be verified by the SQL Server Reporting Services database administrator. Reports will not appear in the Migrator Pro for Active Directory Console UI if the installation of the Reporting feature is skipped. To install the Reporting feature at a later time, select to Modify the installation from the Programs and Features page in the Control Panel. When an AD credential is used as the Data Credential on the SQL Report Server screen in the Migrator Pro for Active Directory installer, the Windows Credential check box is not checked. This will need to be changed manually in the DataSource in the Report Server after installation is completed. |
-
The Ready to Install screen appears. Click Install to begin the installation.
-
When the installation completes, the InstallShield Wizard Complete message appears. Click Finish.
Also, click Finish on the Installation window.
|
|
If upgrading from a previous version of Directory Sync Pro for Active Directory, you must delete the C:\Windows\BTPass folder from all domain controllers being used in the Directory Sync Pro for Active Directory profiles. A new version of BTPass will be pushed to the domain controllers on the next sync. |
-
The Apps screen or Start Menu is updated and the Migrator Pro for Active Directory and Directory Sync Pro for Active Directory icons are added to the desktop.
Apps screen:
Desktop icons:
If planning to use the Password Copy functionality of Active Directory Pro Synchronization, PsExec must be installed in the Directory Sync Pro for Active Directory program directory (C:\Program Files\Binary Tree\DirSync). Ignore the PSTools Installation Guide concerning the proper installation location. PsExec is available at: https://technet.microsoft.com/en-us/sysinternals/bb897553
The Upload Logs functionality requires the following actions to work:
-
Enable BITS on the Migrator Pro for Active Directory server.
-
Update the c:\windows\system32\inetsrv\applicationhost.config file to include a physical path (C:\Program Files\Binary Tree\DirSync\DeviceLogs\) for the application path="/adm/DeviceLogs" under the Default Web Site. Then, reset IIS.
5.2 SID History and Password Synchronization Requirements
4.1 Migrator Pro for Active Directory Basic Installation Requirements
The Migrator Pro for Active Directory suite consists of Binary Tree Migrator Pro for Active Directory, which includes both the console and the Web service, and Directory Sync Pro for Active Directory software packages. Both packages will require access to Microsoft SQL Server. In most environments, all of these components will be installed on the same server.
Single Server Installation Requirements
|
Supported Operating Systems |
|
|
SQL Server Requirements |
|
|
Minimum Hardware Requirements |
|
|
Additional Components |
|
If you are planning to have a long-term co-existence (1 year+), we recommend using the following formula to determine if you should use a full edition of SQL Server with our products. This formula assumes High / Verbose logging turned on for all profiles = worst case scenario.
Formula: (Expected months of co-existence x Users) x Profiles = N
If calculated N >= 12000 then we recommend full edition of SQL Server.
-
Low example: 3 months x 300 users x 1 profile = 900
-
Medium example: 6 months x 1000 users x 2 profiles = 12000
-
High example: 12 months x 3000 users x 5 profiles = 180,000
-
Extreme example: 14 months x 6000 users x 7 profiles = 588,000
Multi-Server Installation Requirements
Migrator Pro for Active Directory is scalable and supports segregating components and can be installed in a multi-server configuration to support larger or complex environments.
If required in larger installations, remote SQL Servers may be used for the primary database and the logging database. Additionally, the primary database and the logging database can be segregated onto separate SQL Server instances.
Each of the following roles/functions may be separated onto different servers as required in advanced configurations:
-
Directory Sync Pro for Active Directory/Migrator Pro for Active Directory Administrative Web Interface
-
Migrator Pro for Active Directory Web Service
-
Directory Sync Pro for Active Directory Databases
When installed independently, the components require the following resources:
|
Supported Operating Systems |
|
|
Migrator Pro for Active Directory Split Role Minimum Hardware Requirements |
|
|
Directory Sync Pro for Active Directory Hardware Requirements |
|
|
SQL Server |
|
|
Additional Components |
|
Report Server Requirements
|
SQL Server Requirements |
|
4.2 Workstation and Member Server System Requirements
|
Supported Operating Systems |
|
|
PowerShell Requirements |
|
|
.NET Framework Requirements |
|
4.3 Admin Agent Device Requirements
|
Operating System Requirements |
|
|
Supported Operating Systems |
|
|
Additional Requirements |
|
4.4 Networking Requirements
Domain Controller Access
For most scenarios, Migrator Pro for Active Directory requires access to at least one read/write domain controller running Windows 2003 SP2 or newer in each source and target Active Directory domain. For fault tolerance, at least two domain controllers in each source and target domain is recommended.
If SID History will be synchronized, any domain controller listed in the Target DCs tab within a Directory Sync Pro for Active Directory profile will require access to the domain controller holding the PDC Emulator Active Directory FSMO role in the source. Keep in mind that even if the domain controller holding the PDC Emulator Active Directory FSMO role is not listed in the Source DCs tab, any SID History migration attempts will require a DC in the target to communicate with the PDC Emulator domain controller. For this reason, it is a best practice to ensure that all domain controllers specified on the Target DCs screen within a Directory Sync Pro for Active Directory profile have the appropriate networks access to communicate with the source domain controller holding the PDC Emulator Active Directory FSMO role before a SID History migration is attempted.
In limited scenarios, it is possible that Migrator Pro for Active Directory will not be responsible for creating or updating any accounts in the source or the target domains. In this scenario, Migrator Pro for Active Directory can be configured to communicate with Read Only Domain Controllers (RODCs).
Network/Firewall Requirements
Migrator Pro for Active Directory requires the following network ports to enable full functionality:
|
Source |
Target |
Port/Protocol |
|
Workstations and Member Servers |
Migrator Pro for Active Directory Server |
443 (TCP) or 80 (TCP) |
|
Migrator Pro for Active Directory Server |
Source and Target Domain Controllers running Windows Server 2003 |
135, 137, 389, 445, 1024-5000 (TCP) 389 (UDP) |
|
Migrator Pro for Active Directory Server |
Source and Target Domain Controllers running Windows Server 2008 or newer |
135, 137, 389, 445, 49152-65535 (TCP) 389 (UDP) |
|
Target domain controllers listed in the Target DCs tab |
Domain controller in the source environment holding the PDC Emulator Active Directory FSMO role |
135, 137, 139, 389, 445, 3268 and 49152-65535 (TCP) 389 (UDP) |
The following ports need to be opened between workstations/servers and writable domain controllers for a successful domain join operation:
|
Type of Traffic |
Protocol and Port |
|
DNS |
TCP/UDP 53 |
|
Kerberos |
TCP/UDP 88 |
|
EPM |
TCP 135 |
|
NetLogon, NetBIOS Name Resolution |
UDP 137 |
|
DFSN, NetLogon, NetBIOS Datagram Service |
UDP 138 |
|
DFSN, NetBIOS Session Service, NetLogon |
TCP 139 |
|
C-LDAP |
TCP/UDP 389 |
|
DFS, LsaRpc, NbtSS, NetLogonR, SamR, SMB, SrvSvc |
TCP/UDP 445 |
|
LDAP SSL |
TCP 636 |
|
Random RPC |
TCP 1024-5000 |
|
GC |
TCP 3268 |
|
GC |
TCP 3269 |
|
DFS-R |
TCP 5722 |
|
Random RPC |
TCP 49152-65535 |
4.5 SSL Certificate Requirements
Migrator Pro for Active Directory does not require HTTPS (HTTP with SSL), and can operate using HTTP. However, it is strongly recommended to implement Migrator Pro for Active Directory using HTTPS to secure communications between the devices to be migrated and the Migrator Pro for Active Directory Server. In order to activate HTTPS on the IIS component in Windows, the Migrator Pro for Active Directory system will require that a SSL certificate is present.
An SSL Certificate is not provided as part of the installation. For the most secure installation, purchasing an SSL Certificate from a Windows supported 3rd party provider is recommended.
In scenarios where this is not possible, self-signed SSL Certificate can be generated in Windows following these directions: https://technet.microsoft.com/en-us/library/cc753127(v=ws.10).aspx
If using a self-signed certificate, it should be noted that Migrator Pro for Active Directory’s agent component would utilize the operating system’s certificate trust list. Due to the security nature of Active Directory migrations, there is no method of implementing an override and forcing the agent to use an untrusted certificate. If a self-signed certificate is used, that certificate will need to be added to the trusted root certificate list for all computer objects to be migrated. This can be accomplished via group policy: https://technet.microsoft.com/en-us/library/cc738131(v=ws.10).aspx
4.6 Service Account Requirements
Migrator Pro for Active Directory requires the following user account permissions and privileges to support Active Directory migrations:
-
One service account with read/write access to all organizational units (OUs) containing user, group, and computer objects in the source Active Directory to be migrated to the target environment.
-
One service account with administrative rights on the target domain(s)
-
If administrative rights cannot be granted, the service account requires the following rights:
-
The ability to create and modify user objects in the desired OUs in the target Active Directory environment.
-
Read Permissions to the configuration container in Active Directory
-
User credentials with the delegated migrateSIDHistory extended right.
-
-
-
A service account in each source and target domain with the ability to modify computer objects and add computers to the domain.
4.7 SQL Server Reporting Services (SSRS) Account Requirements
Migrator Pro for Active Directory's Reporting feature requires credentials in the following places:
-
Content credential: Credential for accessing the report server content.
You must set the securities in two different places in the SSRS ‘Report Manager’ web interface (http://<servername>/Reports) to connect to the report server and upload reports from the installation program.
In the Site Settings, you MUST enable the ‘System Administrator’ role during installation. After installation is complete, you may change this user’s role to ‘System User’ if desired.
In the Folder Settings, you must add the same user with (at least) ‘Browser’ permission.
-
Data Source Credential: The Data Source is used to access queries in the ADM database. These credentials and roles are set in the SQL server with SSMS
The user must have public, db_reader, and db_executor roles on the ADM database.
The user must have the public role on the report server and report server temp databases.
4.8 DNS SRV Record Requirement
In each source domain, a SRV DNS record must be created to enable autodiscover for Migrator Pro for Active Directory agents.
-
To enable autodiscover when HTTPS is desired
-
Record Name: _btadm._https.SourceDomainName.Local
-
Weight and Priority: 0
-
Port Number: 443
-
-
To enable autodiscover when HTTP is desired
-
Record Name: _btadm._http.SourceDomainName.Local
-
Weight and Priority: 0
-
Port Number: 80
-
4.9 Directory Sync Pro for Active Directory Requirement for Synchronizing Passwords
If you are planning to use the Password Copy functionality of Migrator Pro for Active Directory, PsExec must be installed in the Directory Sync Pro for Active Directory program directory (C:\Program Files\Binary Tree\DirSync). Ignore the PSExec Installation Guide concerning the proper installation location. PsExec is available at: https://technet.microsoft.com/en-us/sysinternals/bb897553
4.10 Offline Domain Join (ODJ) Requirements
In order to successfully facilitate the new Cached Credentials job (which supports the Offline Domain Join feature) a one-way external trust must be configured from the source domain to the target domain.
The devices that the ODJ process is being run on must have network connectivity to BOTH the source and target environments at the same time in order to have the Cached Credentials function work properly.
Offline domain join files must be created prior to running the Offline Domain Join process. A full explanation of Microsoft’s Djoin.exe utility and how to create these files can be found here:
https://technet.microsoft.com/en-us/library/offline-domain-join-djoin-step-by-step%28v=ws.10%29.aspx
Section 5. Requirements for Both Directory Sync Pro for Active Directory and Migrator Pro for Active Directory
5.1 Browser Requirements
Directory Sync Pro for Active Directory uses a browser-based user interface. We recommend using Chrome or Firefox for the best browser experience.
The browser Download settings should be configured to ask you where to save files before downloading.
SID History Synchronization Requirements
Microsoft requires an administrative account in the source domain.
In order to support synchronization of SID History from the source to the target domains, Windows requires that a specific domain local group exists and that account auditing is enabled.
The source and target domains must not have the same NETBIOS name to allow the required trust between the two environments.
Communication between a Source PDC and the configured Target GC is required for SID History Migration to successfully complete. Please note, there are additional ports that must be open between the Source PDC and the configured Target GC as defined in Section 3. Directory Sync Pro for Active Directory Advanced Network Requirement’s (Directory Sync Pro for Active Directory Profile with SID History Synchronization selected) of this document.
Preparing the Source and Target Domains
To prepare each source and target domain for SID History Synchronization, the following configuration steps must be completed:
-
In the source domain, create a local group called SourceDomain$$$, where SourceDomain is the NetBIOS name of your source domain. For example, if your domain's NetBIOS name is ADM, you must create a domain local group named ADM$$$.
|
|
SID History synchronization will fail if members are added to this local group. |
-
Enable TCP/IP client support on the source domain PDC emulator:
-
On the domain controller in the source domain that holds the PDC emulator operations master (also known as flexible single master operations or FSMO) role, click Start, and then click Run.
-
In Open, type regedit, and then click OK.
-
In Registry Editor, navigate to the following registry subkey:
HKEY_LOCAL_MACHINE\SYSTEM\CurrentControlSet\Control\LSA
-
Modify the registry entry TcpipClientSupport, of data type REG_DWORD, by setting the value to 1.
-
Close Registry Editor, and then restart the computer.
-
-
Enable auditing in the target domain:
-
Log on as an administrator to any domain controller in the target domain.
-
Click Start, point to All Programs, point to Administrative Tools, and then click Group Policy Management.
-
Navigate to the following node: Forest | Domains | Domain Name | Domain Controllers | Default Domain Controllers Policy
-
Right-click Default Domain Controllers Policy and click Edit.
-
In Group Policy Management Editor, in the console tree, navigate to the following node: Computer Configuration | Policies | Windows Settings | Security Settings | Local Policies | Audit Policy
-
In the details pane, right-click Audit account management, and then click Properties.
-
Click Define these policy settings, and then click Success and Failure.
-
Click Apply, and then click OK.
-
In the details pane, right-click Audit directory service access and then click Properties.
-
Click Define these policy settings and then click Success.
-
Click Apply, and then click OK.
-
If the changes need to be immediately reflected on the domain controller, open an elevated command prompt and type gpupdate /force.
-
Repeat the above steps in the source domain.
-
|
|
It may also be necessary to reboot the domain controller to have auditing take effect. Even with group policy applied on the default domain controller for the domain audit, the server audit setting on the primary domain controller (PDC) may not be enabled. Please confirm this setting is enabled for the local security policy on the PDC server. If not enabled, use the local security policy to enable this setting. |
Validate Cross-Domain Verification
In order to receive the maximum benefit a trust should be in place. When a trust is present, it is necessary to ensure that the trust is properly configured to permit cross-domain verification. To do so, first identify if the trust between the source and target domain is an external trust or a forest trust. Next, following commands must be run from an administrative command prompt:
If the trust between the source and target is an external trust:
-
From the source domain:
-
Netdom trust SourceDomain /domain: TargetDomain /quarantine:No /user: domainadministratorAcct /password: domainadminpwd
-
-
From the target domain:
-
Netdom trust TargetDomain /domain: SourceDomain /quarantine:No /user: domainadministratorAcct /password: domainadminpwd
-
If the trust between the source and target is a forest trust:
-
From the source domain:
-
Netdom trust SourceDomain /domain: TargetDomain /enablesIDHistory:Yes /user: domainadministratorAcct /password: domainadminpwd
-
-
From the target domain:
-
Netdom trust TargetDomain /domain: SourceDomain /enablesIDHistory:Yes /user: domainadministratorAcct /password: domainadminpwd
-
Domain Controller Access
If SID History will be synchronized, any Domain Controller listed in the Target DCs tab within a Directory Sync Pro for Active Directory profile will require access to the Domain Controller holding the PDC Emulator Active Directory FSMO role in the source. Keep in mind that even if the Domain Controller holding the PDC Emulator Active Directory FSMO role is not listed in the Source DCs tab, any SID History migration attempts will require a DC in the target to communicate with the PDC Emulator domain controller. For this reason, it is a best practice to ensure that all Domain Controllers specified in the Target DCs tab within a Directory Sync Pro for Active Directory profile has the appropriate networks access to communicate with the source Domain Controller holding the PDC Emulator Active Directory FSMO role before a SID History migration is attempted.
Password Synchronization Requirements
The domain controller with the PDC Emulator FSMO role must not be configured to run LSASS as a protected service or the password sync will fail with an access denied error.
5.3 Password Requirements
Directory Sync Pro for Active Directory and Migrator Pro for Active Directory do not validate the password policies present within your domains. Verify that the password entered as the Default Password complies with the password policy of your target environment. Objects will fail to be created if the password violates that policy.
5.4 Internet Requirement for Online Help and Video Tutorials
An internet connection is required to access the online help system and video tutorials.
-
Within the Directory Sync Pro for Active Directory/Migrator Pro for Active Directory interface, the online help system can be accessed by clicking “HELP” in the pull-down menu
and the video tutorials can be accessed by clicking the
icons found throughout the application. Relevant topics in the online help system can be found using the Search bar at top of the page or navigated to while viewing topics by clicking on a topic in the list on the left side of the page. Individual topics can be printed by using the browser’s Print function.
-
Windows Server operating systems will need to have the Desktop Experience feature (or a video codec) installed to view the video tutorials.
Section 6. Installing Directory Sync Pro for Active Directory and Migrator Pro for Active Directory
The Binary Tree Directory Sync Pro for Active Directory and Migrator Pro for Active Directory installer can be used to install both Directory Sync Pro for Active Directory and Migrator Pro for Active Directory at the same time or individually. Migrator Pro for Active Directory should only be installed at the same time as Directory Sync Pro for Active Directory or if it has previously been installed on the same server.
This guide includes the steps for installing Directory Sync Pro for Active Directory and Migrator Pro for Active Directory at the same time. Installing Directory Sync Pro for Active Directory first and running the installer again to install the Migrator Pro for Active Directory components is another option.
The installer creates a local group on the Directory Sync Pro for Active Directory server named BTDirSyncPro and will add the currently logged in user to the group. Other users or a Domain group can be added to provide access to other users.
|
|
It is recommended to select “SQL Server Authentication” during the Directory Sync Pro for Active Directory/Migrator Pro for Active Directory server console installation if multiple people will be accessing the Directory Sync Pro for Active Directory/Migrator Pro for Active Directory web user interfaces. Otherwise, if “Windows Authentication” is chosen during installation, create a security group in AD and assign DB Owner rights to the Directory Sync Pro for Active Directory SQL databases and add all the users that need access to the console as members. |
6.1 Installing Directory Sync Pro for Active Directory and Migrator Pro for Active Directory on a Windows Server
-
Download the installer executable file from the FTP site and save it on the Binary Tree Windows Server.
-
Double-click the executable to begin installing Migrator Pro for Active Directory. The Welcome screen appears. Click Next to continue.
-
The License Agreement screen appears. To accept the terms of the license agreement and continue with the install, select “I accept the terms in the license agreement” and click Next.
-
The Setup Type screen appears.
-
Select Default Installation to install Directory Sync Pro for Active Directory and/or Migrator Pro for Active Directory with the default configuration options. A series of screens will appear while installing the needed databases and features. The Install Wizard Completed screen will appear when done.
-
Select the Advanced Installation option to review and set the configuration options for the installation. The Install Wizard will continue to the next step.
-
The SQL Option screen appears. Select to use an existing SQL server or to install SQL Express and then click Next. If you choose to install SQL Express, a series of installation screens will appear while SQL Express is being installed.
-
The Installation screen appears and will remain open. The Recommended Components screen will appear in a separate window. You will be prompted if there are applications using files that need to be updated by the installer.
-
The Recommended Components for This Computer screen appears. By default, only the Directory Sync Pro for Active Directory components are selected. To install Migrator Pro for Active Directory, select the Directory Sync Pro / Migrator Pro Console, Migrator Pro for Active Directory, and (optionally) Migrator Pro for Active Directory Reports components and click Next to continue.
-
The Installation Directory screen appears. Both Directory Sync Pro for Active Directory and Migrator Pro for Active Directory are installed in the same directory. Click Browse to choose a different install location. Click Next to continue.
-
The Device Log Virtual Directory screen appears. Click Browse to choose a different location where device logs will be written. Click Next to continue.
-
The File Location for Download Jobs screen appears. Click Browse to choose a different location where download jobs will be saved. Click Next to continue.
-
The Database Server Login screen appears. Enter the SQL Database Server location, credential information, and database name. Click Next to continue. If you chose to install SQL Server Express, the installer sets the “sa” account with the default password “Password1”.
-
The Database Server Login screen appears again, this time for the logging database. Enter the SQL Database Server location for the logging database, credential information, and database name. Click Next to continue.
-
If you selected to connect using Windows Authentication on the previous screen, a screen to enter domain username and password appears. Enter the domain user in DOMAIN\username format and the password. Click Next to continue.
-
If you selected to install the optional Reporting feature, the SQL Report Server screen appears. Enter the Report Server URL and select the appropriate Connection Credential and Data Credential options. Clicking the Test button to verify the SSRS connection credential is a best practice. See the Appendix of this document for information on verifying the Report Server URL. Click Next to continue. If SQL Server Reporting Services (SSRS) is not set up, click Skip and OK on the confirmation window.
|
|
The Connection Credential requires an account that has the Content Manager role and the System Administrator role defined on the SQL Server Reporting Server. The Data Credential requires an account that has permission on the SQL Server Reporting Services database. These permissions are typically the database-level roles db_datareader and db_datawriter but should be verified by the SQL Server Reporting Services database administrator. Reports will not appear in the Migrator Pro for Active Directory Console UI if the installation of the Reporting feature is skipped. To install the Reporting feature at a later time, select to Modify the installation from the Programs and Features page in the Control Panel. When an AD credential is used as the Data Credential on the SQL Report Server screen in the Migrator Pro for Active Directory installer, the Windows Credential check box is not checked. This will need to be changed manually in the DataSource in the Report Server after installation is completed. |
-
The Ready to Install screen appears. Click Install to begin the installation.
-
When the installation completes, the InstallShield Wizard Complete message appears. Click Finish.
Also, click Finish on the Installation window.
|
|
If upgrading from a previous version of Directory Sync Pro for Active Directory, you must delete the C:\Windows\BTPass folder from all domain controllers being used in the Directory Sync Pro for Active Directory profiles. A new version of BTPass will be pushed to the domain controllers on the next sync. |
-
The Apps screen or Start Menu is updated and the Migrator Pro for Active Directory and Directory Sync Pro for Active Directory icons are added to the desktop.
Apps screen:
Desktop icons:
If planning to use the Password Copy functionality of Active Directory Pro Synchronization, PsExec must be installed in the Directory Sync Pro for Active Directory program directory (C:\Program Files\Binary Tree\DirSync). Ignore the PSTools Installation Guide concerning the proper installation location. PsExec is available at: https://technet.microsoft.com/en-us/sysinternals/bb897553
The Upload Logs functionality requires the following actions to work:
-
Enable BITS on the Migrator Pro for Active Directory server.
-
Update the c:\windows\system32\inetsrv\applicationhost.config file to include a physical path (C:\Program Files\Binary Tree\DirSync\DeviceLogs\) for the application path="/adm/DeviceLogs" under the Default Web Site. Then, reset IIS.

