This guide describes how to install and use Code Tester for Oracle® administrative features.
In addition to this guide, there are a number of options available for quickly finding the information you need.
There are several ways to access online help topics.
|
To... |
Do This... |
|
Display the table of contents for help topics |
Select the content tab in an open help window. |
|
Search for a specific help topic |
Select the index tab in an open window. |
|
Display the index for help topics |
Select the index tab in an open help window. |
|
Display help from a window or dialog |
In the window or dialog, do one of the following:
|
To access the latest release notes, go to:
support.quest.com/technical-documentation
Code Tester for Oracle automates the process of testing PL/SQL programs, making it possible for you to identify bugs and verify program correctness in a fraction of the time it has taken previously. Rather than write (and maintain) thousands of lines of test code, PL/SQL programmers describe the expected behavior of their programs through a graphical interface. Code Tester then generates the required test code, and runs it whenever you reCode Tester (either through the interface or via command line execution).
The following provides a summary of how Code Tester works:
Before installing Code Tester for Oracle, ensure your system meets the minimum hardware and software requirements that are listed in the Code Tester for Oracle Release Notes that accompany this release.
Code Tester for Oracle uses a backend repository to store tests and testing results. Each database being tested must have its own repository.
When you install Code Tester, you must specify the Oracle schema into which the test repository will be placed. This repository (a set of tables) holds the definitions of the tests for your programs. This schema can be created specifically for the Code Tester repository, or those tables can be placed in an existing schema.
Before you install Code Tester, you should decide where the repository and the test code generated by Code Tester will be placed, in relation to the code being tested.
This section reviews the most common configurations and offers advice about how to install and use Code Tester to match those configurations. In each configuration we explain how to use Code Tester in these three different types of schemas:
|
Code Tester Schema |
The owner of the Code Tester repository. When you install Code Tester, the database tables and packages that hold the repository are placed in this schema. |
|
Test Schema |
The schema from which testing is performed. In other words, you always connect to the Test Schema when you start up Code Tester. This schema owns the test objects created by Code Tester. |
|
Code Schema |
The schema that owns the code (or has execute authority on the code) being tested. To test this code, you must have execute authority from the Test Schema on the programs in the Code Schema. |
Installation Options
You can install and use Code Tester in each of the following configurations.
Installing a Shared Repository
There are two ways to create a shared repository:
Public Synonyms
Choose the "Create public synonyms..." option in the Installer.
Code Tester will then create public synonyms for the repository so that it can be accessed from any other schema in that database instance.
Private Synonyms
In Code Tester the Installer does not automatically create private synonyms. You must create them by running scripts manually in SQL*Plus or Toad or another execution environment.
When you install Code Tester, do not check the "Create public synonyms..." option. Instead, install the repository into the specified schema without public synonyms. After the installation is complete, open your SQL execution environment and connect to the Code Tester schema. You will then run two scripts, each of which are located in the Code subdirectory of Code Tester's installation folder:
qu_grant_execute.sql: When running this SQL*Plus compatible script, you specify the name of the Test Schema from which you want to run Code Tester. The EXECUTE privilege is then granted to you schema for all Code Tester objects.
After running this script for each of the schemas from which you want to run Code Tester, you will need to connect to each of these schemas in turn and run the following script:
qu_private_synonyms.sql: When running this SQL*Plus compatible script, you specify the name of the Code Tester Schema (owner of the repository). Private synonyms are then created for all relevant Code Tester objects.
Code Tester can now be used from each of these individual Test Schemas.
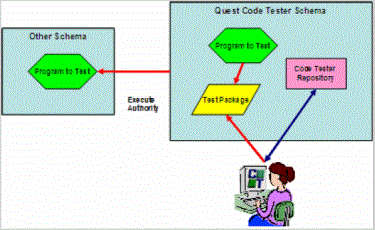
Installing a Private Repository
This is the simplest installation. The schema in which the repository is installed is also the test schema and the code schema. You simply install Code Tester into the application code schema. The repository of test information is private to this schema and cannot be seen, used, or run by any other schema.

Good for: Small projects, evaluating Code Tester
How to do this: Install, but do not install public synonyms during the install and do not install any private synonyms afterwards.
To use Code Tester: Connect to the schema in which Code Tester was installed (and which also contains your code or has execute authority on the code you want to test).
Advantages
You don't need any special privileges to install the product (as long as your code schema has the privileges to create procedures, tables, etc.).
Disadvantages
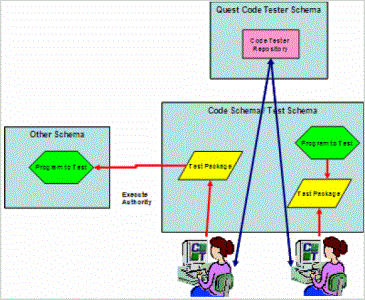
Installing a Shared Repository, Code Schema = Test Schema
You install Code Tester into its own schema and make the repository and test engine available to the various Code Schema through public or private synonyms. You run Code Tester from the Code Schema (owns the application code). In other words, the Test Schema is the same as the Code Schema.

Good for: Team development, in which test definitions need to be shared.
How to do this: Install with public synonyms or create private synonyms after installation is finished.
To use Code Tester: Connect to your Code Schema and choose the programs in (or accessible from) that schema.
Advantages
Disadvantages
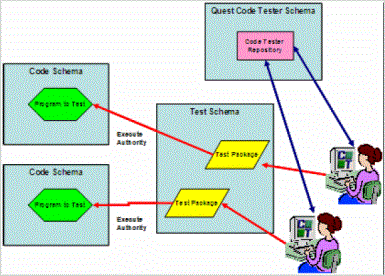
Installing a Single Shared Test Schema for all Developers Repository
In this configuration, you take the extra step of creating a schema in which test code will be created for all applications on which members of the team are working.

Code Tester does not create the Test Schema. You will need to do this yourself outside of the Code Tester install, but it does not have to be created before you install Code Tester.
Good for: Team development, in which the same team works on several different applications.
How to do this: Install with public or private synonyms, depending on whether you want the repository to be available to all schemas or a selected subset. Click here for more details.
To use Code Tester: Connect to the shared Test Schema and choose the programs to test from the relevant Code Schema.
Advantages
Disadvantages
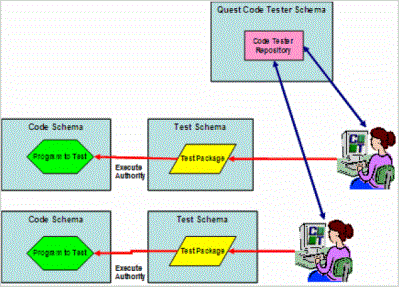
Installing a Separate Test Schema for Each Application Repository
In this configuration, you take the extra step of creating a separate schema in which test code will be created for each application on which members of the team are working.
Code Tester does not create the Test Schemas. You will need to do this yourself outside of the Code Tester install, but it does not have to be created before you install Code Tester.

Good for: Team development, in which different members of the team work on different applications or subsystems.
How to do this: Install with public or private synonyms, depending on whether you want the repository to be available to all schemas or a selected subset.
To use Code Tester: Connect to the Test Schema for your application and choose the programs to test from the relevant Code Schema.
Advantages
Disadvantages