During the migration lifecycle, notices can be sent through the Migrator for Notes application to the end user community. These may be for relaying important information, delivering end user driven action buttons or both. See the Migrator for Notes Installation and Configuration Guide for information on how to configure and customize message templates.
|
|
|
Once you have determined your communications strategy and updated/created the message templates, you are ready to send them according to your communications plan and any end user processing updates required. You can send pre-migration as well as post-migration messages to end users. Pre-migration messages typically prompt users to click the embedded action button in the message to perform an action, such as decrypt the encrypted messages in users’ mail files or copy/replicate users’ local archive database to the mail server. After the end user has performed the required action, a status message is returned to the Migrator for Notes application using standard Notes Mail.
|
|
|
To send a notification:
Expand Notify End Users for Required Actions in the Navigation Pane
Click Send End User Notifications; depending on the setting configured in the Required Settings tab, you can either send one notification per user that will contain the selected actions/forms that you want to send to the user or send one notification per action/form per user
Select all the Person documents in the Data Pane to whom you want to send the notification
Click the Send Users Notifications button in the Data Pane
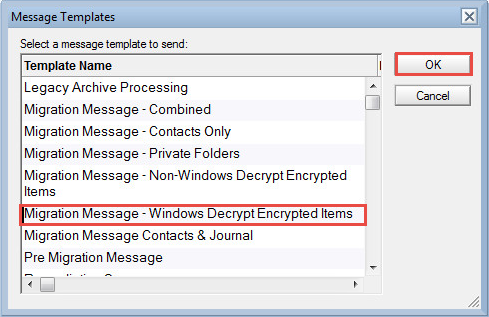
In the Message Templates dialog box, a list of available predefined templates is displayed; if you have created pre-migration custom templates, these will also be listed; select the template you wish to send and click OK; for example, select the Migration Message – Windows Decrypt Encrypted Items message template, and click OK:

Message Templates Dialog Box
The progression message box displays; after a few seconds of processing, another message box displays confirming that notifications have been sent to selected users (see screenshot below); click OK
After you have sent the first notification to the users, the users remain in the Notify step (under the Pending Responses view). The users remain in this step so that you can continue sending the rest of the notifications
Notifications where users are required to click an embedded button in the email are processed differently. The Migration Message – Windows Decrypt Encrypted Items email template, for example, contains buttons that can be clicked by the user to perform many functions. If users don’t click the buttons, their response is considered pending and is listed in the Pending Responses view.
|
|
To demonstrate this, if user John Smith has not performed the required action, the Data Pane will show that two notifications have been sent, one requires user action, and no response has been received. In a situation like this, you may want to send another notification prompting users to respond to migration notifications. |
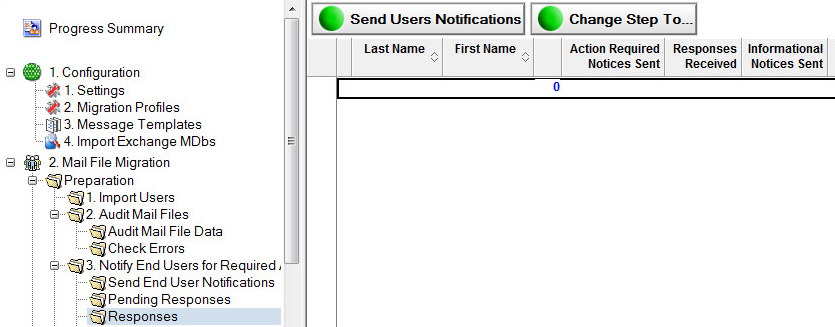
Responses can also be seen in the Responses view; click Responses in the Navigation Pane:

Responses View
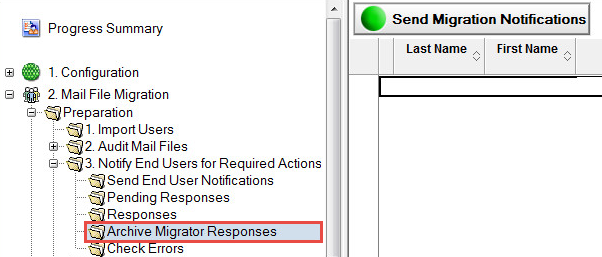
Responses to the Archive Migrator Opt Out option can be seen by clicking Archive Migrator Responses in the Navigation Pane:

Finally, you need to check for notification transmission errors; click Check Errors:

If the user’s mail files do not move out of the Notify view, then you need to move them to the Match view using the Change Step To button. Do this when you have ensured that all the notifications have been sent, all the pending responses have been responded to, and there are no unresolved errors.
|
|
|
During the migration lifecycle, notices can be sent through the Migrator for Notes application to the end user community. These may be for relaying important information, delivering end user driven action buttons or both. See the Migrator for Notes Installation and Configuration Guide for information on how to configure and customize message templates.
|
|
|
Once you have determined your communications strategy and updated/created the message templates, you are ready to send them according to your communications plan and any end user processing updates required. You can send pre-migration as well as post-migration messages to end users. Pre-migration messages typically prompt users to click the embedded action button in the message to perform an action, such as decrypt the encrypted messages in users’ mail files or copy/replicate users’ local archive database to the mail server. After the end user has performed the required action, a status message is returned to the Migrator for Notes application using standard Notes Mail.
|
|
|
To send a notification:
Expand Notify End Users for Required Actions in the Navigation Pane
Click Send End User Notifications; depending on the setting configured in the Required Settings tab, you can either send one notification per user that will contain the selected actions/forms that you want to send to the user or send one notification per action/form per user
Select all the Person documents in the Data Pane to whom you want to send the notification
Click the Send Users Notifications button in the Data Pane
In the Message Templates dialog box, a list of available predefined templates is displayed; if you have created pre-migration custom templates, these will also be listed; select the template you wish to send and click OK; for example, select the Migration Message – Windows Decrypt Encrypted Items message template, and click OK:

Message Templates Dialog Box
The progression message box displays; after a few seconds of processing, another message box displays confirming that notifications have been sent to selected users (see screenshot below); click OK
After you have sent the first notification to the users, the users remain in the Notify step (under the Pending Responses view). The users remain in this step so that you can continue sending the rest of the notifications
Notifications where users are required to click an embedded button in the email are processed differently. The Migration Message – Windows Decrypt Encrypted Items email template, for example, contains buttons that can be clicked by the user to perform many functions. If users don’t click the buttons, their response is considered pending and is listed in the Pending Responses view.
|
|
To demonstrate this, if user John Smith has not performed the required action, the Data Pane will show that two notifications have been sent, one requires user action, and no response has been received. In a situation like this, you may want to send another notification prompting users to respond to migration notifications. |
Responses can also be seen in the Responses view; click Responses in the Navigation Pane:

Responses View
Responses to the Archive Migrator Opt Out option can be seen by clicking Archive Migrator Responses in the Navigation Pane:

Finally, you need to check for notification transmission errors; click Check Errors:

If the user’s mail files do not move out of the Notify view, then you need to move them to the Match view using the Change Step To button. Do this when you have ensured that all the notifications have been sent, all the pending responses have been responded to, and there are no unresolved errors.
|
|
|
During the migration lifecycle, notices can be sent through the Migrator for Notes application to the end user community. These may be for relaying important information, delivering end user driven action buttons or both. See the Migrator for Notes Installation and Configuration Guide for information on how to configure and customize message templates.
|
|
|
Once you have determined your communications strategy and updated/created the message templates, you are ready to send them according to your communications plan and any end user processing updates required. You can send pre-migration as well as post-migration messages to end users. Pre-migration messages typically prompt users to click the embedded action button in the message to perform an action, such as decrypt the encrypted messages in users’ mail files or copy/replicate users’ local archive database to the mail server. After the end user has performed the required action, a status message is returned to the Migrator for Notes application using standard Notes Mail.
|
|
|
To send a notification:
Expand Notify End Users for Required Actions in the Navigation Pane
Click Send End User Notifications; depending on the setting configured in the Required Settings tab, you can either send one notification per user that will contain the selected actions/forms that you want to send to the user or send one notification per action/form per user
Select all the Person documents in the Data Pane to whom you want to send the notification
Click the Send Users Notifications button in the Data Pane
In the Message Templates dialog box, a list of available predefined templates is displayed; if you have created pre-migration custom templates, these will also be listed; select the template you wish to send and click OK; for example, select the Migration Message – Windows Decrypt Encrypted Items message template, and click OK:

Message Templates Dialog Box
The progression message box displays; after a few seconds of processing, another message box displays confirming that notifications have been sent to selected users (see screenshot below); click OK
After you have sent the first notification to the users, the users remain in the Notify step (under the Pending Responses view). The users remain in this step so that you can continue sending the rest of the notifications
Notifications where users are required to click an embedded button in the email are processed differently. The Migration Message – Windows Decrypt Encrypted Items email template, for example, contains buttons that can be clicked by the user to perform many functions. If users don’t click the buttons, their response is considered pending and is listed in the Pending Responses view.
|
|
To demonstrate this, if user John Smith has not performed the required action, the Data Pane will show that two notifications have been sent, one requires user action, and no response has been received. In a situation like this, you may want to send another notification prompting users to respond to migration notifications. |
Responses can also be seen in the Responses view; click Responses in the Navigation Pane:

Responses View
Responses to the Archive Migrator Opt Out option can be seen by clicking Archive Migrator Responses in the Navigation Pane:

Finally, you need to check for notification transmission errors; click Check Errors:

If the user’s mail files do not move out of the Notify view, then you need to move them to the Match view using the Change Step To button. Do this when you have ensured that all the notifications have been sent, all the pending responses have been responded to, and there are no unresolved errors.
|
|
|
During the migration lifecycle, notices can be sent through the Migrator for Notes application to the end user community. These may be for relaying important information, delivering end user driven action buttons or both. See the Migrator for Notes Installation and Configuration Guide for information on how to configure and customize message templates.
|
|
|
Once you have determined your communications strategy and updated/created the message templates, you are ready to send them according to your communications plan and any end user processing updates required. You can send pre-migration as well as post-migration messages to end users. Pre-migration messages typically prompt users to click the embedded action button in the message to perform an action, such as decrypt the encrypted messages in users’ mail files or copy/replicate users’ local archive database to the mail server. After the end user has performed the required action, a status message is returned to the Migrator for Notes application using standard Notes Mail.
|
|
|
To send a notification:
Expand Notify End Users for Required Actions in the Navigation Pane
Click Send End User Notifications; depending on the setting configured in the Required Settings tab, you can either send one notification per user that will contain the selected actions/forms that you want to send to the user or send one notification per action/form per user
Select all the Person documents in the Data Pane to whom you want to send the notification
Click the Send Users Notifications button in the Data Pane
In the Message Templates dialog box, a list of available predefined templates is displayed; if you have created pre-migration custom templates, these will also be listed; select the template you wish to send and click OK; for example, select the Migration Message – Windows Decrypt Encrypted Items message template, and click OK:

Message Templates Dialog Box
The progression message box displays; after a few seconds of processing, another message box displays confirming that notifications have been sent to selected users (see screenshot below); click OK
After you have sent the first notification to the users, the users remain in the Notify step (under the Pending Responses view). The users remain in this step so that you can continue sending the rest of the notifications
Notifications where users are required to click an embedded button in the email are processed differently. The Migration Message – Windows Decrypt Encrypted Items email template, for example, contains buttons that can be clicked by the user to perform many functions. If users don’t click the buttons, their response is considered pending and is listed in the Pending Responses view.
|
|
To demonstrate this, if user John Smith has not performed the required action, the Data Pane will show that two notifications have been sent, one requires user action, and no response has been received. In a situation like this, you may want to send another notification prompting users to respond to migration notifications. |
Responses can also be seen in the Responses view; click Responses in the Navigation Pane:

Responses View
Responses to the Archive Migrator Opt Out option can be seen by clicking Archive Migrator Responses in the Navigation Pane:

Finally, you need to check for notification transmission errors; click Check Errors:

If the user’s mail files do not move out of the Notify view, then you need to move them to the Match view using the Change Step To button. Do this when you have ensured that all the notifications have been sent, all the pending responses have been responded to, and there are no unresolved errors.
|
|
|