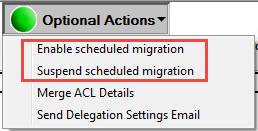
Enable and suspend scheduled migration options are available under Optional Actions:

Select one or more mailboxes and click Optional Actions | Suspend scheduled migration to stop the scheduled delegation migration
Select one or more mailboxes and click Optional Actions | Enable scheduled migration to set the scheduled delegation migration attempts; you may want to use this option after attempting a manual delegation migration
Delegation data for selected mailboxes can also be manually migrated immediately using the local machine. Manually migrating delegation data will remove the mailbox from the scheduled state and it must then be validated by the same machine. As stated in the Access and Delegation Migration Overview, PowerShell 4 must be installed on the workstation/server that the migration process is to run from. You can use the Enable scheduled migration option to reset to the scheduled state.

To manually migrate delegation data:
On the Delegation Migration view, select one or more mailbox and click the Migrate Delegation button; the local machine immediately attempts to migrate delegate information
This process can be run in conjunction with the Active Mailbox process; after the mail file audit process has completed, select the Delegation Migration option to switch to the following view:

This view displays the mail file owner, a list of people assigned delegate access, the level of access in ACL terms, and whether the calendar is “open” for public viewing.
|
|
This view only shows a maximum of nine delegates per user. If there are more, these can be viewed by opening the person document and switching to the Delegation Information tab. |

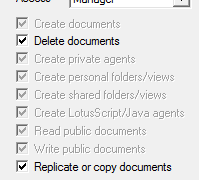
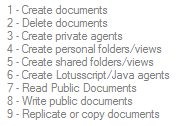
The values “1, 2, 3, 4, 5, 6, 7, 8, 9” refer to the “tick” settings in the database ACL as shown below:


This form also displays the Forward Meeting Notice settings as configured in the delegation settings of the mail file associated with this user:

This process can be run in conjunction with the Active Mailbox process; after the mail file audit process has completed, select the Delegation Migration option to switch to the following view:

This view displays the mail file owner, a list of people assigned delegate access, the level of access in ACL terms, and whether the calendar is “open” for public viewing.
|
|
This view only shows a maximum of nine delegates per user. If there are more, these can be viewed by opening the person document and switching to the Delegation Information tab. |

The values “1, 2, 3, 4, 5, 6, 7, 8, 9” refer to the “tick” settings in the database ACL as shown below:


This form also displays the Forward Meeting Notice settings as configured in the delegation settings of the mail file associated with this user:
