Tchater maintenant avec le support
Tchattez avec un ingénieur du support

NetVault 13.0.2 - Administration Guide for Managed Service Providers

Introduction Getting started Configuring clients Managing catalog search Configuring storage devices
About storage devices SAN considerations Quest DR Series systems Quest QoreStor NetVault SmartDisk EMC Data Domain Systems Snapshot Array Manager Virtual Tape Libraries Virtual standalone drives Shared Virtual Tape Libraries Physical tape devices Storage tiers
Backing up data Managing policies Restoring data Managing NetVault dashboard Managing jobs Monitoring logs Managing storage devices
Role-based access to manage storage devices Monitoring device activity Managing disk-based storage devices in list view Managing disk-based storage devices in tree view Managing the Snapshot Array Manager Managing tape libraries in list view Managing tape libraries in tree view Managing tape drives in list view Managing tape drives in tree view Adding shared devices
Managing storage media Managing user and group accounts Managing Tenant Monitoring events and configuring notifications Reporting in NetVault Working with client clusters Configuring default settings for NetVault
About configuring default settings Configuring encryption settings Configuring plug-in options Configuring default settings for post-scripts Configuring default settings for Verify Plug-in Configuring Deployment Manager Settings Configuring Job Manager settings Configuring Logging Daemon settings Configuring Media Manager settings Configuring Network Manager settings Configuring Process Manager settings Configuring RAS device settings Configuring Schedule Manager settings Configuring Web Service settings Configuring Auditor Daemon settings Configuring firewall settings Configuring general settings Configuring security settings Synchronizing NetVault Time Configuring the reporting utility Configuring NetVault WebUI default settings Configuring NetVault to use a specific VSS provider Configuring default settings using Txtconfig
Diagnostic tracing Managing diagnostic data Using the deviceconfig utility NetVault processes Environment variables Network ports used by NetVault Troubleshooting
Common errors Safe Mode in NetVault

About Quest DR Series systems

The Quest DR Series disk-based data protection appliances optimize utilization with in-line deduplication and compression, and reduce network bandwidth requirements with client-side deduplication processing and deduplicated replication.

These appliances incorporate innovative deduplication and compression technology to help you achieve a data-reduction level up to 15:1. As a result, you can retain more backup data for a longer period in the same footprint.

The Quest DR Series systems use the Plug-in for Rapid Data Access (RDA) to integrate its data storage operations with NetVault. This plug-in is automatically installed on the NetVault machines when you install the NetVault Server or Client software.

For more information about Quest DR Series systems, see the Quest DR Series system Administration Guide.

Quest DR Series system prerequisites

Before adding a Quest DR Series system to a NetVault Server, verify that the following requirements are met:

Configure the required storage options: On the Quest DR Series system, configure the storage options for the container. For more information about the storage options, see the Quest DR Series system Administration Guide.
Configure ports for optimized replication: To perform optimized replication operations across a firewall, configure the following fixed TCP ports on the Quest DR Series system to support RDA replication operations:

Adding a Quest DR Series system

To use a Quest DR Series system for backups and restores, you must first add the device to the NetVault Server. You can use the configuration wizard to add and configure this device.

Adding a Quest DR Series appliance

1
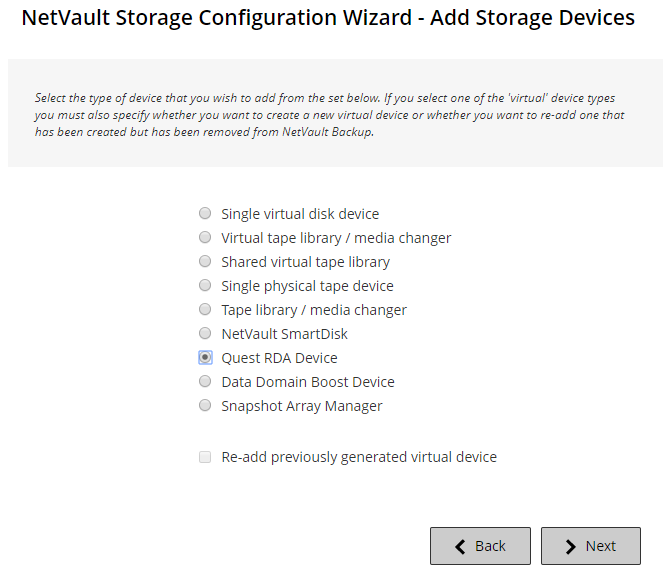
In the Navigation pane, click Guided Configuration, and then on the NetVault Configuration Wizard page, click Add Storage Devices.
In the Navigation pane, click Manage Devices, and then click Add Device.
2
On the Add Storage Devices page, select the Quest RDA Device option, and click Next.
3
On the Add Quest RDA Device page, provide the following details.

Hostname

Type the Fully Qualified Domain Name (FQDN) or IP address of the Quest DR Series system.

If the server is unable to resolve the host name, it fails to add the device.

Username

Specify a user account that can be used to log on to the device.

On the Quest DR Series system, only one user account exists, and the user ID for that account is backup_user.

Password

Type the password for the user account.

4
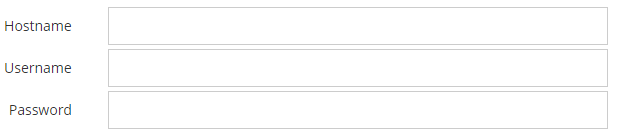
Click Add RDA Device to add the device.
Documents connexes

The document was helpful.

Sélectionner une évaluation

I easily found the information I needed.

Sélectionner une évaluation