To ensure you can recover your Active Directory® forest with minimum downtime, it is recommended that you regularly run the verify settings operation on your recovery project. When you run this operation, Recovery Manager for Active Directory (RMAD) connects to the domain controllers in the project, collects their configuration parameters, and then saves these parameters in the recovery project (.frproj) file. The verify settings operation does not modify any data in your Active Directory® forest.
After the configuration parameters have been collected, RMAD checks the recovery project settings against these parameters for any incompatibilities that may affect the forest recovery process. When the verify settings operation completes, you can view a report providing details about any problems found in your recovery project.
Running the verify settings operation on a regular basis allows you to promptly reveal any potential recovery problems and proactively prevent them by making appropriate adjustments to the recovery project settings.
When you run the verify settings operation, RMAD collects and saves the following information from each domain controller in the project:
IP addresses of all network adapters
IP addresses of all DNS servers on all network adapters
DNS names of all FSMO role holders in the Active Directory® forest
Forest Recovery Agent version installed on the domain controller (if any)
Whether the domain controller is read-only (RODC)
Operating system version installed on the domain controller
NOTE:
Check that the Administrative Share Admin$ exists and is accessible on the target domain controllers to perform the remote Forest Recovery Agent installation.
If the backup is located on the Recovery Manager Console machine: Check that the Administrative Share 'DriveLetter$' exists and is accessible for the disk where the backup is stored .
Otherwise, the Forest Recovery will fail. For more information, see Installing Backup Agent automatically.
Create or open a recovery project.
Specify recovery settings in the project.
On the toolbar, click the drop-down toggle next to Verify Settings, select Verify Settings and wait for the operation to complete.
To perform the verify settings operation for the particular domain controller(s), use the Verify Selected DCs option from the drop-down list.
After the verify settings operation completes, you can view a report on the operation results: from the menu bar, select View | Report.
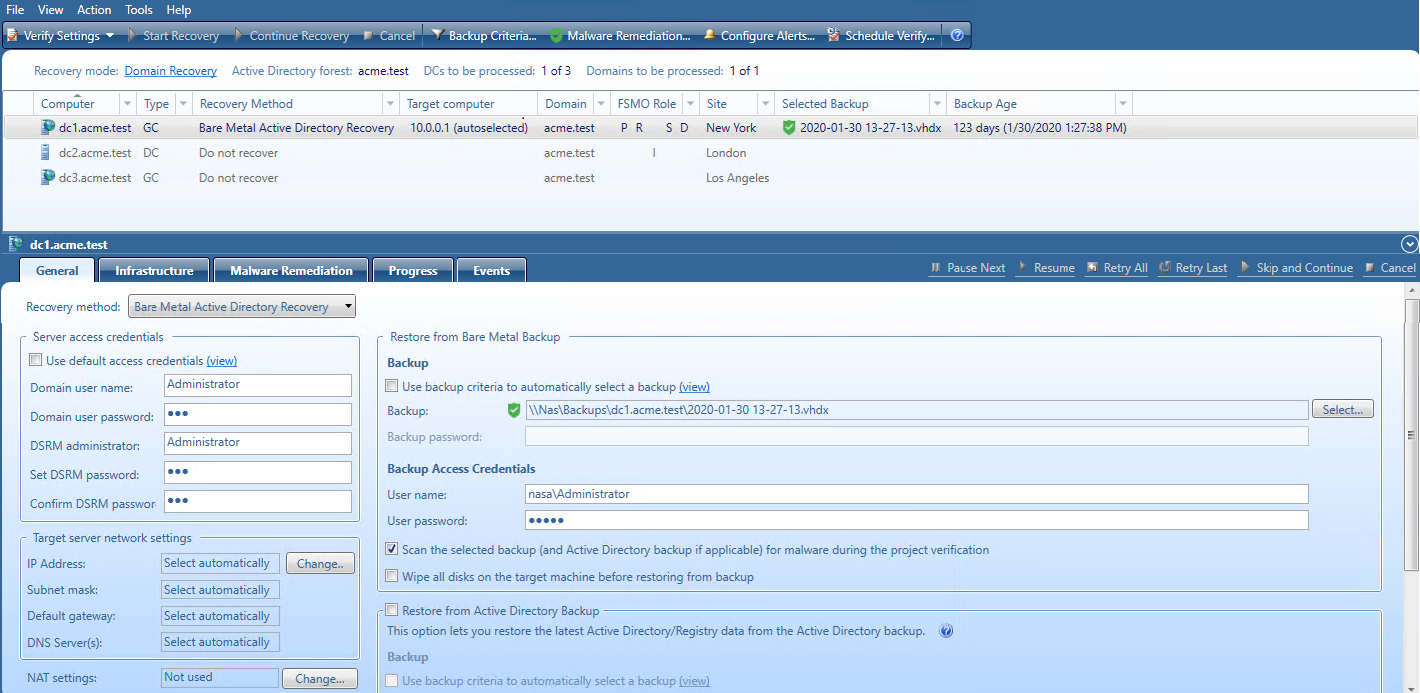
Recovery Manager for Active Directory scans BMR and Active Directory® backups for malware as a part of the verification process (not recovery). The anti-virus checks are performed on the Forest Recovery Console machine running Windows Server® 2016 or higher by means of antivirus software installed on the machine. The best practice is to use the scheduled verification to have up-to-date backup scan results and to run anti-malware checks in the background because this process is time-consuming. To configure the verification schedule, refer Scheduling project verification.
Microsoft Defender
FEATURE PREVIEW Symantec™ Endpoint Protection 14.x; Broadcom Endpoint Security (former name: Symantec™ Endpoint Protection 15)
| Note |
Recovery Manager for Active Directory Disaster Recovery Edition only supports scanning of BMR backups. |
The scan performance highly depends on the network speed to the remote backup storage.
It is not recommended to scan more than 5-10 BMR backups in parallel - this means that only 5-10 DCs should be configured to restore from the BMR backup. It is a risk to restore some DC from scanned BMR backup, and others from not scanned backups that can potentially contain malware.
If you have remote sites with slow network connection, consider installing other instances of RMAD there, and configure backup metadata replication. For details, see Consolidating backup registration data.
In some cases, depending on a host environment and the size of the backed-up data, the host machine can experience a high CPU load while scanning a backup. To avoid this, a user can limit CPU utilization in the antivirus software settings. For example, a user can change the ScanAvgCPULoadFactor setting if Windows Defender Antivirus is used. For details, see Configure Microsoft Defender Antivirus scanning options. You can use this formula to estimate a possible setting value: (number of parallel backups) * ScanAvgCPULoadFactor < (desired overall CPU usage by RMAD scan process).
For all antivirus vendors, real-time protection mode can affect Active Directory® backup scans.
A parallel backup scan is not yet supported for Symantec™ Endpoint Protection. Therefore, the scan operation with Symantec™ may take longer than a scan using Windows Defender.
Make sure that AD backup checks are not run together with any other file system scans on the Forest Recovery Console machine.
For Symantec™ Endpoint Protection: If you cancel the project verification, the virus scan will continue running due to the Tamper Protection feature of Symantec Endpoint Protection (SEP). To resolve this problem, there are two workarounds:
Stop the current antivirus scan from Symantec™ Endpoint Protection Manager.
Then, end the ccSvcHst.exe process. This process is a common scanning process for the SEP client, so this action will drop all scanning tasks on the machine. See Symantec™ Endpoint Protection for details.
| Supported features | Backup type | Windows Defender | Symantec™ Endpoint Protection, Broadcom Endpoint Security |
|---|---|---|---|
| Parallel scan | BMR backup, AD backup | ✔ | ✖ |
| Scan with enabled Real-Time Protection mode | BMR backup, AD backup | Supported for BMR backup only* | Supported for BMR backup only* |
| Completely cancel the verification process | BMR backup, AD backup | ✔ | ✖ |
| Warn if the anti-virus database is outdated | BMR backup, AD backup | ✔ | ✔ |
* If Real-Time Protection is disabled, Active Directory backups can also be scanned.
| Note |
Only Windows Defender supports parallel scanning of backups. Other anti-virus solutions scan backups in sequential mode. This must be taken into account when planning the verification schedule. |
Recovery Manager for Active Directory automatically detects antivirus software and you do not need to explicitly specify it in the configuration file (%ProgramFiles%\Quest\Recovery Manager for Active Directory\Management\AntivirusConfiguration.json). The AntivirusToUse parameter value is empty by default. If this parameter contains any value, the autodetect feature will not work. Recovery Manager for Active Directory detects only antivirus software specified in the "Antiviruses" section of the configuration file, using Prechecks. Make sure that all the PrecheckTarget parameter values are correct. If you have more than one antivirus software supported by RMAD in your environment, the autodetect feature will use the first found antivirus software for backup scans.
| IMPORTANT |
If you upgrade or reinstall Recovery Manager for Active Directory, the settings from AntivirusConfiguration.json will be reset to the default settings. |
In Forest Recovery Console, select the Malware Remediation tab and then check the Scan the selected backup for malware during the project verification option.
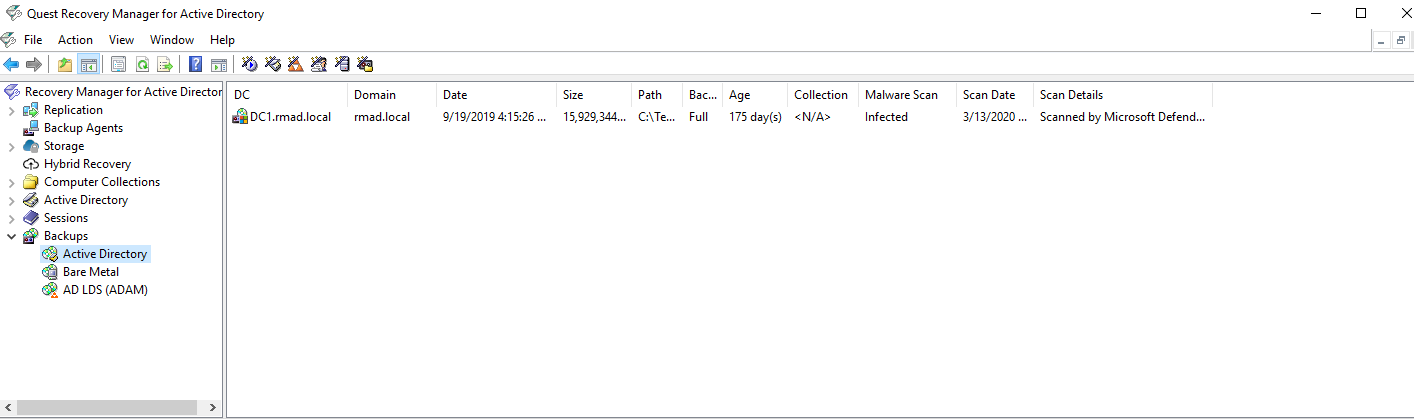
The backup scan status is shown next to the backup in Recovery Manager for Active Directory Console and Forest Recovery Console. Also, Recovery Manager for Active Directory Console gives a better representation of scan results. Anti-virus check statuses:


| Note |
You can get the Passed with warnings status if your antivirus database is older than the specified time limit. According to security best practices, this limit is set to 3 days by default. Depending on the policies of your organization, you can configure this parameter in the AntivirusConfiguration.json file that is mentioned above. Change the AntivirusSignatureAgeThresholdInDays property to the desired value. In case of any security incident or data breach, it is recommended that you run an antivirus scan using the latest database for your antivirus software. |
If you set the project to automatically select backups using the backup selection criteria, the following logic is applied:
| Backups, #3 is the latest backup |
Backup selected and scanned for Verify |
Backup selected for Recovery |
Comments |
|---|---|---|---|
| #3 Not scanned | X | X | The latest backup will be used for the settings verification or recovery. You will get a warning before the recovery process. |
| #2 Not scanned | |||
| #1 Not scanned | |||
| #3 Passed | X | X | The latest backup with the "Passed" status will be rescanned and will be used for the settings verification or recovery if there are no newer backups. |
| #2 Not scanned | |||
| #3 Not scanned | |||
| #3 Infected | If only the latest backup is scanned and has the "Infected" status, the latest not scanned backup will be selected for settings verification or recovery. | ||
| #2 Not scanned | X | X | |
| #1 Not scanned | |||
| #3 Infected | If the latest backup is scanned and is infected, and there are several scanned backups that have passed the virus checks - the latest backup with the "Passed" status will be selected for settings verification or recovery. | ||
| #2 Passed | X | X | |
| #1 Not scanned | |||
| #3 Not scanned | X | X | If there are a scanned backup with the "Passed" status and the newer non-scanned backup, the latest not scanned backup is selected for settings verification or recovery. You will get a warning before the recovery process. To avoid this scenario, configure the regular anti-virus scan in accordance with the BMR backup schedule. |
| #2 Passed | |||
| #1 Not scanned | |||
| #3 Infected | X | If all the existing backups are infected, an anti-virus scan can be skipped, and the latest backup is selected for recovery. You will get a warning before the recovery process. | |
| #2 Infected | |||
| #1 Infected | |||
| #3 Not scanned | X | X | The latest backup will be used for the settings verification or recovery. You will get a warning before the recovery process. |
| #2 Infected | |||
| #1 Not scanned |
To automate running of the verify settings operation on a regular basis, you can schedule this operation for the recovery project.
In Forest Recovery Console, create or open an existing recovery project.
Click Schedule Verify… on the tool bar.
In the Configure Schedule dialog box, click Modify….
In the dialog that appears, click New… and configure the schedule.
Then you will be able to see a list of configured schedules in the Configure Schedule dialog. The Enable schedule option is selected by default.
To specify a user account for the project verification, click Select account… in the Configure Schedule dialog. If you skip this step, you will be prompted for a user name and password when saving the schedule. You must use the Administrator user account.
Click OK to save the schedule.
In Forest Recovery Console, open an existing recovery project.
Click Schedule Verify… on the tool bar.
To enable or disable the schedule, use the Enable Schedule check box in the Configure Schedule dialog.
To change the schedule, click Modify…..
In the dialog box that opens, configure the new schedule and click OK.
To change the schedule account, click Select account… in the Configure Schedule dialog.
Enter new credentials, then you will be prompted for the account which is currently used for this schedule. Enter the current credential and click OK.
Click OK to save the changes in the Configure Schedule dialog. If you have not changed the account, you will be prompted for the current credentials.
In Forest Recovery Console, open an existing recovery project.
Click Schedule Verify… on the tool bar.
Click Modify….
Delete all schedules and click OK.
Click OK in the Configure Schedule dialog and you will be prompted for the current schedule account.
Enter the current credentials and click OK.
You can set individual recovery settings for each domain controller in your recovery project. For more information about these settings, see Domain controller recovery settings and progress.
Create or open a recovery project.
In the list of domain controllers, select the domain controller for which you want to specify recovery settings.
Use the General tab to specify recovery settings.