After the Secure Storage server has been added and the Storage Agent has been installed on it, the server is hardened automatically. The following list outlines what happens to a Secure Storage server when it is hardened:
All SMB server roles are disabled (SMBv1 - SMBv3).
All incoming TCP ports are blocked by IPSec policies, except for the high-level Secure Storage Agent port.
ICMP traffic is blocked (i.e. the server cannot be pinged).
Remote desktop (RDP) traffic is blocked.
Only one TCP agent port is left open on the server for communication with Recovery Manager for Active Directory, the Storage Agent port (by default, this is 48001).
Agent traffic is encrypted by the public/private key pair.
Logons to the server are only allowed via console (physical) access.
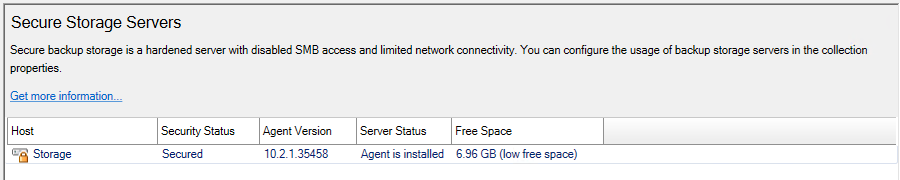
When a Secure Storage server is hardened, the lock icon next to the name of the Secure Storage server in the Secure Storage Servers window will be closed and it will have a Security Status of Secured.
| IMPORTANT |
You cannot install the Secure Storage server agent on a domain joined server, a domain controller or a member server. A server that is hardened will not be able to perform authentication or allow replication to occur. A Secure Storage server should be a stand-alone server in a workgroup. |
To get the hardening status of a Secure Storage server
During the installation of the Secure Storage agent on the Secure Storage server, a PowerShell® module was installed and is located in the agent installation folder.
On the Secure Storage server, run the PowerShell® console. The module will be automatically imported.
To get the hardening status, run the cmdlet Get-RMADStorageServerHardeningStatus. For further details see the Management Shell Guide supplied with this release of the product.
To unharden a Secure Storage server
During the installation of the Secure Storage agent on the Secure Storage server, a PowerShell® module was installed and is located in the agent installation folder.
On the Secure Storage server, run the PowerShell® console. The module will be automatically installed.
To unharden a Secure Storage server, run the cmdlet Unprotect-RMADStorageServer. For further details see the Management Shell Guide supplied with this release of the product.
To harden a Secure Storage server manually
During the installation of the Secure Storage agent on the Secure Storage server, a PowerShell® module was installed and is located in the agent installation folder.
On the Secure Storage server, run the PowerShell® console. The module will be automatically installed.
To harden a Secure Storage server manually, run the cmdlet Protect-RMADStorageServer. For further details see the Management Shell Guide supplied with this release of the product.
It is recommended to use a dedicated, clean physical server that is not joined to a domain. However, virtualized servers can be used including a the virtual machine in the cloud.
To access the Secure Storage server that is hosted on-premise you must have physical access to the server and use interactive logon with a local administrator account.
Each Secure Storage server is installed with dedicated PowerShell® module to setup and maintain the storage server. For further details see the Management Shell Guide supplied with this release of the product.
| WARNING |
While Secure Storage server remains hardened, no RDP, PowerShell® Remote and other remote control services and protocols are available. |
If you have configured the dedicated virtual machine on your physical server you may use hypervisor capabilities to control the virtual Secure Storage server including virtual machine connections and execution of commands through the hypervisor services (such as PowerShell® Direct on Hyper-V® machines).
Amazon EC2
To access a Secure Storage server that is deployed in the Amazon EC2 you can use EC2 Serial Console.
To get more information on how to connect to the virtual machine refer to Connect to the EC2 Serial Console
Microsoft Azure®
To access a Secure Storage server that is hosted in Microsoft Azure® virtual machine you can use Serial Console access. Refer to Azure Serial Console
To add a Secure Storage server it is recommended to install the agent manually. This method saves the agent installation package to the local machine. You must transfer the package manually to the Secure Storage server. This reduces the likelihood of any malware infecting your Secure Storage server by being exposed to your network before the server is secured. Your Secure Storage server is only secured after the Storage Agent has been installed and the Secure Storage server is hardened.
To add a Secure Storage server using manual method (Recommended)
In the Recovery Manager for Active Directory (RMAD) console, click the Secure Storage node.
In the Secure Storage Servers pane, click Add Server.
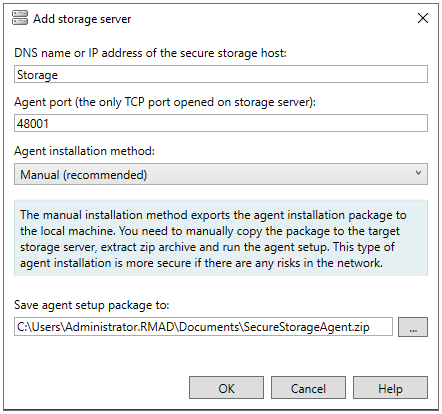
Type the DNS name or IP address of the server you want to use as your secure storage server.
In the Agent port field, type port number or use default port of 48001.
NOTE: Ports cannot be changed after the Secure Storage server is added. To change the port after the Secure Storage server is added, it must be removed and added again.
From the Agent installation method drop-down list, select Manual (recommended).
Type the path or browse to path to Save agent setup package to.
Click OK. The agent setup package is saved to your local machine.
Copy the package, SecureStorageAgent.zip, to the server being configured as your Secure Storage server. This requires console (physical) access to the Secure Storage server.
Extract the installation package on the Secure Storage server and double-click the SecureStorageAgent.msi file to install the agent.
A warning will be displayed and requires confirmation to proceed. IMPORTANT PLEASE READ: This server is about to be hardened and all network connections to this server will be lost including Remote Desktop. Ensure you have physical access to this server and have an available method to access such as console access or serial access. Select YES to acknowledge you understand and are prepared for the Secure Storage server to be installed and hardened. Recovery Manager for Active Directory cannot undo this operation without physical access to the server.
NOTE: For quiet installation both the /qn switch and FORCE=true can be specified when launching the msi file from the command line.
The Storage Agent is installed and the server is hardened automatically. For more information on hardening, see Hardening a Secure Storage server above.
To add a Secure Storage server using automatic method
In the RMAD console, click the Secure Storage node.
In the Secure Storage Servers pane, click Add Server.
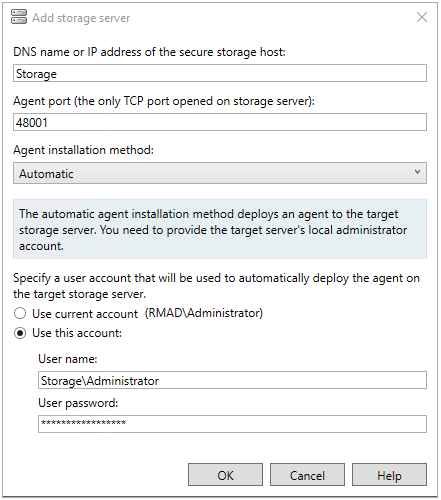
Type the DNS name or IP address of the server you want to use as your secure storage server.
In the Agent port field, type port number or use default port of 48001.
NOTE: Ports cannot be changed after the Secure Storage server is added. To change the port after the Secure Storage server is added, it must be removed and added again.
From the Agent installation method drop-down list, select Automatic.
Specify a user account that will be used to automatically deploy the agent on the target storage server. Select Use current account to use the currently logged in user account or select Use this account. Type the user name and password for the user account to be used to deploy the agent.
Click OK.
To manually export the setup package
If you have misplaced the agent setup package or need to update the configuration for a Secure Storage server, you can manually export the package again.
In the RMAD console, click the Secure Storage node.
In the Secure Storage Servers pane, right-click the Secure Storage server that you want to manually export the setup package for.
Click Export setup.
| NOTE |
The setup package is exported to your local machine. You must then copy the setup package to the server that you want to use as your Secure Storage server and run the installation. |
To delete a Secure Storage server from RMAD console
In the RMAD console, expand the Secure Storage node.
Right-click the Secure Storage server and select Delete.
| NOTE |
The Secure Storage server is not automatically unhardened when deleted from the RMAD console. To unharden use available PowerShell cmdlets on the Secure Storage server. For further details see the Management Shell Guide supplied with this release of the product. |
If the RMAD server is lost, after installing the RMAD console on a new server, you can register the backups that are stored on the secure storage server on your new RMAD server.
| NOTE |
Due to server hardening, the Automatic agent installation method is not supported when adding an existing Secure Storage server to a clean RMAD installation. |
To add a Secure Storage server on a clean installation of RMAD console
In the new RMAD console, click the Secure Storage node.
In the Secure Storage Servers pane, click Add server.
Type the DNS name or IP address of the server you want to use as your secure storage server.
In the Agent port field, type port number or use default port of 48001.
NOTE: Ports cannot be changed after the Secure Storage server is added. To change the port after the Secure Storage server is added, it must be removed and added again.
From the Agent installation method drop-down list, select Manual (recommended).
Type the path or browse to path to Save agent setup package to.
Click OK. The agent setup package for the new RMAD console is saved to your local machine.
Copy the package, SecureStorageAgent.zip, to the existing Secure Storage server. This requires console (physical) access to the Secure Storage server.
Extract the package on the Secure Storage server and double-click the SecureStorageAgent.msi file to reinstall the agent and register the Secure Storage server with new Recovery Manager for Active Directory console.
In the RMAD console, you will now see the Secure Storage server and can now retrieve your backups from the existing Secure Storage server for recovery purposes.
| NOTE |
The existing Secure Storage server has continued to be hardened throughout this process. |
By default, the Storage Agent port is 48001. If you want to use a different default port, you can configure it in the Secure Storage server Properties window or overwrite when adding each Secure Storage server.
To change the default Storage Agent port
In the RMAD console, right-click the Secure Storage node and select Properties.
In the Storage Agent port field, type a port number.
The Storage Agent is used to pull the backup onto the Secure Storage server.
Click OK.
| NOTE |
Ports cannot be changed after the Secure Storage server is added. To change the port after the Secure Storage server is added, it must be removed and added again. |
To view Secure Storage server properties
In the RMAD console, click the Secure Storage node, in the Secure Storage Servers pane, select a Secure Storage Server, right-click and select Properties.
Properties of the Secure Storage server will be displayed. Properties include the Host name, Agent version, Agent port, and Server Status. All properties are read only and cannot be edited.
Additionally all configured volumes are displayed in priority order. Each volume is shown with the amount of space taken by Existing Backups and the amount of Free Space available on the volume.
| NOTE |
A warning icon will be displayed if a volume is running out of available free space. |

After upgrade of Recovery Manager for Active Directory (RMAD) it is recommended to upgrade the Secure Storage agent on the Secure Storage server to the same version.
With a hardened Secure Storage server, RMAD does not automatically upgrade the agent and this must be completed with console (physical) access to the server.
| NOTE |
The Secure Storage server agent will continue to function when its version does not match the version of the RMAD console but any new functionality may not be available. |
In the Recovery Manager for Active Directory console, click the Secure Storage node.
In the Secure Storage Servers pane, select the Secure Storage server. The current version of the agent installed will be displayed.
If the agent installed does not match the version of your RMAD installation, right-click the Secure Storage server that you want to manually export the setup package.
Click Export setup.
Copy the package, SecureStorageAgent.zip, to the existing Secure Storage server. This requires console (physical) access to the Secure Storage server.
Extract the package on the Secure Storage server and double-click the SecureStorageAgent.msi file to upgrade the agent.
A warning will be displayed. IMPORTANT PLEASE READ: This server is about to be hardened and all network connections to this server will be lost including Remote Desktop. Ensure you have physical access to this server and have an available method to access such as console access or serial access. Select YES to acknowledge you understand and are prepared for the Secure Storage server to be installed and hardened. Recovery Manager for Active Directory cannot undo this operation without physical access to the server.
NOTE: For quiet installation both the /qn switch and FORCE=true can be specified when launching the msi file from the command line.
The Storage Agent is installed and the server is hardened automatically. For more information on hardening, see Hardening a Secure Storage server above.
| IMPORTANT |
During upgrade the Secure Storage server may be unhardened for a short period of time (seconds). |
To prevent temporary unhardening and before installing the new agent on the Secure Storage server, perform the following steps:
On the Secure Storage server, open a command prompt.
To retrieve the id for the current Quest Secure Storage agent, type and run: wmic product where "Name like 'Quest Secure Storage Agent'" get Name, Version, IdentifyingNumber
Using the returned id, type and execute the following: msiexec /x {Identifying Number} AUTO_UNHARDENING=FALSE