Recovery Manager for Active Directory Disaster Recovery Edition provides the ability to set up and use dedicated cloud storage locations for backups. Cloud Storage in combination with primary (Tier 1) storage options ensure that your critical backups are always available in case of disaster.
By using Cloud Storage you can store your AD and BMR backups in the cloud ensuring that your backups are always accessible and protect your backup files with storage account properties such as immutability policies, and redundancy with different types of replication.
| IMPORTANT |
Use of Cloud Storage requires a Recovery Manager for Active Directory Disaster Recovery Edition license. |
Requirements
Internet access available on the Recovery Manager for Active Directory console. A standard outbound HTTPS port 443 is used to upload data to Azure® Blob and Amazon S3 Storage.
Azure and Amazon S3 subscription(s) to create and manage Azure and Amazon S3 Storage accounts and containers.
A method of creating and managing Azure and Amazon S3 Storage accounts, containers, and policies for the storage account (lifecycle, immutability and replication policies).
| note |
Recovery Manager for Active Directory does not create or provide management features of the storage account. |
Best Practices
Recommend using immutable storage for your business-critical backups. By using immutable storage you can protect your backups from being overwritten or deleted. For further guidance on configuring immutability policies for containers reference Microsoft Azure documentation: Configure immutability policies for containers and for Amazon S3 documentation: Use Immutable Storage.
For high availability of your critical backups it is highly recommended to use geo-redundancy. For Azure Storage accounts there are two options: Geo-zone-redundant storage(GZRS) and Geo-redundant storage(GRS): Change how a storage account is replicated and for Amazon S3 Storage there are two options: Cross-Region Replication (CRR) and Same-Region-Replication (SRR) Setting up replication.
To help identify immutable storage, a message will appear below the selected container, which if immutable states, Backups uploaded to an immutable storage container cannot be modified or deleted for a user-specified interval. By configuring immutable policies in (Azure Portal or AWS Management Console), you can protect your backups from overwrites and deletes.
Recommend minimum TLS version 1.2
User Scenario
Backup data for all domain controllers can be accumulated on primary storage, and at the same time, you can make a copy of your backup on Cloud Storage. If disaster strikes, you could lose your backups on the primary (Tier 1) storage and even your installation of Recovery Manager for Active Directory but your Cloud Storage will remain in place.
To add Azure® Cloud Storage
In the Recovery Manager for Active Directory console, click the Cloud Storage node.
Click on the Add Storage button at the bottom of the Cloud Storage pane. The Add Cloud Storage dialogue box will now appear in the user interface.
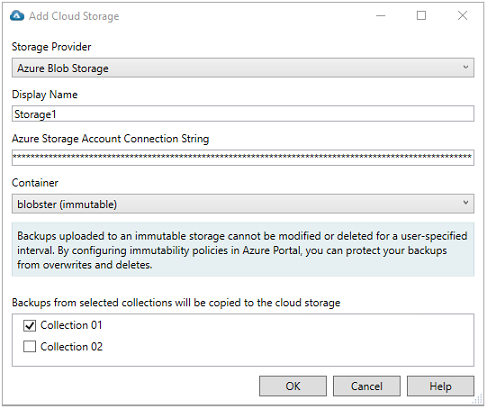
In the Storage Provider dropdown, select the Azure Blob Storage.
Type an identifying name in the Display Name field. This name is used in the Recovery Manager console for the registered Azure cloud storage account and selected container.
To register a cloud storage in Recovery Manager for Active Directory, specify the storage account connection string in the field Azure Storage Account Connection String. The connection string will be protected and will not be displayed.
To retrieve your Azure® storage account connection string:
Log in to the Azure® portal.
Select your Storage account and navigate to Access keys under the Security + networking section.
Click on the Show keys and copy the Connection string.
In the Recovery Manager for Active Directory console, paste the Connection string in the Azure Storage Account Connection String field.
Select the Container. The available containers in the Azure® Cloud Storage will be displayed in the drop down list for the connected storage account. Containers protected with an immutability policy will be displayed with (immutable) after the container name.
note: To validate the connection to the correct Azure® storage account, compare the available containers in the drop down field on the Add Cloud Storage dialog with the created containers in the Azure® portal. In the Azure® portal, the Containers are listed under Data storage. RMAD support only with Container types. In the case a storage account has no containers, the dialog box will prompt you to create at least one container in the Azure® Portal, or specify a connection string to another storage account.
Select one or more computer collections by selecting the checkbox by the computer collection name in the section Backups from selected collections will be copied to the cloud storage.
Once a backup is created, the Active Directory® and BMR backups on primary storage (Tier 1) are copied to the registered and configured cloud storage container (Tier 2).
Click OK.
To add an Amazon Web Services® (AWS®) Cloud Storage
In the Recovery Manager for Active Directory console, click the Cloud Storage node.
Click on the Add Storage button at the bottom of the Cloud Storage pane. The Add Cloud Storage dialogue box will now appear in the user interface.
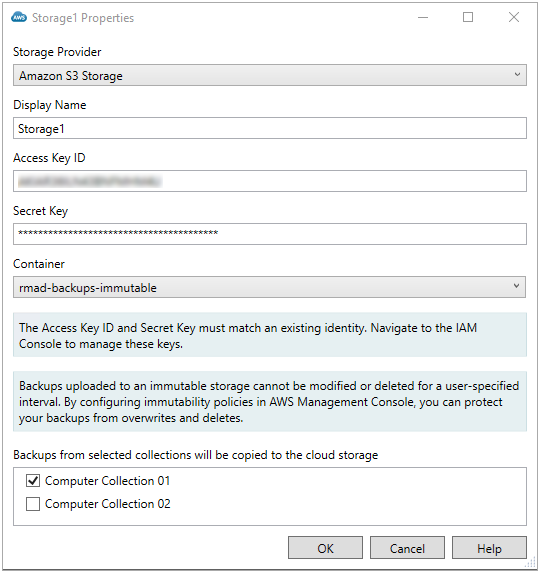
In the Storage Provider dropdown, select the Amazon S3 Storage.
Type an identifying name in the Display Name field. This name is used in the Recovery Manager console for the registered AWS® cloud storage account and selected container.
Note: An AWS Identity and Access Management (IAM) user account will be needed in advance to create and finalize the AWS Storage location. See IAM Access Keys for more information.
To Create an IAM account:
Create an IAM user, see Creating an IAM user in your AWS account for details
Add an AmazonS3FullAccess policy
Note the user's access key ID and secret access key
Note: To manage an IAM account or to generate a new access key for an existing user account see Managing access keys for IAM users for more information.
In the Access Key ID enter the ID for the AWS® Cloud Storage IAM account you are using. See Access Key ID and Secret Access Key for more details.
In the Secret Key enter the key to access the AWS® Cloud Storage. See IAM Access Keys for more details.
Select the Container. The available containers in the AWS® Cloud Storage will be displayed in the drop down list for the connected storage account. Containers protected with an immutability policy will be displayed with (immutable) after the container name.
Select one or more computer collections by selecting the checkbox by the computer collection name in the section Backups from selected collections will be copied to the cloud storage.
Once a backup is created, the Active Directory® and BMR backups on primary storage (Tier 1) are copied to the registered and configured cloud storage container (Tier 2).
Click OK.
To view all registered Cloud Storage in Recovery Manager for Active Directory
In the Recovery Manager for Active Directory console, expand the Storage node.
Select the Cloud Storage node in the console tree.
All registered cloud storage will be displayed in the Cloud Storage pane. The display name, the chosen container, all configured computer collections and a summary of the upload sessions will be displayed.

