Note: If you create a new Benchmark Factory 5.5 (or later) repository, earlier versions of Benchmark Factory will not work against this repository.
The Repository is a database where all of the test results are stored. Benchmark Factory inserts test results into the repository and provides an easy way to access the data. By default, the Repository is a SQLite database that resides on the same machine as Benchmark Factory. The Repository can reside on another database server if required.
Note: By default in Benchmark Factory 7.1.1 or earlier, a MySQL database is created and used as the Repository, unless you selected the SQLite option during installation. In Benchmark Factory 7.2 or later, by default a SQLite database is created and used as the Repository.
To change the database, select the Data Source Name of the ODBC connection for the new database. To migrate data from one database to another, click Data Migration to open the Data Migration Wizard.
Note: If the database structure does not exist on the selected database, a prompt to create the structure will appear when OK is clicked.
The supported database types are:
To open the Repository Manager
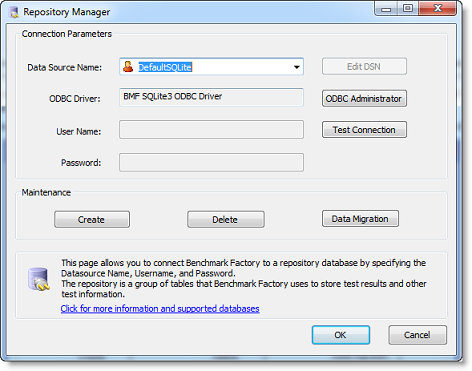
The Repository Manager opens. Modify connection parameters or perform maintenance functions.
Review the following for additional information:
| Connection Parameters | |
|
Data Source Name |
Data Source name of the ODBC connection used to connect to the repository database. |
|
ODBC Driver |
Current ODBC driver |
|
User Name |
The User Name used to log into the selected database. |
|
Password |
The Password associated with the user name used to log into the database. |
|
Edit DSN |
Displays the ODBC connection information dialog for the selected data source. |
|
ODBC Administrator |
Displays the ODBC Data Source Administrator dialog. Use this to add and edit ODBC connections. |
|
Test Connection |
Tests the connection of the currently selected ODBC Data Source. |
| Maintenance | |
|
Create |
Creates the repository objects on the selected database. |
|
Delete |
Deletes the repository objects on the selected database. Warning: This will delete all test results stored in the Repository. |
|
Data Migration |
Launches the Data Migration Wizard. |
The Data Repository Migration Wizard allows you to migrate the Benchmark Factory testing repository from one database type to another. For example, from the default SQLite database to a Microsoft SQL Server database.
For information about using the Command Line to run the Data Migration Wizard, see Migrating Repository Data Using the DOS Command Line.
To use the Data Repository Migration Wizard
When the Data Migration Wizard opens, click Next.

To migrate data from the default SQLite database installed and used with any new installation of Benchmark Factory 7.2 or later, select Default SQLite.
Note: The option to use a default SQLite database was also available in Benchmark Factory 7.1.1 or earlier.
You can create a Support Bundle and send it to Quest Support for review. To help troubleshoot problems, the support bundle contains information such as:
To create a Benchmark Factory support bundle
 . Then select a location in which to save the zipped file.
By default, the support bundle is created and saved in the following location:
C:\Users\<user name>\My Documents\My Benchmark Factory\<version number>\BMFSupportBundle.zip.
